The Lake of Fire
Author: George Maciver (George M)
Download: Here
We will not mention all the enemies.
The Story: (extended story in the read-me)
Rumours
whisper that there is more to the stone
Walkthrough:
Level
1 The
Just
before you think about how to shoot that Skellie, the problem will be solved
for you. After falling through the secret entrance trapdoor and after a slide
you will end up on the walkway above
Go to the lever you can see on the opposite L corner and throw it. You have to jump to the ledge, hang from the side and shimmy to the corner to get in front of it. Watch the cutscene (The Chandelier on 2nd Square has one lit lamp) Turn around and see a ladder on the pillar on the side you came from, now look L and that/s where you have to go, jump back to the walkway and head to the top of the 2nd Square.
From
standing on the L side of the opening, do a long runjump to the ledge in the
L corner, then a standjump/grab to a crack you can see in the wall to the
L. shimmy to the R and pull up on the ledge in the opposite corner, jump around
the L and find lever#2 (2nd lamp lit). Go drop to the ground
floor and head back to the
On the R side, behind the water is a blue door, to the L of it are some Flares. Go back over the water and to the opposite ladder, go into the R hand side and R at the gate.
Below
Down
the blue steps and to a gate that will open for you, enter and to the L is
lever#3, throw that and see the 3rd lamp lit. Go back up
the stairs and up the ladder to the upper walkways. Go to the
Runjump/grab around the R hand corner to grab a crack in the pillar, shimmy L and pull up in the CS, go in to the R and throw the switch. A trapdoor opens, and its just below of where you are, so drop down from the CS and look behind the pillars and drop in.
Timed Run. (*tight run*) 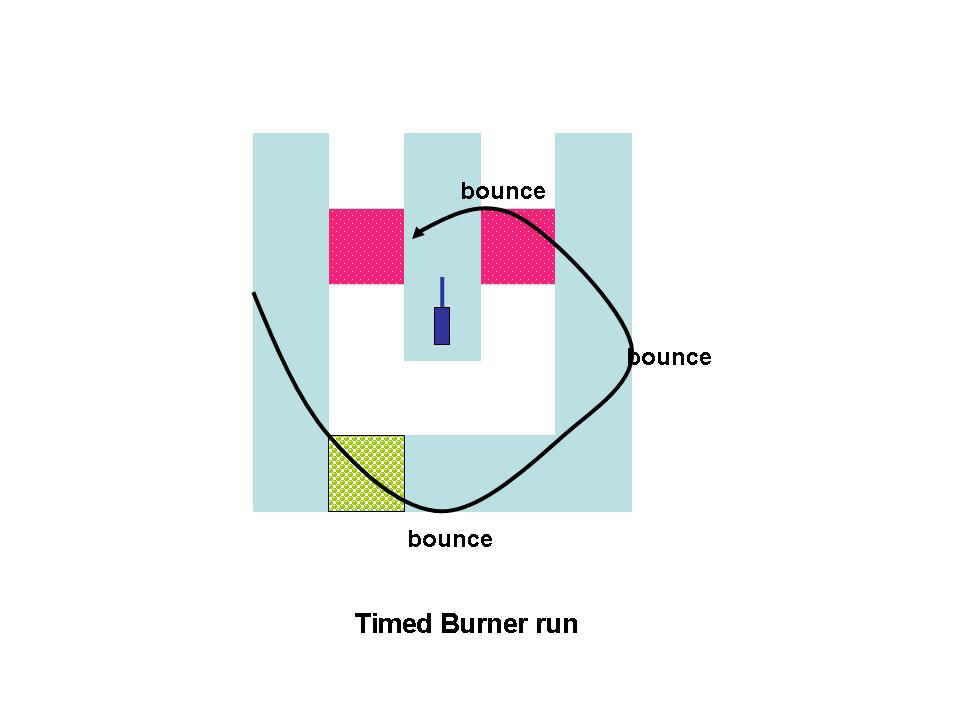
To the R is a burner and a lever behind that, go on to a Wolf Tile in the back of this place and go to the other side of the Tile, save somewhere on the other side of the Tile, facing the direction of the trapdoor and sprint over the Tile, go L around the corner (try to let Lara bounce of the walls) and sprint to the extinguished burner, go L over the burner and throw the lever to open a gate in the room below Square 1. Go out over the other burner which is off and climb back at the trapdoor, go to Square 1 and down those blue steps again.
Below
On the other side of the room is the open gate with the lever that will open the gates near the ladder upstairs. So go back up after you opened them and into a new area.
To the L around the corner is a ½ MP for you. On a walkway above is a Golden Vraeus on a pedestal, look for an opening up in the R hand wall from the entrance, hop over the block and throw lever#4, the last lamp on the Chandelier lights up and the gates are open. So head back out and go to Square 2, cross over and go through the open gates.
Room with the Pool.
In the deepest part of the pool in front is a trapdoor, go to the ledge to the R and save in front of the switch, throw it, backflip/roll and dive down while swimming to the R, go down and L into the open trapdoor and follow the wide tunnel, in the deeper part is a hole up in the ceiling, follow this tunnel to a pool in the Raptor room.
Raptor room.
Climb out at the Dog statues and shoot the Raptor before he even reaches you. From climbing out at the Dogs, go R and through to another room.
High Room.
Go past the opening in the floor and in the other side of the room is an opening in the wall with a pedestal, to the R, on the pedestal is the Shotgun. Go back to that opening in the floor in the middle of the room and drop down, coming from the Shotgun on the L side and on the back of the block there, is a ladder, climb to the ground floor and go R from the ladder, then L at the blue door and in the end to the R is a switch, throw that and go back up that ladder, a trapdoor opened in the middle of the floor.
Climb down into a blue room with another switch, throw it to open that blue door you saw below, so go up. down the ladder behind the block and turn R to the open door. Go L and around a R hand corner is an opening to a blue room, go in and see a sloped ledge between the pillar and the wall in the back. You will have to do a sidejump onto that sloped ledge, in the corner of lowest part and wall. Go to the L side and stand in the corner of the walls, the sloped ledge to the R, take two steps back and turn L a bit, then sidejump R and you will be on top. Go stand with your back to the slope and backflip/jump/grab to an alcove above, throw the switch and hop back into the now flooded room.
Swim out of this room (notice the gate to the R) and go L, then R out of the blue door to the high room and go to the opposite side of it, R there and look in the last alcove to the L for the UW lever. This lever will open that gate you just saw, so swim back through the blue door, go L and then R, through the open gate and to the L wall in the next room, get some air (notice the gate to the L) and swim into a small opening in the wall, to the L is an UW lever. Save in front as it is a timed swim.
Timed Swim. (*tight swim*)
Roll (hold "roll" even when Lara pulls the lever) after pulling the lever and swim out of the small hole. Go R and to the open gate, just surface right at that gate and get in (you will have to do it once or twice to get the exact spot where you have to surface right) The gate closes behind you, so just run up the ramp. Dont stop anywhere and jump over the slope around the corner, the gate opens up to the top of the High room, get one floor down and jump down in the water, find the blue door and swim back to the room where the Timed swim was. Get up in the re-opened gate. Turn around and runjump around the R to the ledge with the plant. Standjump to the ledge closest to the plant and turn R runjump to the ledge on the R hand wall and do a runjump/grab to the next ledge.
Then jump to the lever and throw it to open a gate in the Raptor room. Runjump to the ledge with the Ammo and get out through the open gate. Crawl under the deadly Knifeball-trap and go R out of the upper gate keep going R till you come to that opened gate in the Raptor room. Go in and follow the steps up to a bridge over the Raptor room. walk out a bit and turn around R, runjump into the alcove L of the opening you came out of and use the switch to open a gate in this room (from facing out from this alcove its to the R).
Jump back to the bridge and go all the way into the alcove on the other end, turn and grab the MS, go to the alcoves L and use the cracks in the pillars to go around the R corners to get to the opened gate. Follow the passage up the blocks to the end and hear a gate opening up, drop down through the opening and land back in the Room with the Pool (look to the R to spot the open gate).
Get out at the thin ledge, turn and runjump to the one with the plant, runjump L to the next and go to that opened gate in the wall behind the plant, go into a small room (notice the 2 Burners on the other ledge) and drop down from the ledge. Go up to the next room opposite the Burners, follow through, go L and L and get another Shotgun in the back, go out again, R and straight to an opening L, go through and to the R to a passage with Blue doors, the Torch-passage.
Blue Doors Puzzle.
Go to the end (past 3 Blue doors) and jump up the sloped floor, immediately R and go to the switch in the end. Throw the switch to open the first Blue door, head back, go L and down the slope to the first door R. Go in and R when you get into the Back-passage. Ignore that blue door to the R for now and go to the grated window in the back to the R is a switch, pull that and now go into that blue door L as you head back, inside is a ½ MP. Get it and go through the next door, go R and down the slope to the Torch-passage. Go into the first R again and then L in the Back-passage, L again in the end to the Skellie Pit.
Runjump/grab over the pit and use the switch after disposing of the Skellie (or just ignore him/her) and runjump/grab back over the pit. Go R into the Back-passage and R back through the same door again and in the Torch-passage a bit L and straight into the opposite door, in the back of the room is a switch. Save there and pull the switch, backflip/roll and run R, jump through the door to the R before it closes. Throw the switch to the R in that next room and watch the cutscene, One of the 2 Burners you saw before is off now. So turn and go out to the Torch-passage, go L and to the end, L there and in the next passage into the first L, follow through to the room with the burners.
The Torch.
Climb onto the lower ledge L and hang on the edge of the first Burner, shimmy around to get to the extinguished one and go into the small alcove to get the Torch (the last Burner goes off too), turn and throw it out by hitting the space-bar and crawl out, get the Torch and go stand on the lower ledge on the other side of the Burner that just went off, try to light your Torch there (it worked for me, but is not necessary yet).
Go
jump back up to the room you came from before (taking the Torch with you)
and go R, then L into the Torch-passage, follow up that slope and in the end
go R between the 2 pillars. Go through to a gate that will open for you and
arrive back at the
Secret Roundup.
Go L and to the 1st Square, L to the ladder and light the Torch (if you didnt yet) at the wall-torches behind the ladder, go to the opposite side of the Square, and light the 2 Dog statues at the small pool, the blue door beyond the pool opens. Drop the torch where you can find it again and go in, shoot 2 Guards and get Secret#1, pick up the MP and Ammo and go to the back of the room, to the R hand side of the Burner ledge, look up L to spot the floor above. Step onto the very corner of the Burner ledge and turn L, climb up to the floor above fast and go get Secret#2, Uzis and Ammo. Drop down and head back out. Pick the Torch up and go to 2nd Square, light a wall-torch to the L, drop the Torch and enter the room that opens up to the R.
Swimming for Secrets.
Theres a small pool in the R hand side of the room, dive in after saving and swim down, keep going L everywhere and come to Secret#3, a ½ MP on the bottom, roll and swim back, and when you come into that greenish light, cross over diagonally to the opposite corner, go L and keep the wall to the R, then you will see an air pocket diagonally across the room, get there and save. From looking into the corner of the room (as you swam in here), look straight and see that purplish light, swim in there and go R around corners to find the UW lever, pull it to open a trapdoor somewhere. Swim back to the air pocket and turn R slightly, theres more purplish light in that corner, swim there and go R to a tunnel in the wall, follow to an opening up, climb out into the Dino room.
Go the Dino gate and then L into the passage there, follow to where that trapdoor opened. Wait up a bit at the trapdoor after going in and hearing the Secret#4 sound, 2 Guards will show up and leave Uzis and Ammo. Go R from the trapdoor and find a MP and Ammo. Get back to the trapdoor and climb back up, go to the Dino room and dive into the water again, swim back through the tunnel and go L. straight to the air pocket, dont turn but keep your position while getting some air, then swim to that wall ahead and go R along that wall, follow that passage to an opening up into a room (looks a bit like that first UW room), look in the other side of that room for an opening up in the ceiling, climb out into the 4 Switches room.
The 4 Switches room.
To the R hand side of the hole is some Ammo, wait up a bit and a Guard will show up. take him out now, so you will not get confused later. From the water and the Ammo to the R, you have a switch behind you, one in front on the other side of the room and 2 more to the L.
Lets say the one behind you is #1, well dont pull that one as it will burn you to crisps. Switch#2 will be the one straight ahead from the water and pull that one to open a trapdoor somewhere else in the room. Go L from that switch and go along the wall, not over that elevated floor part as a Knife ball will drop from the ceiling, ignore the next switch (#3, wakes up a Skellie) you see and go into an adjacent part of the room, in the centre of it is the trapdoor you just opened. Over the trapdoor is another switch and that one would have brought out a Raptor.
Timed Swims.
Save, standing at the plant and looking straight down into the UW tunnel, then dive into the water and follow past the closed gate, through a low and narrow hole to the R and pull the UW lever in the end, save in a new slot while Lara pulls and immediately roll, swim down to the hole and L, L and up a bit to get through the timed gate before it closes. To the R is another small hole, (a trapdoor has to be opened there first). Swim to the end and R around the corners to another UW lever, save while pulling and roll, swim back around the L corners and into the hole, R and down into the trapdoor. Go L underneath the trapdoor and follow past a gate to a small hole to the R, go in and immediately up for air. You can make it without loosing health if you practice it a bit.
Save again and go for the UW lever, it will open that last gate near the trapdoor, so pull/roll and swim out, L and L and then R into the open gate (will open again, so you can go back for air if needed), go around the first R hand corner and into the hole near the bottom, roll and use the UW lever over the hole, dive and swim out, R and to an open gate up to the L, sharp R when through the gate and follow to a hole near the bottom, go L and immediately up to safety.
Just climb out in front, check your health and go forward a bit from the hole, then go L and look up in the L wall for the CS, climb into that and out on the other side, follow to the end where an earthquake will occur (notice the hatch up in the ceiling in the end of the passage, you will be back in a bit). Go back out and to the water again, dive in, go down and R to that room and into an opening in the floor. Go pull the UW lever there and go back out, up and swim back to where you came from. Into that low hole and L, up to the room with the CS and climb back in again, the hatch in the end where the earthquake occurred is now open.
Turn and climb the ladder to an upper passage that leads to the top ledges of the big room. Run out to the L and go over that ledge to the other end, runjump to a ledge R and behind a pillar, do runjump/grabs over the pillars to the corner, go R with a runjump/grab and standjump/grab into the opening in the R hand wall. Standjump up to the pillar in front and standjump to the one L, from there and runjump/grab to the ledge with the ½ MP. Go R and pull the switch on the next pillar to open the gate ahead.
Standjump up to the next pillar behind the gate and grab up to the MS ceiling, go over to the opposite passage and go run down, past the Knife ball-traps and drop down to the 4 Switches room again.
Go to the waterhole you entered from in the first place and dive in from facing the switch (#1). Swim down and L a bit, down into that hole in the floor, follow the wall to the R and come back to the air pocket, turn l a bit and swim to the purplish light corner, the one with the square tunnel, follow the tunnel and go up into the Dino room, go to the gate opposite the Dino gate and youre back at 1st Square.
The Guardian Key.
Go
through to
Skellie Cellar.
A Laser contraption will wake up a Guardian Skellie, which in its turn will open the next gate for you. Turn L from the receptacle and go into the open gate, run with that Guardian at you heels and jump up to a block just to the R in the next room. Look at the surface of the block and notice the texture Tile, now turn till you can see two of those textures on the walls in a corner, one to the R and one to the L over some openings, run off the block and get into the opening under the L Tile, run to the 2nd L opening and go to the wall in front. L there and quickly pull switch#1, another Skellie awakes as the first one approaches, get out of there and run back to the block, turn to the same corner and now go for the R hand Tile, inside go R and to switch#2, roll and run back to the block as one more Skellie joins the fun. From facing the corner with the Tiles, turn L a bit and see an opening there. Run into that one and go R, follow to switch#3 in the back, throw it quick and turn R from the switch, follow the passage going R everywhere and come to switch#4 (in front and L in a corner). Get back to the block and from facing the Tiles, turn R to the first opening you see. Run in there and in the back to the R is switch#5. A gate opens back in the room.
The
Could
be you saw the gate already, but when you run back out of this end of the
room, its behind a pillar to the L. Run through the next rooms and in the
end is the Crossbow to the L, Ammo to the R, get that fast and
shoot those nasty Skellies sky-high. Then get the
Go in and up the block behind the pillar, climb through the open trapdoor on the L hand side and just go straight, into the first L and through the familiar gate to the 2nd square, go L to 1st Square and to the far end, then R and through the open gate to the Dino room, place the Temple Key to the R of the Dino gate and enter. Go to the hole in the floor and drop in backwards, grab the end of the slope and drop once more, then go up to a Burner-trap. Stand in the exact centre of the passage and walk up close. Take one step back and the a hop back, then runjump/grab and get to the wall, climb over and drop, get into the next hole and slide into the Temple of Fire.
Level 2 The
Sliding down the slope you have to pay attention, at the end you have to jump/grab to a ledge above and in front. Pull up in and crawl to the passage and get Secret#5. Theres Fire Wraith too, so youll have to keep moving fast
Go R when you come to a room and find some Ammo, leave it there for now and turn L, run along the R hand wall to find a switch on a pillar to the L, turn R from the switch and go on, into the passage there and L, follow the sloped passage down to some welcome water, after the Wraith is gone, go back to the room and go L past the switch to get the Ammo. Stand in the middle of the room and with your back to the switch-pillar, look in the opposite wall and see a L and a R hand opening.
The Revolver.
Go L first and keep going L, in the end to the R and get a ½ MP, then go back out to the room, do a U-turn to the L and save in front of the pit in the entrance of the R hand passage. You can just make out the opening to the R in front of a slope. Runjump over the pit to that opening and roll, run and jump back over the pit as a Boulder drops into the pit, now jump over again and go into the R hand opening, runjump to the R over the pit in the entrance and go R for the Ammo, then turn back and go R around the corner at the Chain, jump diagonally over the pit to another ledge (Boulder) and go into the passage with the second Chain to get the Revolver from the back, carefully make your way back and out of the Secret room to the R to crawl back to the first slope, drop down and come to the Lava Chamber with the Fountains.
The Lava Chamber with the Fountains.
Lava Labyrinth.
Walk up to the Lava pool and notice a different square R of the R hand Snake fountain a standjump will get you into that "safe" opening in the lava. Swim in and go R around first corner, then into the hole in the R hand wall, down into the hole and follow going R till you get to an UW lever, throw it and save while doing that, roll and swim back, go L and up through the hole again, then forward and L and around the next corner is the trapdoor you just opened. Climb out and find a Star to the R, no Crowbar yet.
Timed Run.
So go L now and follow to some steps, go up and see a closed gate to the L, go R in that room and straight to a switch (#1), from standing at the switch you will see a second one (#2) to the L. Go use the second switch (#2, a block goes up in the Lava Chamber) first, then use switch (#1), its a timed one and opens the gates back to the Lava Chamber, but also releases a Raptor, go shoot that first and go to switch#1 again. Pull, backflip/roll and run forward, L and R and sprint straight through to the Lava Chamber.
Crowbar and Fire Star.
Go up the block in front and grab the MS, go over to the block on the other side and get another Uzi, turn L and see the Crowbar on the floor in the corner, get it and go to the other side of the ledge and standjump into that Labyrinth again, swim around the corners, R in the end and up through the trapdoor, to the R is the Fire Star, get it and go back to the steps to the room with the gate, L and to the MS. Go over to the gate and open it by placing the Fire Star.
Follow the passage to a wider part of the passage, look L for a ½ MP and then go on to a Square with a pool. The pool has several levels.
Pool Square.
Dive
in and swim R (E), down one level and into the R hand corner (SE), to the
L in that corner is an UW lever, throw it to see a blue door opening up, roll
and swim back to the pool and swim up straight without turning, get some air
and turn W swim to the other end of the pool and all the way down, find the
opening in the floor, go in and follow up to the structure in an outside Lava
lake, climb up R and turn around, hop to the other wall and get the Music
Scroll. Swim back to the
Timed Swim. 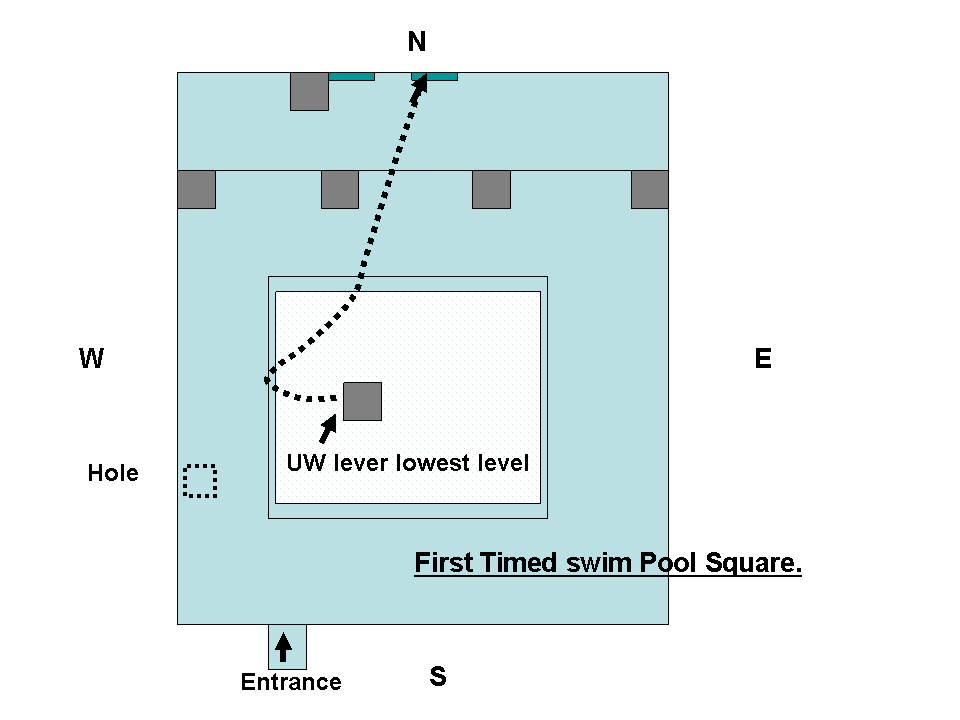
This is a Timed one and will open a gate on the 1st level to the R (better go find it first) Pull (save) and roll, swim R a bit and go up as soon as possible and turn R while swimming up one floor, then turn L and go N between the pillars and into the hopefully open gate. Swim to the far NW corner and L of those 2 red pillars for air up in a hole.
UW Levers.
Turn with your back to the wall and dive, swim NE, L of the red pillars, past the blue doors to the L and theres an UW lever straight ahead on the face Tile. Pull and roll. Swim into the first open door to the R and pull the lever there. Go back for air and Now swim back to the entrance gate, to the L of it is another Face tile (SE) with an UW lever, pull that to open the next blue door, so go there to do the next UW lever, the last door can be opened with the UW lever on the face tile R of the entrance gate as you swim to it (S wall). In the last opened door is an UW lever that will open a hatch in the ceiling in the middle of the room, so if you got enough air, roll and swim straight out, L at the 3rd pillar and up to a nice pool.
Climb out and go to the NE corner, into the N passage and follow to where you can place the Music Scroll. Go back and when you come back in the room with the pool. Go L into the e passage, follow to a ½ MP. Go back and now go into the SW corner, shoot the vase for the Ammo it contains notice the switch on the pillar next to it, pull the switch (opens the exit to the Pool Square) and go to the pool, dive in and swim S, back through the exit gate to the Pool Square, go L and to the SE.
Go get some air first and dive all the way down and into the SE corner, entering from the S side alcove. There you will find that open trapdoor, swim through and to the far SE corner, follow the narrow tunnel till it gets wider and you can swim up to a pool room, get out and go NE in the next room is a Burner tile to the L, runjump over that tile to the alcove SW and look N, runjump/grab over the pit and pull up L of the Chain, immediately roll and runjump/grab back to get away from the Boulder.
Jump
over again and go into the passage L, follow to a room with a Snake switch.
Go to the back of the statue and throw the switch to get a cutscene of a block
rising from the lava lake where you got the Scroll before. Nothing
else to do here, so head back to the Chain and hop back quick when you feel
the tremble. Another
The
Climb up the wall and go to the N edge, line up for that block below and just standjump to it, face NW and runjump to the purple flowers, go pull both switches to open a gate and go E along the bank of the lake, watch out for the sloped parts. Get over to the S side and in the exact SE corner of the lake is a hidden tunnel, just run off the grass and swim to the other end, up through the open hatch and climb out.
Room with the Many Ledges.
Climb over the wall at the Dog statues S. Go W and then L in the end to find a switch on the back of a pillar SW. Go back to the E and in the NE corner is a new block on the floor, climb up and climb up to the ledge L. Runjump to the ledge N and go L, hop to the SW opening and follow to the W jumping some corners. In the end a runjump into an opening S, turn R around the corner and throw the switch there, turn around and see a block raised across the room, so safety drop down and get up on that new block. Standjump SE and go jump to the L ledge and follow to where you have to jump NE into the dark, get to the block with the face and climb it.
Go N a bit and then onto a lower ledge E, runjump to the greenish roof over the Lava pit and head SE to jump into the opening S, up the block beyond and a runjump/grab to the E, jump into the lower opening L and throw the switch (gate opens). Jump back to the block and runjump/grab back W. then turn R and runjump/grab to the upper opening N, walk over to the N side and runjump to the cutout in the pillar NE and from there to the pillar with the Tiles and from the NE tip of it a long runjump into that opening NE. Jump N and follow (same route as below) to the W where youll find the opened gate. Runjump NW and a runjump up into the S opening again and around the R hand corner is another switch that will open a trapdoor somewhere.
Now jump back to the N ledge and go E a bit to the end of the ledge and runjump to an opening S. climb up L and get the Ammo there, drop back and safety drop from the N side of the ledge, another safety drop from the N side and go W there. in the end is that open trapdoor. Get the Flares to the L and drop into the hole.
Dark Tunnels and a Torch.
Runjump to a ledge W and then to the one W and L. Then a standjump back E to a lower ledge (on S wall) and 2 more hops E, turn NW and standjump down to that corner ledge and from that one you can drop to the ground floor, go W and find the Torch in the next room. Now keep going W, past a gate, a fountain and some Ammo all the way in the end to the R is the wall-torch where your Torch can be lit.
Head back E, theres a passage to the R (S), go in and find a Dog statue to the L, light that one and turn back, go R (E) and to the Dog statue in the first pit. Light it and go all the way W, to the last room, where you lit the Torch and light the 2 Dog statues there. The gate opens and a Raptor comes out, so drop the torch and shoot it, go back one room to the E and grab the Ammo, then go pick up the torch again and head through the open gate into the W room go NW and fins another Dog statue. When you light it a block will come up to the L of you, go there and hop on, turn N and hop to the pillar, hop E to the next and a Skellie will wake up N, better drop the Torch and shoot it with the Shotgun while it comes jumping towards you.
Go back to pick up the Torch again and go all the way to the dark N ledge, light the Dog statue and drop the Torch from the ledge, get the Flares from the ledge and drop to the ground floor. Get the Torch and head back to the room with the fountain E. Opposite the fountain is a darker Tile in the SW corner, throw the Torch on that Tile and go E one room, look L and find the gate there opened. Go in and throw the switch, the Torch will go up on a raised pillar.
Head out and go W, to the passage L (S) and follow to the end, climb up R and wait for the raptor to come, shoot it and go follow the passage to the N. to the R there and hop over a hole in the floor youll be using soon, straight ahead is the Torch. Get it and go into the room N (its possible to do the following like I describe it here, if you want to get rid of the Wraiths first, go in without the Torch and pick it up when you return here). A couple of Fire Wraiths will come out, just run to the far end of the room (behind the pillar in the middle) and quickly light the wall-torch on the steps (gates open in the Room with the Many Ledges.
Run out as soon as you can and go R (W), just run into that hole you jumped over before, roll and run E, to the room with the fountain next door, drop the Torch while running and get into the water to get rid of the Wraiths. You can now leave the Torch here as you dont longer need it. Go back E all the way to the end where a wall-torch lights the corner where you have to climb back up, stand facing W an almost against the n wall, only use "Ctrl" to climb up and turn SE. standjump into the corner and then run jumps to the W, turn around and do runjump/grabs to the E to finally climb back up through the trapdoor.
Room with the Many Ledges part 2.
Go E and then turn R (S), hop through the opening in the wall go R again and past the fountain through the open gates. Go to the W end and R, on the back of the fore last pillar is a switch that will raise a block on the other side of this pillar.
Nasty Jumps.
Now here comes a nasty part, because you will be hindered by Guards on the ledges and they can easily shoot you while you can hardly take aim at them. I just stood with Laras back against the N wall, facing S and next to the block, from here you can shoot your first Guard up S. Then climb the block and runjump/grab S, a Guard will be shooting you, but you cant get him yet, So roll and runjump/grab back as another block went up un the N side, roll again and runjump/grab S to a thin ledge, from here you can take out that fool upstairs.
Well from here on you will have to find your way to the top N ledge and runjump E to the opening, go down the steps and S to get a MP from the vase there. Go to the edge of the floor (close to the pedestal) overlooking the room and look around the R hand corner, two openings a top one (same lever as you are on) and one below that.
Thats
the one you have to jump to and its a tricky jump, just aim for the top opening
 and runjump with a R curve and a grab in the end to land on the lower ledge
N (to the upper ledge is possible too and then run off the N side to land
on a lower ledge and jump S into the opening you have to go to) from the lower
opening you have turn NW and do a R curved runjump onto the long ledge on
the cut out pillar. Look SE from there and do a runjump with a L curve to
land in the ledge E. go down to the L to the Tile and go E and look out SE,
again a runjump R curved to get to that pillar and then go jump to the dark
SW corner.
and runjump with a R curve and a grab in the end to land on the lower ledge
N (to the upper ledge is possible too and then run off the N side to land
on a lower ledge and jump S into the opening you have to go to) from the lower
opening you have turn NW and do a R curved runjump onto the long ledge on
the cut out pillar. Look SE from there and do a runjump with a L curve to
land in the ledge E. go down to the L to the Tile and go E and look out SE,
again a runjump R curved to get to that pillar and then go jump to the dark
SW corner.
Climb up N and follow to the end, there do a runjump E to that floor and get the Ammo from the vase. Go SE and from the corner jump to the opening there, jump up S and roll, runjump/grab back to the opening above S and go to the L side, standjump to the ledge around the L corner (NW) and then a runjump/grab W, go R and use the switch on the pillar (a block goes up on a ledge). Runjump/grab back to the ledge you came from SE and just let go so you will drop to the floor where the Ammo was, go N to the ladder and you can already see the block you raised, from the top of the ladder to the R and runjump/grab N, up the block and grab the CS up E, crawl to a blue door that will open for you.
Red Hot Fountain.
Go SE and into the E opening, go L inside and around the R hand corner R again into a passage with a blue door, Secret#6 is yours, get the MP and continue to the other side of the blue (fake) door and get the Ammo. Go back out and past the blue door to the R, go to the S side of this place and through the passage with the familiar Tile and do a runjump/grab over to the ledge with the switch S. (Youve visited this room before at the beginning of this level.)
Timed doors.
A Guard will open fire somewhere up E, shoot him first and save in front of the switch. Its Timed and after pulling you have to roll and run out with a sharp L curve so you can jump into the blue opened door W. Get the ½ MP and look around the L corner for the ledge you have to jump to. A L curved standjump/grab will do. Roll and runjump/grab up to the N upper ledge, runjump N and r a bit and turn R and runjump into that opening SE with a R curve in the end, then SE again and to a ledge in front of a closed gate next, turn S and see a ledge SW.
Runjump into that corner to get to the Timed switch for that gate. Save in front of it and pull/roll, curve L while running and jump curved L to the ledge at the gate and quickly get in. (for me personally it worked better like this: Pull, turn R and hop back in the L corner, turning diagonally NE, then runjump with a L curve out of the alcove and onto the ledge and get into the gate fast. >Dutchy).
The Fire star.
Follow straight, go R in the end and R again, into the blue structure, get up to the block and pry the Fire star from the wall, the end music starts so you must be near the end. Go back out and to the Timed gate and you can just safety drop down to the ground floor, but be sure your health is full. If you want to get back over all those ledges, be my guest Go to the N side of this room and find a block, go up and climb back to the entrance ledge, go N and L back to that Red Hot Fountain.
Place
the Fire Star S and enter. You are on top of the first room of the level go
over the ledge to the middle and runjump/grab to the W, go through the open
gate and dive into the water, swim down and follow to the
Level 3 The
Lava Pool.
Keep
on swimming and go up to climb out at the Lava Pool. From standing between
the hole you came from and the Pool, go to the far L corner and through the
stone pillars to the
Shoot
the Raptor on the central island from here and spot the little green
patch on the L and do a runjump to that small ledge and go on along this side
till you can jump up to where the receptacle for the Gem is under the Dino
head, go on with a runjump around the corner to a flatter part of the bank
and from there over to the small green ledge, turn R and face back to the
other side of the lake, so you just see the Dino head to the R in the screen,
when you look just over the edge in front and down youll see another one
of those tunnels in the Lava, just run in and swim to an UW lever, a cutscene
shows the opening of the gate to Secret#1 (later), go back and climb onto
the ledge. Turn R and runjump to the central island and onwards to the opening
across the
Dino Gardens-On the Rocks.
Go straight to the opposite side and L, past the gate and at the first big palm tree, you can pull up on the rocks, get the Ammo and look out over the area, you have to go over the rocks to that corner to the R with all the purple flowers. So go along this upper ridge to the first corner with some jumps and there a runjump to the L with a R hand curve so youll slide down and can grab the edge, shimmy L and pull up just before you cant go further, do one more runjump after you shot that Guard and get some Flares before you enter the dark tunnel. Go to the end and use the switch to open gates at the Lava Pool. Go back out and return to the Lava lake and now you have to get back to the Pool by jumping all the way back around the Lake (theres a little shortcut over the Lake, when arriving back, just go L around the corner and on that very corner you can face away from the Lake and just use "Ctrl" to climb the rocks. Then go R and over the wall to the corner that leads back to the Pool -> Dutchy).
Lava Pool.
Go straight along the R hand side of the pool and R into the opening there (the water-hole is to the L of you)
The Big Stairs.
Go down a few steps of the Big Stairs and then R into the open gate, get the Ammo and find the fountain, turn around hop back and dive down.
UW Caves and Gate Keys.
Swim to the L upper corner to swim through a narrow tunnel (CS) and then into a large cave, go R of the pillar and look up to spot the hole in the ceiling where you can get some air, dont climb up yet. In the upper room is a blue door visible, face a bit L of that and dive down again, now to the pillar in front and go to the L of it to turn R and into the pillar as theres a shaft down into the pillar. Now when you are down in the next cave, you probably have to turn L and see 2 pillars in one of the corners of the cave, just swim straight between those pillars and up into another breathing hole. Climb out and get the Gate Keys there.
Stand at the water and face between the L Dog statue and the fountain, dive back in and swim straight through the opening between the pillars, go down a bit so you can look up for the shaft you came from earlier. Swim back up the shaft and go L to that wide hole in the ceiling, climb out and face the 2 switches.
The Blue Door Puzzle. (Map)
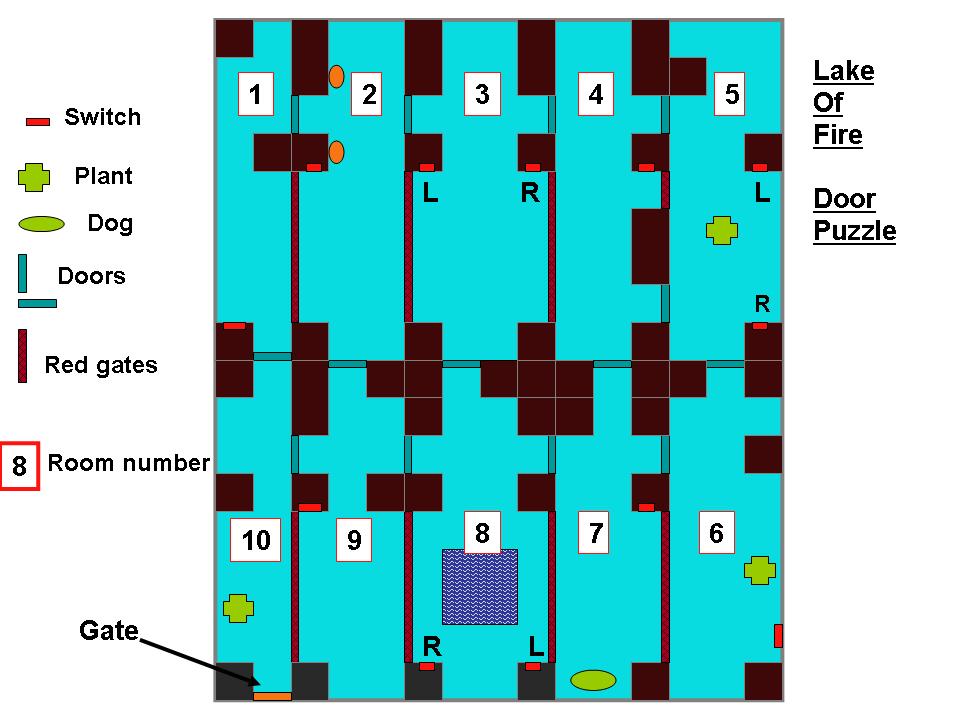
This is a rather difficult Puzzle and hard to describe without Compass, so I made a little Map of the rooms and will give short directions according to that Map. You can of course always try to do it on your own.
Here we go:
From Facing the switches in room 8!!!
Room 8 (start)- Use the L switch. Turn around and go L to room 9.
Room 9- Use the only switch in the room and go to room 2.
Room 2- Use the only switch in the room and go to room 3.
Room 3- Use both switches and roll, head back into room 8.
Room 8 - Use the R switch, turn around and go R to room 7.
Room 7 Room with the Dog statue, use the only switch in the room and go to room 4.
Room 4- Dont use the switch and go R to room 5.
Room 5- Go R to the plant and use the L switch to open a door (cutscene), roll and use the R switch. Turn R and go back out to room 4.
Room 4- Use the switch to go on to room 3.
Room 3- Use only the L switch (from facing the switches) and roll, head back into room 8.
Room 8 - Use the R switch. Turn around and go R to room 7 and straight through to room 6. Music starts, use the only switch and get another cutscene of a door opening up. Go to room 5.
Room 5- Use the R switch (first on the R) and turn R to go R to room 4.
Room 4- Use the only switch in the room and go to room 3.
Room 3- Use only the L switch (from facing the switches), roll and head back into room 8.
Room 8 - Use the L switch. Turn around and go L to room 9.
Room 9- Use the only switch in the room and go to room 2.
Room 2- Just go to the pillars with the wall-torches (dont use switch) and L to room 1.
Room 1- go L and use the switch next to the blue door. Go through to room 10.
Room 10- The end, open the gate with the Gate Key (If you happened to drop in and dont have that Key, look above and in this paragraph UW Caves and Gate Keys.
The Fire Star
Go to the end of the passage beyond the gate and pry the Fire Star from the wall. Walk back a bit and before you step down at the gate, look up to the R and climb up there, follow the steep cave up to the Big Stairs. Drop from the rocks and go down the Stairs and use the star to the L to open the gates.
The Torch and the Revolver.
Go
into a dark room, straight ahead and under the Dino head is the Torch,
pick it up and go into the passage behind the Dino head to light the Torch,
go back to the room and light all 4 Dog statues. The gate opposite of where
you lit the Torch opens now, drop the Torch and shoot the raptor, go into
the R hand side of the back passage and climb the block in the corner after
you picked up the Flares. Turn around and climb up to the upper floor.
Walk to the edge to see a MS on the ceiling, to the L and at the end of the
MS is an alcove in the wall, runjump with a L curve
to land inside and grab the MS to go over to the other end of it. Turn L at
the wall and youll drop onto a ledge, hop to the opening and go R, heres
that gate youve opened in that lava tunnel in the
Go in for Secret#7 a ½ MP and another Revolver.
Go back out and safety drop to the ground floor, go to where you dropped your Torch and pick it up, go into that gate you opened in the back passage, follow through to a crossing in the end. Go L and in the end you have to hop up the blocks to get to the upper room, go sharp R and in the dark corner is a ½ MP. Go on and come to another crossing, go straight first and throw the switch in the end to open a gate where we go to now. So go to the L at the crossing and come to a pit, jump down to the ledge L and go down with the torch to have some light in the darkness, follow to the end and find Secret#8, the Grenade-gun. Pick up your Torch again.
Go back to the other end of the pit and use the blocks to hop back up, go into the passage over the pit and do two run jumps to get to the open gate, drop the Torch for a moment to take care of the resistance, go on and come to a fountain in the end, go R there and come to the upper part of the crossing youve passed down below. The jump is rather tricky, stand against the L side, sidestep R once and take one step back line up for the L side of the opposite opening (screenshot) and hop back. Now runjump and you should just bounce off the L wall into the opening.
Follow the passage to a block in the end hop on the block and here you have to turn around and do a perfect straight runjump up to the pillar a bit back. (Having trouble lining up?? Best way to line up straight was for me to stand behind the block, facing the direction where you have to jump straight as possible and throw the Torch against the block, it will bounce back a bit, now grab up to the block and let go again, Lara is lined up straight now, maybe you have to take a step back to pick up the Torch, but what ever you do, dont turn her again, hop back to the wall, hop on the block and do a runjump onto the pillar.
Turn R and spot the next ledge to jump to, the a bit R again to a ledge R of the opposite opening and jump in, up the block and light the Dog there (gate to the Knot opens up). You dont need the Torch anymore, but if you want to save on Flares, better take it with you. Throw it down in the room and head back to that crossing you jumped over, look down to spot the lower opposite opening, throw the torch down into that opening and follow behind, pick up the torch and go on to the room you opened, get the Fire Stone (Pharos Knot) and a gate opens. Go back to the crossing and L, follow back to the gate at the room with the 4 Dog statues and go up that block (L) in the back passage again.
Climb
up and the gate to the L is open now, go in and at the crossing straight first
to get the MP around the corner, then go into the other passage and follow
to a switch to the L, overlooking the room below. The switch re-opens the
gates so you can leave again, drop to the ground floor, roll and go out L,
up the Big Stairs and to the Lava Pool. L to the
Dino Gardens- Having It Out.
Go to the Dino gardens again and straight to that gate between the pillars, pay attention as you place the Fire Stone, (Knot turned into Pillar) and go in to collect the goodies, MP, Ammo and another Shotgun. Finally save in front of the switch and throw it. A flyby shows the opening of gates and the whole Dino family comes out, quickly arm yourself as you get control back and turn around, Mama T can get in here, so just wait and run under the soft belly, shoot her (once should do) and take out the rest.
The Fire Gem.
Put
on your running shoes, go out and R, L into that long alley the Dinos came
from and follow all the way to a long passage in the end, pick up the Fire
gem from the pedestal and notice the gates to the R, thats the last (end)
gate, so youll return here later. Retrace your steps to the
![]()
Unauthorized walk D&G Productions. 08-06-2005.
THE LAKE OF FIRE
Part 1: The Temple Guardian
Levels by George Maciver
Official Walkthrough by Robin Burgess [rjb]
NOTE: Walkthroughs, by their nature, contain huge numbers of spoilers. So that you can anticipate the 8 secrets in this game, rather than just blunder into them, the phrase [SECRET ALERT!] will appear a little before each one, so that you can Seek it out for yourself, if you wish to do so.
Level 1:THE TEMPLE GUARDIAN (4 secrets)
[Some abbreviations
used: E = there is/there are; psg = passage; fwd = forward; bec = because;
betw = between; SJ = standing jump; R&J = run & jump;
J&C = jump & cling; RJ&C = run, jump & cling; pfm = platform;
BF = bowl-flame;
CPS = crawlspace; FLAME CHANDELIER = flame chandelier; TD = trapdoor; BSt
= block-steps;
bflp = backflip; smslt = somersault (so: bflp-smslt also); CDS= cul de sac;
SG = shotgun; N = normal (as in N SG shells); AH = air-hole (if underwater).]
1. The Four Flames
Start: Delight in the fly-by at the beginning and the cool ethereal music. Wonder what is going to happen to Lara when that armoured skeletor (skeleton warrior) reaches her. Hit the surprise button as we drop away in safety, to leave those walls with all the inscribed writing, that beautiful, stormy sky and the sunset, to run forward along the passage to reach the first of very many rooms, some large, some small. We have (as always) 3 SMPs, 1 LMP and 3 flares to begin our exploration.
Perhaps first run round the room (anti-clockwise) at ledge-level, to note a few things: See the large room at the right with the unlit flame chandelier (note the crevice to the right); the ladder down, just below where we came in; the pool (shallow!) into which we could drop at the far side of this first room; the wooden door beyond the pool, below; the dog statues (was there a clue to something at the start?); the lever that we can reach fairly easily (a standing jump from two places) but where we might topple to the floor below when we try to use it; and a hole in the floor to avoid.
Our first main objective, which is not obvious until we start doing things, is to try and light the 4 parts of the central flame chandelier in the 2nd room that we found, to the right of this 1st room where we initially entered. When all 4 are lit, then .... ! With this aim in mind, first, staying at ledge level, we can make our way round to the lever we can see - a short shimmy will probably be necessary before we can hoist up and pull it and when we operate it, we are shown that one flame chandelier flame has been lit (in the adjoining room) and that perhaps the camera is focusing on a certain area in that room. (?!)
There are several ways we could go next. If we decide we want to do all that we can at this same level, we next want to make our way round to what well call the 2nd room, and the gap between Rooms 1 and 2. From the left gap, we can jump to the single platform that we can see. If we turn to the left and look closely, we can see that there is a series of cut-outs/ledges along the left hand side of the room, cunningly camouflaged, by which we can shimmy all the way along to the next jutting out platform. A standing jump with cling from the first platform will reach the first cutout. We can then shimmy to the right and hoist up at the target platform, go forward to the next and pull a 2nd lever that we find there. We are then shown a similar scene to that which we were given for the first lever - but see if you can spot the mini-Lara!
From here theres nothing for it but a safety-drop to the ground - we could shimmy back, but we cannot reach that first platform again from the cutout. This means that, before we return to the ground floor of the first room through that opening we can see, we can explore this room (Room 2). Note (going clockwise) the blue wooden door; the double gates (are these what weve been looking at in the cut-scenes?), with a room with a pool beyond; the wolf gate with another room within; & those interesting double pillars near the opening. Could they be concealing anything?
Back into the first room, we can now look round the ground floor (or we could have used the ladder earlier, of course). Going anti-clockwise this time (because were going to be heading for that ladder), note the wooden door we saw earlier (that makes 2 so far) across the shallow pool; our 1st pick-up, some FLARES in the left hand alcove; the room seen through some more double gates, with a couple of Georges trademark T-rex heads on the wall (youll have seen the originals in Exodus?! and see what you can spot round to the extreme left in that room); a pair of single gates, either side of the ladder, through which another room can be seen (and whats that on the pedestal on the high ledge?); and the place were actually going next, cunningly tucked into a passage to the right of the ladder as we look at it, a set of lovely marbled blue steps that descend.
Going down, past the opening gate, we come into a smaller room that continues the marbled theme, where there is a closed gate at either side: the left hand one, next to the floor lever, has a passage beyond it and the right hand one has a lever in a small room. Note also the receptor on the far wall, by the bowl-flame torches - for an item we might just have seen in that room off Room 1? (Note that structure attached to the ceiling, also - not a lamp, then?) Operating the lever at the left, we find the 3rd lamp/flame on the flame chandelier in room 2 has been lit. Ah, thisll be easy, wont it?! (Though in coming to that conclusion, dont overlook Georges philosophy of wanting to: break us in gently! - known as Georges rule no. 5.)
So now we can return to the steps, to use the ladder to get back up to that ledge where we began. This time, we want to go round to the left, to return to the opening that overlooks room 2. We have a tricky jump to make now, looking at that crevice to the right (directly above one of the double pillars) that we noticed (?) on our first bit of exploration. We need to make a diagonal run, jump and catch to hold on to that crevice, then shimmy around to the left, until we can hoist up into the crawlspace.
Through the crawlspace, we find a wall lever. It doesnt produce the 4th flame we hoped for, but there is a distinct trapdoor opening sound. (Did we notice where that was in our earlier exploration?!) Backing out through the crawlspace, we need to drop to the floor and we lose a bit more energy. The hole where the trapdoor has opened is very close. Looking from above (for we never know what delights George will have waiting for us, so let us look before we leap, as they say!) we might glimpse the floor tile below with small holes in it. We might also have seen this elsewhere, in other adventures, and perhaps know this as a flames tile, producing: flames such as might be on a stove, or stove flames.
[A moment, here, to try and solve the next bit yourself, before you continue reading.]
When we do get down, and look through the gap where the stove flames have quickly come alight, we see that there is a lever inside what seems to be a small, enclosed room. We can also see a second stove flame by a gap at the other side of the room. When we go round the outside of the room, we pass a floor tile with the wolf emblem on it and come to the 2nd stove flame. Ah. The 1st flame is now off. We rush back round, but find that it is on again when we reach it (or just coming on). Eventually we twig that the wolf sq is a pressure pad that puts the first flames out. If we run round from the wolfs head, we cannot quite make it before the flames SF light up again. And when we try to rush through, Lara somehow always seems to light up herself!! (The 2nd flames never seem to be be off, so its the 1st flames we must concentrate on.)
So how can we reach the flames tile and get through safely, in time? Can we sprint? Well, its very easy to run into walls that way! What we need to be able to do is run across that wolfs head at a sprint to the corner, then stop sprinting for a split second to get Lara angled round the corner, then sprint again while curving Lara while she runs, into the entrance and past the flames, before it lights up again.
Simple, eh? (George tells me he can do it every time, the clever clogs! - but then he is the designer of the puzzle!) We need to be able to sprint as much of the course as possible. It IS poss. to curve while sprinting and we need to utilise that possibility to solve this. (My own keyboard has a slight fault, such that I cannot curve to the left while sprinting but I can to the right!! - so this problem was doubly hard for me.) Start from behind the wolfs head, or you cant build up enough speed, in the back right hand corner, then angle Lara as far as you can to the left to still clear the first corner. Sprint round the corner, being prepared to ease off slightly past the corner, so that you can run left into the opening and sprint completely across the flames tile. Unless you have amazingly intuitive control over your fingers, I imagine youll see Lara in flames more than once before you succeed!
(Two further notes about this: if we sprint for too long, once we have passed the 1st left hand corner, it is very easy to run past the opening that were trying to enter!; and also, should you have a similar problem with your keyboard as I have on mine, I found that I could (briefly) sprint to the left, by releasing the forward cursor key for a very short time, while keeping sprint and left engaged - though it mustnt be for too long or the sprint momentum will run out and Lara will skid to a halt. [Or the reverse might be possible if on your keyboard you cannot curve a sprinting run to the right.])
George has also provided this helpful note, though I confess I couldnt do it his way!: You can in fact sprint the whole way, and Lara glances off the far wall and sprints through the opening. You can also do it with an initial jump over the wolfs head square, and then sprint, again all the way through the opening just by angling her to the left. So, our adventuring friend: however you can do it, be our guest!!
We find (we are given a nice little cut scene) that the lever doesnt light the 4th flame that weve been waiting for on the flame chandelier, but it does raise the gate in the Blue Room that guarded the other lever, below the blue steps, where weve already been once. We then find that the square right next to the 2nd flames conveniently turns it off, so we can escape from this room. We can then go round the outside of the room and hoist back up to what weve been calling Room 2. When we return to the Blue Room we find that using the lever that was behind the gate still doesnt light the 4th flame on the flame chandelier, but instead we are shown that the two gates, to either side of the ladder in main Room 1, swing open.
Ah, what a nice surprise as we go through the gates!: a friendly raptor! (Was this a jump out the chair moment for you too, since everything has been so very pleasant thus far?!) There is a block within that we can jump up to, to avoid it (or we can back out of the open gates weve just entered), but we soon discover that there is also a black guard of some kind shooting down at us! I dont think Im giving too much away by saying that this guard is one of many well come across during the game - & George has promised further guards, as he thought that perhaps there werent enough at the beta-testing stage! And note that, knowing George, he just possibly wont tell us about every single one that hes added(!), as his 6th rule states: ... but lets not make things too easy! These guards have a sort of black-garbed, hooded terrorist look, but to avoid calling them terrorists in these sensitive times, well just call them machine-gun guards (even though they sometimes switch to using grenades), or MGs. So if you see MG in the text, just think: thug!!
There are a number of ledges higher up in this room (or perhaps one large surrounding ledge), that we cannot seem to reach as yet, and also we can see more closely the pedestal that we saw through the closed gates, on a section of one of the ledges. (Is it possible that the item on the pedestal matches one of the receptors that weve seen?) Moreover, beyond the block in the alcove at the right hand side we can find the lever that at last IS the means of switching on that final light on the flame chandelier. We are then also shown the double gates in Room 2 that the camera has been focusing on, swing open. Before leaving the area, there is a SMALL MEDIPAK tucked away in a corner of the room.
2. The Pool Rooms
As we go through the opened gates into what we might call a pool room, it is nice to hear the pleasant, non-threatening music. Except that the gates suddenly close behind us! Ah! Note the gate at the far side (reached from the paths), and the deep pit in the centre. There is a lever on a ledge on the right. There appears to be an impossible timed run to the door on the other side of the pool but then we discover that the lever also opens a Trap Door at the bottom of the pool, which is on a timer. We can swim through it (there is no problem if we go directly) into a wide tunnel, then we reach a shaft that goes up to a turning, sandy-floored tunnel to find a large, pillared room patrolled by another raptor. (Did we mention Georges interest in dinosaurs?!) When we surface, note: the opening to one side (There is a huge floor space at the left); the bridge and the monkey swing above; a lever at bridge level; that there is a skeletor patrolling the bridge!; a closed gate (with steps up within) behind the dog statues; and note especially - easy to miss - the cracks/crevices in 2 of the high pillars at the right. (Why, exactly?)
We cannot climb up, so let us go towards the huge left hand space, where we come to a kind of large sunken floor area, and we can see 2 blocks to get up and down. There is a surrounding ledge all around, with a closed gate in the LH wall (we can see a slope down beyond it); There is a side passage, along to only our 3rd pick-up, a Shotgun (loaded with 6 Normal SG shells) on a pedestal. We can then go down, via one of the blocks, into the sunken area.
Perhaps the first thing to note, if we havent already, is the considerable drop outside the central area to the ground that surrounds it! Looking carefully around the central structure (without falling off!), we might note: another wooden door, another lever, and is that an underwater-type lever in one place?!! There is also the trap door in the centre of the structure to consider and the ladder down that goes from one of the end raised blocks.
Going down the ladder, when we pull the dry lever, we hear a trap door opening. (Now where might that be?!!) Up the ladder again, we see that the central trap door has indeed been opened. (A comment here: it seems that George will tend to provide cut scenes of the result of levers etc if they are some distance away. [Not true with all custom levels, alas!] If they are within earshot, however, then we will be expected to figure out that the levers effect is close by. So we need to keep our eyes open for visual clues and our ears alert for sound clues!)
Entering the trap door opening, we find some blue rooms within the central structure, that go down to a lever. Again were not shown - but we hear! - a faint creaking sound when we operate this lever. Could it be that a wooden door has just been opened, perchance? If we climb up to the trap door once more and peer down from above, over the edge, before committing ourselves, we might just be able to see that the blue wooden door that we saw earlier has now been opened also. To the ladder and down, then! Inside the door, we can see passages going off both forward and left, with further openings leading from each of them. If we go left, and then round to the right, note that there is a closed gate ahead with what seems to be water beyond it!
Going back slightly, there is a central room that we can enter, which continues Georges blue theme. Before rushing to jump anywhere, though, look up, to above the slope. Is there going to be any way that we reach that high ledge? (Solution in a second.) Firstly, we need to do an standing jump diagonally into the alcove below the blue slope. With our back to the slope, we can then backflip and bounce and neatly catch hold of the upper ledge above. (You might want to SAVE here, after youve hoisted up, to be able to replay the next bit.) When we pull the lever we hear a great swishing noise and water fills the place below where were standing. So can we perhaps use that underwater lever now, that we saw outside this room earlier? Will it open that gate where we saw yet more water?
Yes, thats exactly what happens. (Note that the only air hole within this whole area that is past the blue wooden door, before we go through the corner gate, is within the blue room, a kind of room within a room.) Swim past the corner gate that the underwater lever raises to reach a larger pool room, with another lever and another closed gate, both above the water line (and we can see that there is a slope up past the gate). Note the normal shotgun shells on a pillar and a crawlspace opening in one wall, but no place to hoist up out of the water. Now the slightly tricky bit!: Swimming through the crawlspace opening, we find a lever in the alcove within. We soon discover (hopefully!) that this raises the gate, BUT it is on a tight timer!
It is probably helpful at this point to actually practice the swim from the lever, out of the alcove and over to the gate, as were going to have to hoist up just(!) before the gate drops. (If you want a helpful hint: dont surface at all in the water until youre almost at the gate. You also need to make sure you dont do that frustrating, time-wasting, back-paddle as you surface. You do this by not pressing swim and action at the same time as Lara surfaces.) When weve finally achieved this timed swim, we can panic for a moment(!) that weve not been able to pull that lever in the pool room! But worry not, and just go forward a little up the slope, (NOT to the top just yet - youll find out why soon enough!) and the gate behind us opens again, hurrah!
We can now without too much difficulty run and jump to several of the platforms to reach and operate the lever. We are shown that this opens a gate that we might recognise as being one of those seen earlier (and we might spot a certain something that sometimes emerges from the gate!!). Then we can go for the Normal SHOTGUN SHELLS, and celebrate our 4th pick-up. Next, we can swim or jump back to the opened gate and go further up the slope that is beyond. You are a cautious person, arent you?!! If we saunter up this slope, then we soon encounter a harmless-looking ball that suddenly drops from a hatch in the ceiling of the passage. (You expected a boulder or something, now, didnt you? Admit it! Well, youve just received the something, after all!) If, like most of us, youve forgotten about these harmless baubles, you might have just stood about (as did I!), looking at it. Suddenly, it deploys its less than harmless blade weapon array! Oops!
As a shortcut description of this little cutie (wot, you mean theres more?!!) well call it a ball that becomes spiked, as opposed to the regular spiked ball. If we dont get past one of these balls before the spikes issue forth, then our only option is to crawl underneath - which we can easily do safely enough. But consider: might the situation arise when someone/something could be attacking poor Lara while were doing this on some future occasion - possibly?!
A little further and the gate here conveniently opens as we reach it. So it wasnt THIS gate that we saw opening just now? And where is that skeletor that emerged from the gate we did open? (You did see that skeletor?!) [If we go across to the sunken area again, note: the water around it; that some water is within the central blue building; and that we cannot operate any of dry levers again.] We can now go (behind the dog statues) to the other gate at this level that has been opened, leading to some steps. Past the opened gate and up the steps, we come to the bridge that we saw across the pool from below and realise that the skeletor that we saw on this bridge somewhat earlier is the same one that bugged us near the newly opened gates!
Note, now that were at this level: back round to the right there is the lever that we noticed from below. Further off to the right, too far away to reach from the bridge - nor can we do so from the lever ledge - is a closed gate we may not have seen earlier. We can also see that the monkey swing starts over the far end of this bridge and goes to the right, and also there are those 2 curious crevice cut-outs in the right hand pillars. A run and jump to the lever ledge to operate the lever confirms (the tell-tale sound) that we can open the right hand gate. And by now youll have worked out how we can reach it!
From the far end of bridge we can use the monkey swing to reach one of the right hand alcoves. If we stand at the left hand side of this alcove, turn to face its opposite wall, and jump up to catch onto the hidden crevice, we can successfully shimmy all the way round this pillar to drop into the next alcove to the right. The 2nd crevice is much easier to see (and we can now see the back of the 1st crevice easily, of course), so if we repeat the process, we should come to the 3rd alcove, where the gate was opened by the lever.
We come to a passage that has several block steps, then ordinary steps, all going upwards. Suddenly, we come to a hole in the floor where we can see below the Pool Room that we passed through (the one with the deep pit). As we reach the hole in the floor we hear a gate opening and when we jump down into the water, we can see that this is the gate that was at the far end of the Pool Room, and which can be reached by jumping over several of the platform ledges. (nb. Dont go to the platform where you pulled the lever to open the pit trap door, or else the far gate here will drop shut and you will have to go round the system again! This is one of Georges: You dont really want to do that: youre just messing about, arent you?! But dont despair if you do drop the gate, as it isnt that far to go to open the door again.)
3. The Doors
As we go through the gate, we discover that it is another of those that drops shut and cuts off our return (or retreat!). There is tension music as we enter the next room. Note the curious flames at the left, and the small crawlspace behind. As we make our way to the exit at the right we are greeted by another raptor! Round to the left in a long alcove we find another pick up, a SHOTGUN, in case the first was missed. If we go back to the right, past the entry passage to this area, and turn left, then we enter a longer flame-lit passage, with a number of openings or alcoves off to either side. A window immediately left shows a prone skeletor and a wide pit, in a room that is otherwise quite similar to those weve just left behind.
As we look more closely, we discover another of those blue wooden doors at the left, between 2 pillars with wall flares, then 2 more doors a little further on, at the right. (Incidentally, you may like to know that George assured me at this point that I hadnt missed any secrets yet!) There is a small slope which we can jump up, then a passage to the right where we can see a lever at the far end. Continuing along the present passage, there is another door at the left, then another passage to the right, and this time we can see that there is a closed gate at the end, with one of those wolf panels above it. This door opens automatically as we walk towards it, and leads back to the large chambers where we first arrived. Finally, at the end of the passage, there is a door on the left and a trap door set into the floor. (All the blue wooden doors and the trap door are, of course, closed!)
It would seem that our next course of action should involve the one lever that weve found. Going to the lever, we are shown that it opens the blue wooden door with the wall flares next to it, which should guide us to the correct door. When we go through the doorway, we find another room similar to those that were in at the moment, at the end of which is a further passage with further alcoves and doors to left and right. Going left here, we find a closed door, which we presume to lead into the pit room that we saw earlier through the window. Going back along the passage and up the slope, we are attacked by a raptor.
After killing raptor, go to the far end of the passage (ignoring the door that creaks open as you pass it for now) where we find a lever, and a view to a room so far not visited. When we pull the lever, we hear the now familiar creak of a door opening close by. Go through the door that opened, pick up the SMALL MEDIPAK, then turn to the left and youll find that the door beside the trap door is now opened. Going through we find a metal door through which we can see a narrow passage leading up.
Further explorations of this area reveals that the door to the Deep Pit Room is now open! Here, we can run, jump and catch hold across the pit, where the skeletor arises to challenge us (and perhaps you too will discover anew that skeletors can knock explorers into deep pits!). Choose how you will deal with the skeletor; then (or before, if youre really clever!) pull the lever to hear (only) a creaking noise, that were beginning to learn to associate with the opening of blue wooden doors. When we jump back across the pit and (turning to the right) search for the nearby door that has been opened, then we will find that a door almost opposite the passage weve just come down opposite one of the wall flares in fact - is the one that has been opened by the lever across the pit.
As we go into the room, the door closes behind us. Note, as well as the lever, the door on the left. Operating the lever, we hear a very close creak of a door opening. But suddenly - as we complacently(!) amble towards it - we realise that it didnt stay open for very long! Now: can we reach such a close door AND get through it, when were facing the other way to start with AND we have to turn through almost 90 degrees? (A solution below.)
Perhaps you can do this so easily you dont even think of it as a problem! Well, please bear with those of us who have a little trouble with timed runs! One solution is as follows: immediately (of course!!) you have pulled the lever, try doing a backflip somersault while still at the lever. If you do it just right, then it is possible to hit the ground running and continue running while curving round to the right - sprinting if you can.
In the new room, which is not unlike the one weve just left, there is another lever at the right hand end and another door on the left. This lever does something much more significant than just open another door though. Do you remember those flames when we first came through into this area from the Pool Room? We are shown a slightly longer cut scene this time, where we see the furthest away flame actually being switched off. Some excellent, marvellously atmospheric music accompanies this and continues for a bit. Now, what is in that crawlspace?
When the camera finishes, we notice that the exit door to the room is now open, and when we do go through, we find ourselves once more in the initial long passage with alcoves. So we can therefore go back (to the left), to where we the flames are. Shimmy round the still lit flame, hoist up, and go into the crawlspace for THE TORCH, noticing when we do so, that the second fire goes out. As you cannot crawl while holding the torch, chuck it outside, crawl out and pick it up. When we bring it to the wall flares nearby, we find that we cannot light it as easily as we thought we would be able to. (Georges 6th rule again: see above!)
Ah, but there were a few more flames in Rooms 1 and 2, werent there? (Not counting the ones on the flame chandeliers, of course, unless we can jump to them!) Now we can see the value of the wolf gate, so if we make our way to that, we can go on through to return to Room 2. Before we can go over to the wall flames of Room 1, near the ladder, however, we suddenly realise that were being shot at from the left hand side of the room, from the ledge above the opening between the 2 rooms, in fact, that we have been on ourselves earlier. A black enemy has appeared, to try and make our progress a little more difficult (thats George for you!). [But if you decide to take the initiative and go through to Room 1 (avoiding him by skulking round the walls, perhaps) and go up the ladder to fight it out, youll find he doesnt drop any goodies anyway - but its worth checking!]
[2 SECRET ALERT!] Our first TWO, eh?! That means that the 1st two secrets are both near, so if you wish to try & find them yourself (before you read on) then, Look away NOW! After we have succeeded in lighting the torch from the wall flares by the ladder, then we may turn to the question of where to use it. There is, in fact, 2 places where we can use the lighted torch, one in each of Rooms 1 and 2. One of these is our way forward and the 2nd is the first secret. (A warning, if youre looking for secrets: DONT lose the torch in any water until youve found this one.)
Do you remember that curious dog statue with the flame over its head at the very start of the game? Does that suggest anything we might do with the 2 dog statues here in Room 1? When weve used the torch, and a certain blue wooden door has been opened (note again the shallow water here, as its in a particulary awkward position should we want to backflip for any reason! - not accidental, eh, George?!) then immediately we enter, we are attacked by 2 more of the black thugs, that are lurking just round the corner. We find that this is our 1st secret room. These thugs we need to extinguish, alas (whereas we might mercifully allow certain other baddies to remain), as they each drop a welcome goodie: one drops a LARGE MEDIPAK and the other, some normal SHOTGUN SHELLS.
Now, if we say that the 2nd secret is also in this room, where might it be? (A moment to think, and then perhaps a whole series of reloads[?!] before we retrieve it!) Another clue: the CORNERS of a flames block are less dangerous than elsewhere. An even bigger clue: if you can find just the right spot on the floor to backflip from or somersault from, to land precisely on one of the 2 corners, you can then immed. hoist straight up to the roof covering above, and your problems will truly be little ones. If thats too hard, simply hoist up on a corner, turn around and jump up to the roof taking a little damage. (The goodies we find in this 2nd secret area are the UZI GUN and some UZI AMMO CLIPS.)
4. The Water Channels
To continue: going back out to the main floor area, if we look carefully well find that one of the wall flares dotted about is NOT alight as yet (and this is our way forward in the game). When the wooden door in Room 2 opens(!) and we go in, we hear a wary kind of adventure music as we enter and we can see that there is a (deceptively!!) small pool in the new room. BUT this pool is anything but small in reality! We have found merely the drop-in point! Well also quickly discover that once were in this pool, we can no longer get out, so perhaps this room is another good place to SAVE our game!
[SECRET ALERT!] A 3rd not far off, eh? Now were progressing! Be delighted by the size of this pool beneath that tiny opening weve just come through and its great columns. Swimming down to the left and down further, and further left, we come to the start of a water maze that isnt too difficult really (perhaps that comes later!) where we can see (generally) many large, bright, open areas. (This isnt the usual claustrophobic kind of maze.) Well discover that there are a few cul de sacs to divert us and lead us astray and help us to run out of air(!) while we search around.
Weve already turned left past the 1st cul de sac alcove. Going forward, across another large space, we see a 2nd cul de sac straight ahead and to the right a bit, so left again. Almost immediately right, round the next corner, is the way to continue without the next secret OR when we have obtained it. There is another cul de sac, also forward and right, at the far end of another open area, but if we keep to the left hand wall here and turn left through a narrower, turning passage then we shall reach secret area no.3, (merely) a SMALL MEDI PAK lying on the bottom. After the secret, if we dont yet know the layout down here, this is where we can easily run out of air(!), to avoid which we can either retrace our swim (following the right hand walls) to re-surface where we 1st jumped into the pool, or we can be brave and go fwd to find an air hole in the roof!
When we emerge from the narrower passage that led to the 3rd secret, back into the wider channel, we want to head diagonally right and forward, towards another narrow-looking passage directly opposite. We want to keep going in a straight line (diagonally forward), ignoring alcoves to either side, until we see a pillar in the centre of a wider passage. We can swim to either side of this pillar (we can view our destination more quickly if we go to the left) and then we will see a large air hole in the roof diagonally ahead. Ah! Now we have replenished our air supply (though we cannot leave the water here, of course) can look around.
There are 3 different directions in which we can investigate from this point, really. It would be helpful if you remembered the direction that weve just been swimming in, so that we can take our orientation from that. Call this direction - from the pillar we have just swum around to the diagonal across the air hole, from one corner to the other - forward. [SECRET ALERT!] Well take these in the order that seems most advantageous and leave the most complex till last, as that is the basic continuation of the story from here. (Though do feel free, once again, to charge off in any direction that you wish! - let me not detain you! Were all free agents here!)
If you do elect to go by this most advantageous route, then we first want to swim in a forward direction a short distance, going around 2 right hand corners, until we come to a water-lever. Operating this lever, we are shown that a trap door drops down somewhere. (Note that it is in a dry area.) We can now return to the air hole. (It is probably useful at this point to state that George has incorporated 3 examples of delayed secrets, one in each of the 3 levels, where we pull a lever [or operate something else] and it is only later that we can reap the benefit of doing this, and finding the relevant secret. This is the case here, the final secret for the first level. In the next level - not too distant now! - we pull a lever that opens a door part way through the level and it is not until near the end of the level that we can collect the secret!)
If, from our original forward direction we go to the left (thats right, of course, if were returning from the water-lever weve just pulled), then when we swim round the next right hand corner, we come to the start of a long(ish) tunnel that slopes upwards and comes out to another air hole, where we can hoist out. As we do so (depending on which side of the pool we hoist out - just run round if this doesnt happen straight away), then the double gates at one side of the room we have reached now open. We can see 2 of Georges heads (sorry, 2 of Georges T-rex heads!!) on one wall, next to some other double gates that have NOT opened (and which require a key before they will do so). We will call this the T Rex Room.
Suddenly we realise that we have arrived in the room that we saw through those double gates that have now opened, that adjoins Room 1. And in fact we can now return to Room 1 (or from Room 1 to this room very important at one point in the future) whenever we wish to do so, by these gates. (If we hadnt come this way, then the gates wouldnt have been opened, as they only open from the inside.) Now, if we go to the left of the T-Rex heads, well find a passage off the main room, and at the end of the passage there is a trap door that has now been opened. (We could have come this way before pulling that water-lever and wed have found the trap door closed.) Below is our 4th secret room! You can hear some footsteps, you say?
Ah, those will be the 2 black thugs below that are guarding the place, who are closer than expected! When deaded, they drop UZI GUNS (or ammo if you already have them) and some UZI CLIPS. Also there is a LARGE MEDIPAK and some more normal SHOTGUN SHELLS just round the corner. All most appreciated. We can now use either the water-tunnel weve just come along (quicker) or we can return to the pool where we dived into this section of water in the 1st place (the room off Room 2 where we lit the wall flame), to return to the underwater air hole, to continue our journey.
Once back at the air hole, we need to swim back round to the right from our original forward direction (more back than right), or alternatively, sort of turn right at the air hole upon our return from the 4th secret area. We then need to go forward, threading our way around and between several intervening pillars of different sizes, until we can see an opening above. We can then swim up into a many-columned area, then up again, to a small air hole at the far side, where we can hoist out to some heavily ominous music.
The large room that we hoist up into has many round columns and square pillars. We can see one lever very close by and a 2nd lever somewhat further away. There is also some normal SHOTGUN SHELLS to one side and a prone skeletor. But we would be well-advised to deal first with the patrolling black Thug who (fortunately) seems to be merely ambling towards us. If we have a good look around the room before pulling ANY of the levers (JUST in case!!) then we can spot a 3rd lever, to the left, further along the same wall as the 2nd one. As we go close to this, well almost certainly trigger another ball with spikes as we cross one of the raised panels. Finally, there is a 4th lever to the left of a slightly recessed, closed trap door over in the far side chamber. (There is also an opening in the ceiling [much too high to reach] near what we might call lever no.2.)
Now Im going to be slightly naughty here and NOT tell you what interesting thing each of the 4 levers does, as its not exactly difficult to discover all by yourself! Ill just say, in case youre concerned that you might miss something, that they each produce a different result, that they all affect something in this room - nowhere else and that only one is actually required. As a sort of puzzle within the puzzle, see if you can second- guess George: which of these 4 levers would he set as the needed one?
So we drop down through the trap door into a narrow water channel (narrow, compared to where weve been recently). Swimming along, we soon come to a closed gate in the tunnel on our left. (We can see a crawlsapce opening and a passage to the right beyond the gate.) Continuing right, we come to another opening, at the right: through this, we come to a lever. The lever opens the gate on a timer, and though the gate drops down behind us when we succeed, making us think that weve got to keep going fwd to find an air hole, lest we drown, the good news (which George attributes to his generous nature again! - you draw your own conclusions!) is that the gate re-opens when weve swum far enough past it, so that we can go back to the air hole at the trap door where we began this little escapade should we want or need to.
The next bits a little tricky because of all the turns necessary: going past the gate and continuing forward (rather than going through the crawlspace) to the end of the passage - 2 right turns - we come to another lever. After using the lever, we then need to turn back to reach the opening, through which we discover a timed trap door which closes quickly behind us, NOT to re-open. Swimming down past the trap door, we pass a closed gate on the left and go forward, going around 2 right hand corners, and immediately swim into a crawlspace opening, also at the right, to find the next lever and, more important, the next air hole! (For our heroine was seriously running out of air by this time!!)
From the air hole and lever, we need to swim back out of the opening and left around to the gate we passed earlier, now on the right, which the lever has now opened - though it too is on a timer. It drops down behind, but then opens again, should we need or want to return to the most recent air hole. (How nice of George to do that for us again!) Along past the next right hand corner, we see ahead a low crawlspace to the right and then a further right hand corner. The far corner brings us to another closed gate - at the left and an otherwise dead end, so we need to go through the earlier crawlspace this time to find the next lever. (George likes to vary things: sometimes its the crawlspace you need first and sometimes the lever youre searching for is in the passage itself.) The lever through this crawlspace is directly above the opening itself, so we need to swim in, then roll in the water, to operate it.
The next gate is also on a timer. From the lever (its easy to get caught up on this lever because of our rush to reach the next gate), we need to swim down and round to the right, then up and left through the gate, which is another that drops down behind us. The good news is that weve almost finished this section. There is a kind of window in the floor here, where we can see a small part of another tunnel section below. (But lets come back to this, shall we, rather than look through it now!) If we turn back to the right, and then follow the passage round to the left, we enter a low crawlspace. We then have a choice of forward and up (but this is one of Georges decoy spaces without air, to lure us into giving Lara a spluttery end!) or left and up, a little distance, to some fresh air at last!
5. The Hall of Pillars
As we hoist up into a room with many square pillars and high ledges that we can see, we are greeted with some be very wary music! It seems that we hardly have to move from the pool opening before a black thug starts to shoot down at the ever-persecuted Lara from a ledge above! We can use the pillars themselves to dodge and hide from the thug, and another that we soon learn about on a 2nd ledge to the left. (There are several places where we are shielded from both.) As we look round the room between gunshots, we can see that several of the higher ledges are within range of each other, if only we can reach that upper level, & that there is a closed gate on the same ledge as the first thug.
Eventually, we have to conclude that the only opening Lara can reach is the crawlspace that is almost beneath one end of the 2nd thugs ledge. It is a pleasant surprise (George on a generous day, then!) to discover that if we hoist up at the extreme right hand side of this opening, the thugs weapon seems not to be able to target our plucky explorer. Into and down from the opening, and along a short passage, suddenly an earthquake occurs - so something of significance has happened! When we can focus again (!) we see that there is a closed trap door above the end of passage here. (Note the ladder markings that we cannot use yet.) When we return to the hall, we find that nothing seems to have changed, however. An earthquake suggests a structural change of some kind? If not here, then ....?
So we go down into the water again, down and to the right and along the tunnel, to find that the window we saw in the floor, close to the gate (that has remained shut) has now been removed. So we can now go further down still, to discover another lever in a short passage. We are not shown what this does as we operate it, though to be consistent, it should mean that it is something close by, so perhaps our guess would be the trap door that weve just left? Yes. When we return to that, we find the trap door open and a ladder there that goes up. (We might also have concluded by now that all this to-ing & fro-ing has thoroughly vindicated our earlier decision to zap the 2 thugs in the Hall of Columns!)
Climbing up, we come to an opening just above the ledge where the 2nd thug patrolled. (A further confirmation that it was good thing he was despatched, then?) We can then drop down to that ledge, run along to the far end and run and jump to the right, to the nearest cut-out ledge, by the wall. From there, we can do a couple of run, jump and catches along the wall, to a pillar top and to another cut-out ledge. We then want to turn half-right, for a standing jump to a pillar-top, followed by another run, jump and catch along the wall to the next pillar top. Turning right, we then need to do one of those standing jump with cling (pressing action) leaps, to make sure that Lara doesnt hit her head, then another standing jump to a pillar op, a left turn followed by another standing jump, and finally a run jump and catch to reach the first thugs ledge.
There is a SMALL MEDIPAK here, which was dropped by the thug. The gate on the ledge remains closed, but the (previously unseen) lever on the back of the nearby pillar opens it. A cut scene shows us (with achievement music) not this gate but another (recognised?) gate opening, the one that is reached from the last left hand blue creaky wooden door in the creaky doors area. We also see that THIS gate has been opened.
6. The Return
We can jump straight up to the 1st pillar in the next room and use the monkey swing to reach the pillar at the far end. We hear footsteps from around the corner and sure enough there is another thug (who drops nothing). As we go down the thugs passage, 2 more balls with spikes drop down, just before the passage turns left. (We can race past these before they become dangerous or crawl beneath them.) We then reach a hole in the floor, that is also the opening in the ceiling we may have noticed in the room with the 4 levers.
From here, we need to return to the columns chamber in the water channel below, that we used to reach this room, that goes all the way back to the large ait hole in the first water maze. (If we keep more or less to a straight course we should find it easily enough.) We can then swim to the left at the air hole and make our way to the narrow, sloping tunnel that leads up to the T Rex Room. Hoisting up into that room, we then need to go through the main gates that were opened earlier, back into Room 1. From there we can make our way to the left, across the room, passing the doggie candles (description credited to Mugs on the trle.net forum) to our left, to reach the opening into Room 2, then across that room also, and right, towards the Wolf gate.
Going through here, we can turn right to enter the doors passage, then left at the end of the passage, by the trap door and the last lrft hand wooden door, to go along to the gate that we saw raised by the lever in the Hall of Pillars, and the slope up beyond. At the top of the slope another ball with spikes drops down, and we might meet a thug, depending upon whether or not we despatched this one when we met him earlier! For this thug (who drops nothing), as we see when we go a little further on, is the one that we spied on the high ledge in the room where there was an artefact on a pedestal up out of reach.
As we enter the room at the top of the passage, we see that we are now at the same height as the artefact on the pedestal. We can pick this up: the GUARDIAN KEY. We see also, perhaps not realising it before, that the ledges we saw at the higher level in this room are all in fact one long ledge that runs round the whole upper part of the room. (On no part of the surrounding ledge does there seem to be anything to add to our backpack collection, though.) We have seen a receptor that matches this Guardian Key (also known as the Vraeus) in the Blue Room that is down the blue, marbled steps from Room 1. Hopefully, the gate that hasnt yet been opened in that room will respond to the placement of this artefact! Our quickest way there is to safety drop off this ledge (though for some reason, we cannot do that over the pillars themselves that support the pedestals part of the surrounding ledge). We can then go out into Room 1 and turn sharp left towards the passage that leads to those steps.
7. The Guardian
(A pre-emptive rhetorical question before we discover what happens next: you dont think a skeletor can ever be a real nuisance, do you? Hah!!) When we reach the place for the Guardian Key, and put it into the receptor, the gate doesnt immediately open at all! Instead, we are treated to a fantastic son et lumière display, complete with some energetic, frantic music (from TR1 the Atlantean Stronghold) that suggests we should move pretty sharpish! That strange contraption on the ceiling suddenly comes to life and starts, apparently, to cut a series of lines in the slightly raised dais in the centre of the room, with a very dangerous looking laser. Though nothing falls away, and no hole seems to have been cut out, a skeletor rises up [the laser liberates it!] and it runs to open the closed gate for us. Its generosity, however, stops there as it then lopes towards our Lara with mayhem in mind!!
This skeletor is The Guardian of the title of the level. He guards the way to an artefact that we must find, to open up the way to the Temple of Fire, the next level. When control returns after the cut scene, Lara just(!) has time to escape from the Guardian, if were quick, and though the laser used by the ceiling gadget doesnt seem to harm Lara if she runs through it, the Guardian most certainly will! We might think that we can dispense with our skeletor shadow by going up to Room 1 and knocking him into the shallow pool or somewhere else, but George (being a cunning fellow) has closed off that route for us, by causing the gate to the stairs to shut again!
In fact, were going to find that there is nowhere that we can permanently shield ourselves from the Guardian and with only shotgun shells in our armoury (pistols & uzis have no effect), the best we can do is to knock him down for a second or three. Clearly, we need to go through the opened gate and along the passage beyond, where we find that at least there is a block on which we can stand safely. Though we cannot do anything while we are thus standing, of course, save catch our breath!! (George actually said that this block was an afterthought, put in, again, only because he was nice fellow.) We might have had to negotiate this whole, fairly complex series of passages weve just reached, with NO respite at all!! (But George wanted us to know that basically, so he tells me, Hes a nice guy! YOU decide!!) Perhaps the most important thing to do in this whole area, in fact, is to remember the Galactic hitch-hikers motto: DONT PANIC!!
The next most important thing to do, perhaps, is to establish (and hopefully maintain!) our sense of direction. Assuming that our first action is to jump onto what well call the Wolf Block, then well consider the way we came in as: forward. If we take a quick look to the right, well discover a closed gate behind the right hand block, between it and the wall. So if we think of that gate as to the right (which we want to go through at some point), then hopefully well be able to orientate everything else with respect to that.
Note: every single statement that follows assumes that somehow we will have the leisure to make the necessary observations, while the Guardian is constantly hounding us! The only 2 ways to get a slight interlude from his attentions (as well as using the Wolf Block every so often as breathing time), are if we use the shotgun (with the potential total exhaustion of our SG ammo! - one poor forum person said he had only one medipack and 2 shotgun shells left after this section!) or, once we know the area a bit, if we sprint from one known area to another, to leave him behind. Each of these remedies is only very temporary, though, as youll be finding out!! In addition, whenever we do become disoriented (this WILL happen!!), we can return to the Wolf block to take stock, and re-orient ourselves by noting that right hand gates position.
Starting, then, with the right hand gate, we can see that there is a 2nd closed gate at the other end of a short, narrow room beyond it. In the main room, if we look forward and slightly to the right, there is an opening that is close to the Wolf Block. (This is the nearest opening to the gate). This leads into a small room that has a lever at the right hand side. As we operate this lever, we hear a gate being opened and are delighted to discover that it is the gate (albeit only the first of three) that has been raised, giving access to the room beyond. If we go into this new room (Guardian permitting!) and look through the further gate, then we can now see that there is a 3rd gate beyond that. So thisll be easy, then?! Hah! once more!
NOW it gets tricky?!! Going back to the Wolf Block, the next opening to investigate is the one that is immediately to the left of the first opening we went into, for the first lever. (Note the circle emblem over the doorway.) We come immediately to an area where the left is relatively open, but we can see a 2nd lever to the right in a tiny alcove. Using this 2nd lever (we might just hear it, but its farther away, so fainter) also seems cause a gate rising sound. When we return to the main room, and go once more through the first opened gate, then we can see that, amazingly, the 2nd gate has just been raised for us. My, my! 2 levers & 2 gates! Excellent! We can then go forward to the third gate, and perhaps see that there is a pedestal with something on it in the room beyond and is that a crossbow on the floor, and could those be explosive crossbow bolts, also?!!
Now, if we go back to just before where we pulled the 2nd lever, to the open area just the far side (from the Wolf Block) of the circle emblem doorway, then we can go left, all the way to the end wall, through another gap, until we see a 3rd lever on the left hand wall, in an alcove similar in size to the one for the first lever. This lever should NOT be operated!! (Do so to see why: we are shown that a companion skeletor for the Guardian rises up out of the ground. We would then have TWO skeletors to avoid while we explore. This is generally considered to be NOT good!!)
From this lever, if we follow the right hand wall, we shall come back to the main area with the Wolf Block. (We could have taken any one of several short routes back to this point.) The useful aspect of going by the right hand wall is that when we reach the main area and turn a little to the right, then we can see that there appear to be only 2 more openings yet to investigate. In fact, though, there is only one, as we have just come out along one of the previously unknown passages and the left hand one of the 2 we can see is the passage that leads back to the Blue Room, where the laser freed the Guardian.
Turning right into the one remaining passage, therefore, we quickly come to a T-junction. (As we shall discover, this is one continuous passage and the 2 arms of the T-junction are the 2 ends of the passage.) If we turn left, then the twisting passage comes to another T-junction, but in fact this is really an end of the passage, as immediately to the left is a 4th lever in a tiny alcove. This is the 2nd lever that we should NOT pull and for the same reason as the 3rd lever. (Go on: pull it anyway to see why!; now youll only have 3 skeletors chasing you round from that point on!) From the 4th lever, we need to go back round to the right, where the twisting passage continues. Before too long well come to the final lever, on the right hand wall of the passage itself. When we pull this lever we hear nothing, but thats to be expected if it has raised the far off 3rd gate.
When we continue past the lever and turn right, we soon come to the first of the T-junctions in this bit of passage again, when we can turn left out to the main area and the Wolf Block. (We were a bit naughty here, as you could, of course, have turned right at this T-junction, coming from the opposite direction, and so have reached lever 5 more quickly, missing out lever 4 altogether.) [The person who said he had only one medipack & 2 SG shells left after this section also had 3 skeletors chasing him, With no means of getting rid of any of them! Now that WAS tricky!]
(Note: think for the moment of the person who is trying to struggle through this area without the benefit of a walkthrough: You are trying to find out what each lever DOES; you are trying to remember where each lever IS!!; you are trying to avoid this pesky attendant, so that you dont lose all your health while youre investigating; and then youre trying to formulate a plan to pull ALL the RIGHT levers and NONE of the WRONG levers; and even then, you dont know how youre going to get rid of the Guardian. And you think you had problems with the walkthrough!!)
From the Wolf Block we can go along through all 3 gates, to the farthest room. We see the marvellous sight of that CROSSBOW on the ground and we just hope that the separate quiver of CROSSBOW BOLTS are explosive ones. YES!! So at last we can get rid of the Guardian! From the pedestal we can pick up the pyramid-shaped Temple Key, to find that the adjacent door opens. As we go through it, we see that a nearby trap door drops down, over to the right. As we hoist up there, we discover that this is the one remaining trapdoor that we hadnt seen open, the one at the end of the creaky doors passage.
From above the trap door, we can go head for the T Rex Room to use our newly acquired key to the Temple to open the two iron gates next to the pyramid-shaped [Temple Key] receptor (at the right hand side of the gates).
([SECRET ALERT!] for soon after the beginning of level 2.) Placing the Temple Key, the gates open (this is a good place for a last SAVE position for level 1, should you wish to keep it for posterity) and we can then go forward to the slide down beyond. At the bottom of the slope, we need to jump and catch carefully over the flames (preferably near one of the dividing lines between the two adjacent fire tiles, to reach the crawlspace ledge. Alas, we cannot take our fire torch with us, so if you went back for it, you will have to leave it here. Another slide follows and as we go down that, we finish level 1 and enter: The Temple of Fire.
Level 2:THE TEMPLE OF FIRE (2 secrets)
1. Lava Pool Room
[SECRET ALERT!], remember. Immediately we enter level 2, we should be ready for a jump and catch, right at the bottom of the slope. We cannot get back up to this, and we may want to, as its the 5th secret area (the 1st of this level). As we go forward through the crawlspace we reach another slate-floored area with blue marbled walls. It isnt long before we trigger a fire sprite! Be aware that where each hit that Lara takes from this saps her energy a bit, an even greater danger is that when Laras health depletes sufficiently, she will burst into flames!! We can try to explore the new area with it chasing us, or we can seek a counter to it - which in this case is a pool of water to douse it.
To douse the sprite, find the lever over behind the pillar on the right side of the room. When we use this lever (if not too intimidated by the fire sprite!) we might hear a gate open. We can turn right, then first left from the lever and then follow the turning passage to find the relevant gate. The importance of the gate is that the sloping passage beyond it leads down to the small pool of water we need, in which we can quench the irksome sprite!! (The above CAN all be achieved with no health-loss [using sudden changes of direction to evade the sprite and curving runs to reach our objectives, such as the lever].
Now we can explore the secret area in peace. We can find a SMALL MEDIPAK by following the left hand walls from the entrance point. We next need to make our way to the largest central open area (obvious when we see it). Before heading left to cross a pit with flames in it. There is also some UZI CLIPS we can pick up at the opposite end of the central area from the flames pit. We can now tackle the flames pit and whatever lies beyond it. Doesnt the slope past the pit look just right for a boulder?! Oh, yes! (Perhaps the best way to avoid this one is to run and jump back over the flames pit, into which the boulder falls.) There is a swinging chain (which weve been hearing?) immediately beyond the 2nd flames pit to the right. To pass both chain and second flames pit, we can run and jump over the pit (actually using the low roof to help) as the chain is just reaching the end of its arc to the right. There are more UZI CLIPS along the chains passage to the right, and a crawlspace hole in the wall here, that we cannot get up into, shows that there is a 2nd chain on the other side of the hole, AND we can see a revolver beyond that, if we can reach it.
Going back to the 1st chain, we can time a move to the square to the right. The next square has a boulder ramp at the left, but there is a 3rd flames pit beyond that, so we need to veer to the right going past or come back to the square by the 1st chain, to let the boulder drop safely into the 4th flames pit. We can then jump to the side of the passage (or carefully run over the corners of the non-flames squares) where the 2nd chain swings, avoiding the 5th flames pit beyond. Then we can go left into the alcove for the REVOLVER (loaded with 6 rounds). Having done all this, we can then return, going along the side of the passage where the 2nd chain swings (there is nothing in the passage where the 2nd boulder came from). We then need to time a run and jump over the 2nd flames pit again, so we dont intercept the chain. Finally, we can make our way back (over to the right) to where we first entered this secret area, and drop down to where we would have been had we not jumped up at start of this level.
There is
some gentle wonder, marvel music as we enter quite a large chamber that has
a central area of undulating lava, with 2 water fountains. There is a closed
gate at the right (we can see a passage beyond with 3 openings off to the
left and one to the right) and a monkey swing bridge above - to cross the
lava? - but it is too high up to reach. There is a closed gate at the far
end of the upper level of the bridge (we can just see some water beyond that),
a star receptor in the far wall, with some closed gates next to it, and there
is also a high ledge above left with some more closed gates.
How to proceed? If we look more closely at the lava, we may notice a slight
depression to the right of the bridge and the right hand fountain. An accurate
run and jump from the side will enable us to reach what proves to be a water
channel - protecting us from the surrounding lava. The water-within-lava tunnels
that we can swim along beneath the lava pools surface reveal a closed trap
door in the roof at one point, just past a crawlspace opening at the right.
We can either come back to this opening or go forward to another opening into
the centre of the area, when we see that there is a passage down to a lower
level.
The lower level leads to an opening at the right (or forward to one of Georges trademark cul de sacs). The right hand passage leads to a lever. We are shown no picture as we use this (so a nearby action has taken place?), but we can then return to find that the trap door is now open, where we find a (very much needed!) air hole. As we hoist out of water, we can see a star attached to wall - but have no crowbar as yet. The passage beyond leads to a few steps up, when we find we are in the room we saw through that first gate, to the right of the Lava Pool Room. The gate itself (at the left here) doesnt open on approach, though.
Going around the room, we can see several high openings, walkways and ledges as we look round. Looking from the gate passage, there is a lever in the right hand most passage. [We can also see a short walkway and another closed gate high above the lever, here.] The central passage that runs off the gate passage has a closed wooden door some way off the ground in one wall, near one of the upper ledges, and if we look carefully, from far enough back, we can see that there is a lever above a different ledge at this same upper level that we cannot reach yet, either.
Looking again at the lower level, there is a 3rd lever, which we can use, in an alcove that is opposite the end of the right hand most passage. When we pull this lever we are shown a view of a block rising in the Lava Pool Room, that will now enable us to reach the monkey swing. We now just need to have the gate opened between here and there. When we pull the other lever, a raptor suddenly appears, and we can hear footsteps. (Though we cannot see the source of these, further investigation would reveal that there is a black thug on one of the higher ledges.) In addition, most importantly, the gate to the lava chamber rises on a timer. Take care of the raptor, and get ready to pull the lever again.
This is a tricky timed run, but not too difficult if you dont run into any walls. Immediately roll and sprint to the centre of the room, curving Lara to the left. Stop sprinting for a short second, just to angle Lara round to the right, and then sprint through the door. It is possible to kill the black thug at this stage, but not necessary, and perhaps not worth the loss of ammo.
A note here from George, the designer! Rjb said he could do this timed run no problem, even without shooting the raptor, so I changed the room slightly, to make things a little more challenging 8).
When we reach the monkey swing, via the raised block, we can use it now to cross the lava, where we can pick up the loaded UZI GUNS (with 30 rounds) at the far side. We can see a small water fountain past the lower gates here (by the star receptor) and a passage beyond that, but better still, we can see a most useful crowbar(!) to the left, at this side of the lava chamber - which we can use to get at that star on the wall back in the lava water passage.
We can run and jump into the lava water passage from this side of the lava pool also (so we dont need to go back on the monkey swing), then the opened trap door is quite close to the start of the water tunnels, such that we can soon prise the Fire Star off the wall. We can then go back up the passage to the room with the high ledges, levers and other passages etc, to see that the gate at the left is still open. (This means that the raptor, if not dealt with earlier, can attack! It may even join us in the Fire Star passage!) Dont go near the lever for the gate, or the gate will close, and you will have to do the timed run again. We can now go across the monkey swing for a 2nd time, then use the star in the receptor, when the double gates will open. In the passage beyond, we can then pass 2 dog statues and the small fountain and pool that we saw earlier. We come out into a wider passage there is a SMALL MEDIPAK on a pedestal at the left - where we can see a larger room, with another pool, ahead.
2. The Great Pool
[SECRET ALERT! (part I)] - that is, the secret that isnt far away is actually only the 1st part. We can find a certain item (soon), in order to set up or enable a (much) later secret to be found. If we dont take that particular action fairly soon, then you will have to come back to this area later.
We come to a much larger (& deeper!) pool, open to a beautiful, stormy sky, which is surrounded by pillars on the poolside, and there are many further pillars in the depths that need exploring. Apparently there is nothing to pickup and no crawlspaces to find - around the poolside pillars. Into the pool, then, at what we might call the first level down, there are 2 closed gates at the far side (think of all directions as being from the entrance passage to this area) that lead through to a large underwater room that seems to be a continuation of the pool. (Apparently there is nothing else amongst the numerous pillars at this level.)
At the 2nd level down, at the level of the wide plate or ledge at the base of the pillar in the centre of the pool (we need to start being careful of our depth below the surface from here on!), there is a hole to a deeper area still, also at the far side. There is also a lever in the back RH corner, tucked into an alcove, but again nothing else is apparent among the numerous pillars at this depth, either. The lever in the back corner opens a blue wooden door in a dry area, where we see slate floors and passages nearby - so this is not the wooden door that we already know about, the one that was high on a wall and out of reach in the Gate room, where we met the raptor. Puzzling! (nb. This just might[!] be preparing the ground for the 2nd secret in this level, to come later.) [We discover, in fact, that the hole at the far side of the 2nd level down merely leads to a shaft that goes down to the 3rd and lowest level of all in the pool.]
When we do go down to the bottom (3rd) level (it is now a LONG way up to the surface!) we find that at the LH side or narrower end of the wide plate there is a hole that goes even deeper, by the wall. This left hand hole leads further down still and goes along a tunnel that (fortunately) surfaces after not too long, up to a small room open to the sky above. (The really clever physicists among you will have noticed that the 2 water levels, in the great pool and in this small room, are not level with each other! George has an answer for this, which he calls: Paradigm no. 34 He hinted to me once that he likes to put in the occasional illogical bit, so that: ... Folks can call me names!!)
(Note added by said George: It states in the level editor manual, on page 39, and I quote: Real world physics dont apply to water in Laras world. Water will NOT try to seek an equal level. I would, therefore, respectively suggest to Mr Burgess that he have his wife remind him from time to time, that he is, in fact, while playing Tomb Raider levels at least, not in the real world, lol.)
We can hoist up to the top of the wall at the far end of the room, to see another lava lake below, which completely encircles the central stone structure on which were now standing. We can see heather on the hillsides all around and more of the remarkable sky. There are several darker squares amongst the lava below and we can see 2 levers by a wall to one side. The lava moat is too wide to jump across at any point, however. There is a music scroll on top of the stone structure that we can pick up (but not use as yet). We find that we can walk on all parts of the top of the structure, despite there being several sloping sections. But now we need to return to the great pool.
There are 2 other things still to find in the great pool: at the back right hand corner again, down at the 3rd level, there is a closed trapdoor, again in a (larger) alcove that is tucked away a bit; then finally there is a lever on the very base of the central pillar itself, below the wide plate. Before using this, though, it would be a good idea to go back to the surface (or to the music scroll structure, which is very close) to gulp in a full air supply! (Then perhaps SAVE just before pulling the lever.) This lever opens (only) the right hand gate of the pair of gates that we saw earlier, higher up at level 1 in the pool, but it is on a short timer!! (The swim from this lever to the opened gate is not easy for most mortals!)
From the lever, we need to turn left and swim precisely to (no further than) the edge of the plate, then curve up and around it, twisting in the water as necessary, so that we can clear both the plate and then the side ledge that juts out from the wall at the level above. We then need to twist round in the water again (trying to make our whole journey more or less a vertical climb), so that we have a clear run at the gate, all without running into one of the pillars en route. (If you can twist in, say, a clockwise direction over the plate and can then continue the twist in the same direction over the jutting out ledge, in order to end up more or less in line with the gate when youre horizontal again, then youve a good chance of making it!)
Once weve made it past the gate, well be very aware that we dont have a huge amount of air left! Fortunately there is an air hole in the far left corner of the room which is otherwise completely filled with water. There is a lever to either side of the entrance to this room, in an alcove in each case. There are 3 blue wooden doors at the far end of the room - not too far from the air hole - such that the left hand lever opens the left hand door and the right hand lever opens the central door. The right hand door is opened by a 3rd lever that is tucked away in a larger alcove at the far right of the room. Each of the wooden doors conceals a further lever. When these 3 levers are also pulled, then the trap door that is in the ceiling, behind the central pillar, drops open. (Not difficult, but made harder because of the air situation.) Please note that if you pull any of these levers inside the doors more than once, the trap door will not open until you pull that particular lever again!
When we swim up through the trap door, we reach another room open to the sky, with vases and pedestals and 2 openings at the right hand side. (Hear that wind blow!!) The left hand most vase sets off another fire sprite when you shoot it, so we wont break that next time! (The scrolls on the pedestals cannot be picked up.) The next vase round to the right has some normal SHOTGUN in it and there is a lever near this which opens the second gate below, allowing you to exit the area. The 3rd vase contains nothing. The left hand of the 2 openings at the right of the room has a (darkish) passage off to the left that leads to a music stand. If we place the music scroll on the stand, we hear some music and we are shown a trap door dropping down that has water all around it. (We know of a trap door with water all around it back in the main pool.)
If we go into the right of the 2 openings here, we come to a darker patch in the passage, where there is a (brief) crawlspace, which has an SMALL MEDIPAK on the ground beyond it. So when we return to the great pool, we can swim across it and down to the lowest level to reach the now opened trap door.
When we go through this, we find a curious low ceiling with many small alcoves all around. We need to make our way to the far right hand corner, where the opening becomes a tall passage that leads forward and up into another pool, where immediately we are shot at from above and to the right as we surface. Having hoisted out, as we go forward in the passage that leads off to the left of the pool room, we can hear a chain swinging and see one flames square to the left of the room that we come to. There is a drop down beyond the flames, but also an alcove to the left of it, to which we can jump, over the flames if were careful. We then see a very deep pit between the alcove and the passage ahead with the swinging chain.
We can run, jump and catch to one side or other of the chain, then when we hoist up, there is a great vibration and a boulder descends from ahead. We can cling from the edge to which we have just jumped (at one side) and the boulder will pass harmlessly overhead - or we can run forward into the side passage from the chain, which leads into another room. (We cannot climb up the boulders slope.) In this next room is one of the serpent structures (fire or fountain?) with a lever this time. The flame lights as we pull the lever, but much more importantly, a block rises within the lava lake where we found the music scroll that leads to the 2 wall-levers. We can now therefore retrace our steps: go past the chain (there is a 2nd boulder!!) and the pit, back to the pool room & swim down the tunnel, back as far as the trap door. We can then enter the great pool again, and swim right across the pool (at this lowest level) and into the tunnel that leads to the stone structure in the middle of the lava lake moat. We can then run and jump to the raised block and then to the bank (though beware of a sliding section).
3. The Great Hall - part I
When we pull both levers, we are shown that the double gates by the high ledge back the Lava Pool Room where we began this level, open and we can see water beyond them. We cannot return to the stone structure from the block in the lava moat, as the wall of the structure is too high. When we go around the lava pool (clockwise) from the levers (mind the slidy bit again!), we then come to another water channel at the 2nd corner we reach, exactly like the one in the original lava chamber. There is a trap door in the roof of the tunnel that leads from this corner. This trap door is now open (but not until both levers on the bank have been used), and when we go up through it we come into a completely new area, with many blocks, levels, ledges etc, and to the accompaniment of the same ethereal elvish? music (á la LotR?) that we heard when the flame by the torch went out in the (1st) Guardian level.
We need to jump up or hoist up to the wide block with the 2 dog statues. We can then quickly confirm that we cannot reach up to a higher level still at any point near the dog statue end of the room. As we progress to just past the lava pool, a black thug shoots down from above. There is an opening at the right that we can hoist up (or jump up) into - though it is within range of thug - partway along the room, in which there is a trap door and some FLARES. There is a lever at the far end of the room, in a darker side alcove, a fountain on the right and some closed double gates that lead through to another, apparently smaller continuation of large room.
(nb. Most of the jumps etc that are described in the rest of this section, from here on, are not particularly difficult, but the route to follow IS quite involved! Feel at liberty to take a rest and a deep breath every so often!)
First (or nothing will happen at all!) pull the lever. Neither the double gates nor the trap door are opened, but when we investigate, we can see that a black has raised back near the dog statues. We can now hoist to a higher ledge, then go forward make a running jump to the wide ledge by the side wall, above the trap door where we entered this huge room.
(Perhaps from this side ledge we will start to have an inkling as to just how many openings and other ledges there might be altogether in this Great Hall, for the room is very high and long! And just look at how marvellously the architect that George called in has put all these stone bricks together! Reminds you of the almost seamless building techniques of the Incas!)
We can run along the ledge to the left, then go through the double chicane passage at the left hand end. We come out above that separate side alcove area and can see the trap door below and ahead in the relative darkness. There are ledges to left and right ahead, and when we jump to and go along the right ledge, we see another opening on the left. (Before we make the jump across to the new opening, we can look back to see a closed gate on the level just higher up.) We can run, jump and catch the opposite ledge, or just run and jump if were exactly straight. A hint: though we dont need to do a run and jump in this spot, it is a useful technique to perfect, for there is a particularly tricky jump that will be coming up in level 3 at one point (where we just might be carrying something), where we cannot do a run, jump and catch, so a run and jump will be our only option.
When we jump to the opening we find a lever immediately to the right. When we use the lever, none of the gates we know about open, nor does the trap door, but we find that another block has been raised: on the mini-block that (hopefully!) we noticed near the 1st lever. (We can see this raised block if we turn round from the lever.)
Rather than drop to the floor from this point, when well (unnecessarily) lose a little energy, we need simply to go back to the long ledge we were on immediately before we reached this 2nd lever & then safety drop to the ground from there.
After going through the opening in the separate side alcove, when we reach the raised block and hoist up, we can then jump from it to another (small) opening. From here we can jump further forward and left, to a wider ledge next to the side wall of the room (ignoring the tiny ledge space to the right - this is another of Georges cul de sac red-herrings!). At the other end of this wider ledge (we are close to where the thug shot down at us, now) while facing along the ledge, run and jump diagonally forward and left to a smaller, darker ledge (there is a paler section of wall just above and beyond where were aiming). [It is poss. from here to reach, with a tricky run and jump diagonally, back left again, the actual small ledge where the thug was standing, but there is nothing there to pick up and nowhere else to go from that ledge.]
We next want to go left & forward, to the slightly longer ledge ahead, and climb onto the block with the face, where we see a much longer ledge ahead of us. (We have been hearing footsteps [of another gunman?] for a bit.) Going forward again, we can see to the right of this ledge the wide top to the structure that was above the lava pool with the fountain, that we saw at the beginning in this room. (Before the easy jump to that, looking to the left and high up, directly above the roof for the lava pool, we can see a vase on another very wide ledge, and perhaps we can also see what might be the very top part of a ladder.) [From this roof structure, we now overlook the part of the room where we began the climbing part of this adventure.]
Turning right, we can see the next obvious part of the journey. We can stand and jump (with cling to avoid head-banging!) into the gap, then do another standing jump to the top of the pillar beyond. And it is at this point that we can go wrong, firstly because there are several small platforms and ledges hereabouts that are decoys really, to the intended route, that lead nowhere, even though we might perform some splendid run and jumps to reach them!! Another reason for going wrong, though, is that we might unintentionally cut out a rather important (fairly short) bit of the journey, by jumping (both literally & figuratively!) ahead to the bit that comes after the apparently needless side excursion.
The next wanted bit, now, is to go left to the next pillar top along the side wall (a run, jump and catch from the top of the present pillar will do it). Turning left again, we can reach either of the nearest cut outs in the pillar that juts out from the end wall, here (note that this pillar has 5 such cut outs from bottom to top, altogether!). The upper one of the 2 that we can reach (with a jump and catch has nothing to pick up (& there is nowhere else to go), whereas the lower one has a lever! Guess where were going?! A simple standing jump with cling to the left, down slightly, will reach the lower opening, with our 3rd lever. This time, as it is a little further away, we are shown that this lever raises the gate that we hopefully spotted (!!!) when we looked back near the 2nd lever.
This time we do not want to make our way back to the ground, though, to try and reach that gate. (We couldnt anyway, if we think about it.) Instead, we want to backtrack very slightly, firstly to the pillar-top weve just come from, then run, jump and catch along the side wall to the previous pillar-top. From here, (and we could have done this earlier, so think how easily we might have missed that 3rd lever!) we want to jump and catch up to the right, to the edge of the opening directly above the one we came from, when we came from the roof above the lava pool (if we can remember that far back, lol!). At the far side of this opening, we can see to the right a curious end cut-out in another wall section, a pillar-top with a circle emblem and the H-shaped lava pool roof just below, now.
Note: at this point, that for the next 3 or 4 jumps, there is a black thug who is within range up on the wide ledge just above - the ledge with the ladder at the far side that we can see a bit more clearly now. The jump to the cut-out is not as difficult as it might look: just take a run and jump diagonally right from the current opening and up (a bit of right curve will help). From the cut out, we need to make a run and jump to the free-standing pillar with the circle emblem. We can now (thug permitting!) have a good look at that ladder - note the little bit of ladder round to the right just at the top, that we couldnt see earlier.
(Just think: were about halfway up the room, now; what a shame that well soon be descending to the floor again!! Though without doing so, we wouldnt be able to reach the roof, our ultimate destination in this Great Hall.) From the circle pillar-top, we next need to turn back so Lara is parallel to the end wall (if weve been gazing at the ladder). The next jump may look difficult, as were going to run and jump diagonally right and down a little, to reach the opening we can see by the end wall. (If we look down, we can see the 1st raised block and the 1st ledge we hoisted up into from that, below.) [A problem occurs if were aiming for the wrong (almost identical-looking) opening that IS too far away!] Once weve reached the opening - directly above the 1st opening we hoisted up into, remember - we can (as then) run and jump to the long ledge by the side wall of the room, go left and along it, and then into and along the chicane passage we find there - all exactly the same as when we were just one level lower down (aeons ago!).
A problem occurs if the gate we now come to has not been raised, because we didnt pull the relevant lever! Oops! If this is the case, we first need to backtrack to find out which lever were talking about. If we go back through the chicane passage to the long wall-side ledge and run and jump back to the opening next to the end wall of the Great Hall, then George has made it so that we can actually see from this point the lever that we should have pulled: with our binocs (& focusing), if we look along the end wall and down a bit, there is an opening at the other side of the room with a lever at the right hand side of the opening. (Thats the one!) Unfortunately, we cannot run and jump back to circle pillar from here as its too far away. (We could jump from there because it was higher up. It is also too high to drop from here.) We CAN continue, however, by doing a careful run and jump (with cling) to the 1st level wall-side ledge. From there we can make our to the block raised by the 2nd lever and re-do the above.
From by the gate, we can standing jump sharp left first, then hoist up for some UZI CLIPS. Dropping down, we can then do a run and jump to the darker long ledge that was to the right of the raised gate as we came out of it. We are above the separated side alcove again, and directly above the earlier ledge from which we jumped to the opening in the left hand wall that had the 2nd lever. Were now going to repeat that, one level higher up. A run, jump and catch (or a running jump if very precise) brings us to another opening in the wall and a 4th lever which opens the trap door below. Were a long way up here though, but we can get to the ground fairly quickly without any health loss by first doing a standing jump back to the long ledge that we have most recently left; then turning and repeating that (with a cling to avoid the dreaded head-banging) back to the 2nd lever ledge; then repeating that again to the lower side ledge (when the cling shouldnt be necessary). From this ledge, we are now low enough to safety drop to the ground. We can then go left to the open TD.
4. An Interlude Below
As we go through the opened trap door we hear wary music. (For what reason might that be, George?! Well, I dont know for sure, Mr Burgess, replied George, we had better go look, hadnt we! Woo, its dark down here.) The area is considerably darker than that above, so now we see why the flares were placed just so! There are several unlit bowl flame torches on the wall, blocks to jump to and ledges, below. (Binocs [with the light feature] can be very useful in such a situation.) We can use the blocks to help us reach the floor below. (Note, though, that the very 1st run and jump continuing in the same direction as that when we first entered the trap door - can be tricky because of the low roof.) Two run and jumps, including the first, followed by 3 careful standing jumps back the other way (from the edge of the previous platform in each case), followed by a safety drop to the ground, will avoid any health loss. Then we see an unlit wooden torch on floor. (nb. We may carry a torch or a flare, but not both.)
We are clearly at one end of an underground area of some kind, and as we go forward, we pass a dog statue on the right, before the passage chicanes right and left and then right again. We reach a closed gate on the right (and we can see a lever beyond it), then we come to a small fountain (hint: remember this fountain pool and where it is situated!), across from an obvious raising block in the down position. (The contrasting floor decor, eg, gives it away - nb. this is not accidental!)
We see also a ledge opening above, and that this raising block might reach it, noting that if we are to take the torch back to the surface (always trying to think strategically, as to what might be a next step or so), then some of the blocks we have passed are too high & this would help - so might the lever raise the block?) [nb. We might be hearing a distant raptor at this point!] As we go past the block, we come to a junction where we can see 2 passages of about the same length, left and straight on. The left hand passage has a nearby dog statue in it and at the end of the forward passage we can see a closed gate.
The forward passage has some SHOTGUN SHELL to pick up, 2 more dog statues and the first (and only) wall flame that is alight. (So at last we can light the torch, and for the moment, use it as a substitute flare that wont go out - unless we foolishly douse it in some water!) Going further, we can see that beyond the closed gate is a cave-like room, where a raptor patrols. (Can we hear the sound of 2 raptors, in fact?!) We find that the heads of the nearby dog statues here - the 2 by the wall flame and the one in the left hand passage - can all be set alight, so we have 3 more doggie candles.
We now have a choice of 2 different courses of action. It makes little difference which we choose first, so my suggestion is to set up and prepare the way for the more involved piece of action by doing the simpler thing first. To continue, then, we should initially go back to near the fountain pool, and drop the lighted torch on the ground near to the block (and definitely making sure that it doesnt slide into the pool!!!!). Next, we want to go along the left hand passage, past the doggie candle, to the end. We can hoist up here, on the right. (Note that it is too high to take the torch this way, even should we wish to do so.) The raptor we heard earlier - not the caged one, so there ARE 2! - rushes towards us. After passing him (however we choose to deal with raptors!) we find a passage ahead not dissimilar from that below. Passing several empty alcoves, we can turn right into a longer passage, and then near the end of this, at the right, there is a hole down almost immediately. Looking down, we can see one of the lower passages that weve been in recently (we could check - by jumping down! - that it is nearly above the 2 doggie candles). Jumping over the hole and going forward, there is an opening to the left (see next paragraph) and then a 2nd hole in the floor. Looking down through this, we should see the torch (placed just so for this very reason!) and also the block directly below.
Through the opening is a large room, where we can see 2 of Georges trademark T-Rex heads on the far wall and we might just spot an unlit wall bowl between them, beyond the central pillar. As we go further forward into this room no less than 3 fire sprites appear! (nb. We cannot go forward here just a little, in the hope that therell only be one at a time!) We need to turn back quickly, run out into the passage again and turn left, in order to drop down the block hole, so as to be near the fountain pool (and now the placement of the torch, showing the way, becomes doubly helpful). We then need to race over to the pool and jump up and down several times (unfortunately, we cannot crouch down in the pool) until the 3 sprites are successfully quenched.
This means that the route to the upper room is now free of baddies, so we can begin the more involved part of this section of our quest. (Weve just completed the simpler part!!) It may seem that we cannot proceed, but that is because weve forgotten, perhaps, the 1st dog statue that we ran into down here. We can now go back and light that earlier dogs head - though NOT the unlit wall bowl where we first jumped down to ground level (it seems to be too high up). Suddenly we find that a raptor has crept up to us (if raptors can creep)! We have unwittingly raised the gate at the end of the passage, releasing the lower raptor. (Note: all 4 dog statue heads need to be alight before the raptors gate opens, though the order of lighting is immaterial.)
When we have
dealt with this new raptor threat, we can pick up the torch again and go along
to the raptors dark cave. Using the torch to help us see, we can quickly
deduce that a raptor didnt make this cave itself!! There are 3 free-standing
pillars and a wide ledge on the right side of the cave. We can see another
dog statue on the ground and what might be the head of another above the ledge.
We cannot hoist up anywhere, though, with or without the torch, until we make
another doggie candle.
As we do this, a block raises at the left hand end of the cave, near 2 of
the pillars. We can jump with the torch on to this and then we can
jump up further, to the lowest (& nearest) of the pillars. As we make
this 2nd jump, a skeletor also arises, over on the ledge. (If were not careful
at this point, while were debating what to do, well find that as we jump
to the next pillar, the skeletor has already pre-empted us and has
actually jumped from the ledge to the 3rd pillar and then to the 2nd, on which
our heroine is standing, when it proceeds to knock her to the ground!!)
We can, in fact, with a more co-ordinated strategy, avoid the skeletor altogether. (This may take a little practice, so you might want to just zap the skeletor as it jumps from 1 pillar to another, anyway!) If we jump to the 2nd pillar (more quickly than before!) and then to the 3rd, well find that the wide ledge is then within range. If we time our jump from the 2nd pillar to the 3rd, or from the 3rd pillar to the wide ledge, just when the skeletor is jumping the other way, then we can effectively jump past him. Easier though, to give him a barrel full of lead from the shotgun, and delight as he crumples in a shower of dust on the ground below.
We need to do 2 things only on the wide ledge: light the dog statues head here also (which well find opens the gate to the lever on the lower level) and then, after throwing the torch down to the ground, to pick up again when were off the ledge, pick up the FLARES on the right. We can then run off the ledge without harm (not jump), and from then on we can ignore the skeletors antics entirely, if we were so nice as to leave him creeping around.
We can now go to the lever and use it, when well find that the block outside does rise up, but right to the top of the hole above! Odd. What use is that? We might then realise that this means that we are apparently stuck. Clearly we need to light that wall bowl in the T-Rex room, but how can we get the torch up there?
For Georges most elegant solution, look down a few lines, but consider first: if we had a pressure pad at a high level in a room, onto which we wanted to place a heavy weight, & there was a Mars globe, say, nearby, at a lower level, what might we use to raise that globe to the level of the pressure pad? So, the solution: go back to the lever that raises the block and use it again to lower the block to the ground. Place a certain lighted item onto the flat block and then step away and light the blue touch paper - no, not really! Pull the lever for a 3rd time and very soon that lighted item will be elsewhere!
Now, we need to go back along the passage and hoist up to the higher level and go along to the passage where the block has risen and, if we placed the torch correctly, we can now pick it up and take it into the T-Rex room. When we light the wall bowl, well see a cut scene of the double gates in the Great Hall above, opening. Hurrah!!
(The really adventurous might think that they could raise the torch to the higher level, then dodge the 3 unquenched fire sprites in order to quickly light the wall bowl, then race away to the pool below. But with 3 fire sprites, I almost guarantee a Lara-roasting will be your only reward! But do have a go, O adventurer, by all means!)
If we now go back down to ground level, we can go right along the lower passage, to reach the place where we first dropped down from above, just past the 1st doggie candle. Well find that George (the considerate, wonderful man that he is, ever thinking about the gaming experience of the level players. Yes, hes so wonderful, you should all send him a thank you card to let him know.) has lit the wall bowls here for us (that we couldnt light earlier), to light our way, as a confirmation that were ready to make the great ascent back up to the daylight - well, to the Great Hall.
Hoisting up to the very first block is a little tricky: it needs that odd action and up [only] move (rather than trying to JUMP up, which doesnt work). We also need to be standing slightly away from the lighted wall bowl wall when we do the action/up move. (Note that this means that we cannot carry the torch back up to the Great Hall.) From there it is a fairly straightforward sequence of run and jumps, with the occasional run, jump and catch or standing jump, to reach all the way up to the trap door again.
Once up through the trap door, into what we have called the separate side alcove, we can then go through the opening at the right, back into the main hall, before turning right again, towards the opened double gates.
5. The Great Hall - part II
When we go through the gates, we can see some very tall pillars and many ledges above. A black thug shoots down from a ledge some distance higher up. We cannot reach any of ledges as things stand, but then we see a lever at the back of one of the right pillars. This lever raises a block next to the adjacent stepped pillar, where we are quite within range of the thug! From the block, we can run, jump and catch to the narrow ledge opposite, directly below where the thug stands (or stood!). We see that there are 3 more of these narrow ledges above the first and that the stepped pillar rises to a great height also.
As we reach this ledge and hoist up, another block rises opposite, to which we can also run, jump and catch. When we hoist up here, we can then jump back to the thugs ledge itself. This time, the run and jump is beneficial, as there is a 2nd thug, a couple of ledges further up still, on the opposite side of the hall from the first one. He also shoots down (of course!!), so the run and jump allows Lara to be targeted for a shorter time. There is far less cover this time, so we need to deal with this thug quickly!
In the meantime, a third block has risen on the stepped pillar, enabling the climbing to continue. With another run and jump we can reach this, then with another run and jump we can reach the third narrow ledge. The procedure continues, with a 4th block rising, all on the same side of the room. (En route, when we reach their respective platforms, we also discover that neither thug dropped anything.) Our objective would seem to be a wide ledge (where we can see a vase), more or less directly above the double gates where we entered. (At last were nearer the ceiling now than the ground.) We can run and jump to this wide ledge from the uppermost platform on either side, or reach it with a run, jump and catch from the 4th block (in which case, we dont need to go to the very top of this unusual ladder).
When we reach the ledge some achievement music plays, suggesting, encouragingly, that weve made significant progress in our great journey. The first vase contains nothing, but the vase at the far side of the ledge holds a LARGE MEDIPAK. There is a shallow fountain pool at the right and a dog statue whose head we cannot light (having no torch way up here!). When we go to the far side of the ledge and look over, we can see to the left and below a little, the two levers we used somewhat earlier. We might also pause for a moment to realise that we have achieved something of significance so far, after all! When we look round, there are many high ledges, but few that we might try to reach from here. The question, really, is which should we be aiming for?
(From this point on, the route to take is a little difficult to find on your own in places - as a number of forum members have testified!! and a few of the jumps are quite tricky, so .... let us bravely continue!) George has a little chuckle to himself at this point 8)
At first, it seems as though none of the possible destination ledges is within reach! Then we discover that we can make quite a tricky run and jump, curving round the wall that juts out from the ledge at the right, to the highest and furthest-right opening that we can see from the wide ledge. A direct, straight line run and jump seems to be too far, but if we curve round to the right, missing the wall by a mere whisker, then the distance appears to be a little less. (nb. We mustnt so much as brush the wall edge with Laras arm, or she will be nudged too far to the left. MANY tries may be necessary!!)
It is not obvious where to head for next, though, either. If we turn back left from the opening where we land, then there is a two square cut out, but it isnt obvious that we can reach it. (It also seems as though we would be losing too much height if we went down that way.) Looking past the ledge that weve landed on, there is a pillar top somewhat lower down, but that also seems to defeat the object of being up at this height and havent we been there already? (Or is that a similar pillar to one weve been on before?)
In fact, we find that we can reach the cut out, by 2 different routes: one by way of the pillar-top and the other by jumping there directly. If a direct standing jump, down and towards the cut-out, aiming slightly left of it and then curving right INTO the cut out, as it were, activating cling also, doesnt seem to work, then we can use the slightly longer route. The other way is to jump down to the pillar-top (or, as it is so low down, we can actually run directly off the higher ledge); then turn back and jump down again (a standing jump with cling) to the opening in the wall directly below where we were a moment ago; then do a run and jump diagonally up and to the right, to land in the cut out. And the curious thing is that the 2 routes end up with Lara standing on virtually the identical spot in the cut out, almost on its nearest corner to the higher ledge weve just left.
(It is good to have 2 possible routes, as it was good to be able to reach the wide ledge above from 3 different places on the raising block step-up ladder. Note also that we are now at the same level as the higher of the 2 levers we used when we traversed the 1st part of this hall. And we might recognise other bits of part I of our Great Hall journey if we look around. This is useful because we can eliminate certain potential destinations from our itinerary, as they would all have been included in part I.) So what next?
Standing at the edge of this cut out and looking along it and to the right, we can see a single, darkened alcove with a face on the right, and another opening just down and to the right from it. We can fairly easily run and jump to the lower opening - we just need to be careful that Lara doesnt bang her head as we jump. (It is possible to reach the upper opening directly, also.) We then need to reach (with a standing jump or drop down) the lower ledge that is sandwiched between 2 circle emblems. (If youre exceedingly dextrous you can reach this lower ledge directly from the cut out, also, by jumping straight to the left or right of the intervening pillar and round it, curving round appropriately, to land on this ledge - but perhaps well leave that to the experts!)
From here we can go along the ledge to where the lava pools H-shaped roof is a little below. At this point, we want to jump diagonally up and to the right, to a place where it seems that a very tall pillar has had a chunk taken out of it, nearer the top than the bottom. But where to now? The wide ledge that were obviously trying to reach is still just too far away and there seems to be nothing else available. More than one forum member was stuck at this point and George confessed to a chuckle or two! The solution is so simple that we clever TR players can easily miss it! We forget that because most things have been nice and bright in this room, it doesnt follow that everything has to be! Then the penny drops and we turn to the right, to look towards the side wall and this is especially dramatic if we use the light function on the binocs at this point. There in a dark spot by the wall, needing only a simple run and jump, is our next ledge!
From here we can turn and hoist up to a long ledge. Then we can go along this ledge and run and jump across to the right, to the wide ledge weve been aiming for. This will have one, none or 2 vases on it - depending on how many of our gunshots caught them as we were trying to dispense with an earlier black thugs services. (There is probably none left if we used an explosive crossbow bolt! - this is the thug who shot down at Lara when she was on an earlier cut out or the free-standing pillar with the circle emblem, during part I.) [nb. This thinking back should help us to orientate ourselves accurately.] It seems that this thug dropped nothing, but one of the vases, if any remain(!), contains normal SHOTGUN SHELLS.
From this ledge, we can see numerous other ledges that we havent visited yet and that ladder looks inviting, doesnt it?! If we go up the ladder, then we can climb round to the right at the top, and then go along the high ledge there. If we then run and jump to the lower ledge by the wall and go to the far end, we can see a crawlspace opening above, but we cannot reach it. If, instead, we first of all go in exactly the opposite direction from the ladder, into the opening at the far right side of the wide ledge, then perhaps we can just make out the (almost camouflaged) block, directly ahead of us, that is jutting out from the wall. We can standing jump to this, then turn and jump and catch up to the edge of the opening directly above where we have just been. (This has now become a fairly familiar move.)
Going to the other side of this opening, we can look to the right and see a difficult diagonal run and jump that we might think we could make (maybe!) to another wall opening. It IS possible to reach this, and then a further ledge beyond that, BUT (fortunately, perhaps?) this is one of Georges decoy bits, as the 2nd jump (to the end wall) then leaves us with nowhere else to go! Instead, at this opening, we find that we can do a careful standing jump or running jump diagonally to the left, then turn left again, towards the long ledge by the wall and do a long run, jump and catch to reach it, even though it might seem too far away.
We can then reach the lever that is hidden behind the pillar to the right, and when we use that, we see a block being raised on the other long ledge that we reached via the ladder, below the crawlspace. We can run and jump from the long ledge were on, back to the wide ledge below, but it is better to run, jump and catch back to the pillar first and then safety drop down from there. Then we can use the ladder, first to reach the ledge by the top of the ladder, and then the long ledge that now has the raised block.
6. Nearing the Lake Itself !
We can now reach the crawlspace and go along to where a wooden door opens and then closes behind immediately, with some danger music to boot. We have come into a room with a small lava pool, and with 2 raptors coming round the pool to greet Lara as she enters! There is a closed gate at the far side, with a Fire Star-type receptor next to it and when we look through, we can see that it is the same closed gate that we saw right at the beginning of this level (from the other side), that lies at the end of the top of the bridge of the very first lava chamber we came to. (If you left a raptor in there, youll see that as well!)
[SECRET ALERT! (part II)] [Remember, a long time ago, (in a galaxy far, far away - oh, no, wrong story!) when we pulled a water lever that opened a blue wooden door? Well, very soon .... !] As we continue round the lava pool room, we find the exit at the far corner, leading to a slate-floored, blue marbled passage. Immediately past the exit there is a T-junction, leading right and forward, or left. Taking the right branch, we soon reach another junction, where forward leads to a continuation of the marbled passage and right takes us onto a ledge that is at the higher level (that we couldnt reach earlier) in the room where we met our 1st raptor of this level - the first, much smaller, hall of pillars. We can see the high lever we saw before, directly ahead, across a gap, and if we left that raptor alive, we can hear him stomping about on the floor below and we can also hear the footsteps of the black thug(?) that we vaguely heard when we were in this room before.
If we leave this room just for the moment and go back out into the blue marbled passage, and then go along the corridor, we find that it continues round to the left and, passing a doorway (on the left also), it actually comes right back to the lava pool room exit - the passage makes a complete loop, in other words. Going back to that doorway, we come to a wooden door that is open. Aha!! Why is it open, then? Can we not guess?! Inside is the 6th secret area (the 2nd of this level). We find a LARGE MEDIPAK on a step at the right and some revolver rounds further on, at the back of the door that we opened.
After this short interlude, we can now return to the hall of pillars room, to that high ledge bridge that juts out into the room where we can see the lever across a gap. As we go forward, intending to jump to the lever ledge, perhaps, the thug (that we may have all but forgotten about) shoots from the left; and hell do so as we try to cross to the lever. The lever opens the very near wooden door that weve also seen before, but it is on a very short timer - so do we want to go that way yet? If we do succeed in getting through the door (the thug will shoot as we jump across, if we havent dealt with him yet), then we find an SMALL MEDIPAK on the floor (and the door will have closed behind us already).
We find that we cannot reach up to the higher ledge here, so its not easy to see what we have to do next. However, if we look round the corner to the left, we can see our next destination. (If we go down to the ground level to look round a bit more, then well find that George has gratifyingly put in place a raising block, near the point where we came in, so that we can easily return up to this level.) Have you spotted it yet?! Look to the left, from the ledge past the wooden door, and up a bit, and see that it is not a continuation of the wall decor just there, but a block that we can jump up on. When we do so, we can hoist up, then turn round and run and jump to that ledge at the higher level still, that we couldnt reach a moment ago.
We now have a few tricky(ish) jumps to do: first, we must run and jump forward, round the far right corner a little, to the platform there, then turn right and repeat this manoeuvre exactly, though there is less of the destination platform to see this time. (We can see the wooden door lever below and forward from here.) There is also a platform to the left - it was this platform from which the thug shot down at us. (So unreasonably, too! - what harm were we doing him, after all, I ask you?!!) Now we need to make a ticklish little jump, either a careful standing jump or a run and jump with cling diagonally left to the thugs platform.
We can now see a closed gate ahead (that we probably knew nothing about because of its position - though we could have seen it from the ground if wed looked carefully in exactly the right direction). We need here to run and jump diagonally left to the platform in front of the gate. (Not a standing jump and not a run, jump and catch - this jump is made more difficult by the roof section just above.) [If we hear a gate drop at this point, it will be the one that leads through to the first lava chamber from this room at ground level.] The gate here doesnt open but we can see through it another blue marbled passage ahead.
Turning round to the right again, we next have another of those run and jump round the far corner kind of jumps. Its not too difficult, but we must avoid hitting the corner itself, as its quite a long way down at this point! When youve done it, SAVE here!! [nb. Some will find this next jump very difficult. To that end, the rest of this paragraph and the next two (!) have notes about the jump. If you are one of those remarkably skilled people who can do this jump first time, then youll be able to miss all that out!] Pull the lever to open the nearby gate - the easy bit - but then quake in your boots as you realise that its on a short timer!! (This is not as straightforward as the timed lever below, with the blue wooden door! - perhaps you didnt think that was so easy, either!) We have to pull this lever, then roll, then perform a curving left run and jump from this platform to the gate AND get through the gate, all before it drops!
Provided we get a good jump in and succeed in turning left at the start of it, the jump is actually easier than it looks, because on this (rare) occasion, we can actually use the RH wall that were passing during the jump, to nudge Lara onto the very platform that were after. But you do have to leave your self-congratulations to a moment later and make sure you turn right and get through the gate also! The gate re-opens and stays open when (lets be positive!) we DO make it and go forward a bit.
[Another important note on the jump itself: if you roll and then run straight off the platform, then you will find that the lever (notionally) digs into Laras back and has pushed her forward a bit, so that she is too far forward to avoid, if trying to run and jump, falling off the platform, rather than jumping! It is very important, therefore, to make the run away from the lever a diagonal left run, so as to give her a smidgeon more platform to run along.]
(At his point George butts in and makes the point that he added a full TWO seconds to the timed door, to make this a little easier. Yes, it can be done with a full two seconds less on the timer!! Isnt he a nice guy.)
Once we are beyond the gate, well find that the room is very similar to one a couple of levels down: the openings are almost all tiny alcoves, and the slate floor passage is, in fact, a circular one that eventually brings us back to the opened gate. The one opening that is different (reached slightly more quickly if we take the left path) leads into a small, blue marbled room with a block and a FIRE STAR attached to the wall. When we get onto the block, to crowbar this the Fire Star off the wall, we hear real achievement music (though not for very long).
From the blue room, we can return along one of the passages to the gate, then we can EITHER drop to the floor (with the loss of more than half our health!) and make our way to the block, then up to the ledge opposite the lever and out to the lava pool room, where we can use our Fire Star; OR (more sensible, methinks, though it doesnt really matter as were at the end of the level) we can make the tricky run and jump to the very close thugs platform, then run and jump diagonally right to the high platform we left earlier, and then simply drop to the longer ledge below and so out and left, to the lava pool room as above.
When we put the Fire Star into the receptor, the gate opens and we can run along on top of the bridge that we first used as a monkey swing some time ago now. (nb. Looking down from this bridge to the left, we can see how much easier it is, from this height, to see the water tunnel that is within the lava pool, that was quite tricky to see from the pool side.) We can now run, jump and catch to the right, across to the ledge that is in front of the side gates (that were opened by the 2dragon levers next to the outside lava lake). In front of us we can see a deep pool. If we jump or dive down into this, then we come to a wide, long horizontal tunnel, and it is this tunnel that marks the end of level 2! As we swim further forward, the loading screen takes over, and we enter level 3, The Lake of Fire itself.
Level 3: THE LAKE OF FIRE (2 secrets)
1. Lava Pools and Valleys
The current takes us forward, then up a shaft similar to that which we descended right at the end of level two. We hear tension, apprehension, wonder, music as we rise from the shaft, out of the water. This seems fitting when we look round at the undulating, dangerous looking lava and the surrounding black basalt lava banks of rock. The lava pool here has a great roof above it, supported by a number of pillars.
There are openings in the stone walls to elsewhere at the near left and at the far left. When we go through the nearer opening, we see what looks like a long flight of steps down and some closed gates on the right. The same black basalt banks and high stone walls that are by the lava pool surround this area also. Through the gates we can see a fountain, above what we presume to be water below, though this is actually out of sight. To the right and left there are small alcoves.
A black thug hidden up on the walls may take a sneaky shot at you while you wander round the area, so be wary.
The steps down are the only other avenue to explore in this area: E many shallow steps down here and we reach a wide closed gate at the bottom, with a Fire Star receptor (which we can identify now) at the left. Through the gate, we can see four dog statues, a T-rex head on the far wall, alcoves or passages to right and left, a monkey swing in one place on the ceiling, and what looks very like an unlit torch on the ground near the T-rex head.
[SECRET ALERT! (part I) - that is, as in level 2, the secret that isnt far away is actually only the 1st part. If we dont take a particular action fairly soon, then a later secret may not be accessible - after a certain point. Sorry to be so enigmatic, but if I say more, itll give something away too early, and George wouldnt want that!]
If we return up the steps and go to the lava pool where we surfaced, we can turn left and go towards the far opening. This leads to the rather intimidating Lake of Fire, with several grassy islands dotted about its surface, the largest of which is patrolled by yet another predatory raptor (also intimidating, perhaps, in the circumstances?).
There is a path we can go along on the left, though it soon shelves down into the lava. At this point, we need to do a long run and jump to reach the nearest small island. From here, we can fairly easily run and jump to the grey stone path, further along at the left. We can then jump across to the back section of stone path, to nearly beneath the T-rex head (so thats at least one in each level!), the two burning wall flames and the gem receptor, that are all fixed to this back wall. This stone path runs all the way along the back wall area, but part of it is of the sliding kind and the lava is unforgiving!
At the far end of the path, we can easily jump to the 2nd small island - a good place to shoot at the raptor if we wish. If we now remember those places in earlier lava pools where it was possible to jump into a water channel, then we might find just a such a place nearby at this point! Not at all obvious, nor even visible from further away, if we look from the 2nd island towards the central island - what we might call, to preserve the sense of daring exploration that were doing, Raptor Island! and then turn to look downwards over the side, then what can we see?!
When we jump into the lava-cum-water (somewhere!! - you find it!!), then we discover a small vertical shaft that goes down to a horizontal one, at the end of which is a lever. Now what might this do? When we pull the lever, we see a gate open that we dont recognise, leading into (or out from, for all we know) a room with another lava pool, with more of that curious red water pouring from a fountain over it! (At least this will help us to recognise the room when we DO find it.) It is an easy matter to return to the 2nd island and hoist up onto it (DONT hoist up into the lava itself!!!), though we might discover that if we want another look at the room, we can go to the lever again, and though it wont work a 2nd time, we ARE shown the view once more. (Could this be secret 7, part I, perhaps?!!)
From the 2nd small island, we can jump to Raptor Island and then run (if the raptor is still part of the scenery) to the other side and jump to the 3rd smaller island (a bit larger than the 2nd. By the way, this is the location that George used to take the photograph for the pre-loading screen for the whole game.) From the 3rd island, it is a simple jump over the remaining lava to another stone path, lined with the by-now-familiar black basalt walls. (Note that the area were just leaving is level 3s loading screen picture.) The path leads forward to a wide, grassy valley (also surrounded by basalt walls), going off into the distance at the left. As we enter the valley, what we have called LotR-type music plays, suggesting an interesting journey of discovery continuing. (Does this apparently empty space bring to your mind also any large, space-filling items?!)
There are some closed gates over on the right, part way along the valley, with a receptor of some kind next to them. Through the gates we can see: a Shotgun, SG shells, an LMP and round the right corner just a small hint of something unusual on the wall.
There is a bit more to do in The Valley, but let us first go further along it to the left and then through the wide opening that appears there. As we go into this new area a raptor comes around the corner. We can see that the grassy theme continues and also the basalt rock, above surrounding stone walls. Over to the left is a shallow pool with some normal SHOTGUN SHELLS at the left hand end, and we can see some closed gates ahead, along a narrow defile between more basalt walls. Past the gates we can just see (with binocs) the beginnings of another area beyond the defile.
We can now turn back to The Valley. If we turn left a little as we exit from the area where we met the raptor and stand roughly between the fern at the left and the NEAREST palm tree (what directions, eh?) and then turn round, we should just be able to discern a dark hole in the upper part of basalt rock wall right in the corner - a cave, even. To save you the trouble of trying to find out where we can hoist up to the wall, in order to reach this: turn round again, and look towards the palm tree that is nearest to the wall where we found the double gates. (It is almost a straight line from the fern, through the 1st palm tree, to the 2nd. George has even managed to hire a gardener to plant his trees just where he wants them!) Yes, alas, almost that far away!!
When we go near to the 2nd palm tree, we should see a small tongue of basalt that has escaped from the wall and run onto the grass. THIS is the spot!! We know weve found the right place when we hoist up and see SHOTGUN SHELLS that George has put there as a sort of confirmatory marker. After picking up the ammo, we can run along the top of the wall to the left for a (short!) distance - (you ran tooooo far, didnt you!!) until we reach a spot where we have to jump forward and right. From near there, we can jump forward again (and left run and jump, or standing jump) to the outcrop almost at the corner.
Now, if were really clever, we can confirm our ultimate destination by using our binocs at this point (with focusing), to look right along the next wall section, into the mouth of the cave, where we can see some flares - perhaps for the darkness beyond? Can we shimmy that far? First, take a leap of faith - well, a long run and jump - from the corner outcrop, to as far as you can reach along that sloping basalt edge. Then we can slide down to catch the edge itself and shimmy left some distance. We should find that at some point we can hoist up to a small stable area, where further shimmying is not possible. We can then run and jump over the unshimmyable bit (George thinks this isnt a proper English word!! - I told him that bit is quite acceptable!!), to another stable part, where we can either run and jump a second time, directly to the front of the cave mouth, or we can shimmy a bit more, then round the corner and hoist up to the new stable area. (*Of course, chuckles George, there was no black Thug inside the cave entrance in the beta test level, so the rest of you will just have to try and deal with him without falling back into the valley, heh heh.*)
Aha! There is a lever at the far end of the dark passage (after weve picked up the FLARES). When we use the lever, we are shown a nice cut scene, complete with water sounds, of some double gates opening. Hopefully, well recognise these as the gates way back in the first area we really explored, near that long flight of steps. The water sounds would seem to confirm that the fountain does drop onto some water below (that we couldnt see, remember) - or they may just be the sounds of the fountain. (We can operate this lever again [ad infinitum!], if we wish to remind ourselves of what the gates look like - we are given the elegant camera shot each time.) Whatever the case, this is our only open route at the moment, so we need to return to the lava lake, negotiate Raptor Island and the other islands (without falling into the red stuff!! - mind the slidy bits) and then go round through the lava pool area where we started, to those double gates.
2. Through the First Gates
When we enter the double gates, we can confirm that we cannot reach the top of any of the interior walls. (There are SHOTGUN SHELLS to pick up on the right.) Note, looking down the shaft by the fountain (look before we leap, remember) that were not going to be able to return up this way; wherever were going to, it must eventually lead to an alternative exit! When we do drop down by the fountain, we discover an underwater cave below, of not insignificant size! Black basalt rock lines the walls and pillars that we can see, though the surrounding ledge sections and the floor of the cave are rather more sandy in colour. But how to find our way, and where should we be going, anyway?! A clear air-supply problem is also going to be on our minds, methinks! To have mercy on the fretful adventurer at this point, well say that there dont seem to be any pickups anywhere in this cave and there is only one other exit.
So once youve found that exit, you can swim through - to the next cave!! You give up? Well, the secret for this first(!!) cave is to line up so that the very thick pillar, that is behind Lara as she drops down from above, remains there; then turn round to the right in the water (about 1½ right-angles), and start heading towards the corner that youll then be facing, staying at a high level in the cave. As you near the wall, you can see, on the upper path type structure that runs round the cave, a small basalt block, very close to the corner of the cave. The crawlspace opening that youre searching for is immediately to the left of this block. (Right, thats one!)
We can now swim through to the next great cave, which looks fairly similar, and where the most obvious landmark is the basalt pillar directly ahead, with a chunk that has been bitten out of it by a very hungry shark - which now has a digestion problem, so wont be bothering us. (Phew!!) Our most sensible action might be to swim to the right of this pillar, perhaps go down a little and then look up, to see a very welcome air-hole ahead. We can now take 2 courses of action: hoist up into the room we can see above the air hole, and take whatever action we deem appropriate (a somewhat complex action), or we can investigate the second cave more thoroughly.
Assuming were going to opt for the latter - if not, you can move on to section 3 - then we can start looking around this cave. Air is not such a problem here (yet!!) because of the easy-to-access air hole. Looking round the cave, it seems as empty as the first one, though there are many undulations to check. There are 2 broken pillars in here, in fact. As well as the one where we entered the cave, there is a thicker one just by the air hole. If we swim around this (to the left), we should notice the camouflaged vertical shaft that goes downwards, within the base section. There seems to be nothing to pick up in this 2nd cave, but we might want to go down that shaft - take a deep breath first!
When we swim down the shaft, we discover a 3rd, similar cave beneath, though perhaps this one is a little smaller and it seems much rockier. (And most people will find it harder to reach their objective in this cave as we dont yet know what we might be looking for! A lever? An important pickup? A route to somewhere else? The shark who took that bite out of the scenery?!) Clearly air IS a real problem this time, though not insurmountable, because of the air hole in the 2nd cave.
You give up again?! (My Lara drowned 5 times, despite knowing where the air hole was in the 2nd cave, so dont feel too badly!! - and once more, as I was writing this!) Right, to put you out of your misery: note first the 2 thick pillars of basalt rock, not far from the bottom of the shaft (NOT the thin one); swim between them; swim downwards and directly towards the corner of the cave that youre aiming at; now look up and you should see the air hole for this cave. (That seemed very easy, but the air hole is recessed, so is difficult to see unless youre either near the floor of the cave or almost on top of it, anyway. And finding your way back is not so straightforward, either!)
Aha, says Lara, as she picks up a GATE KEY in the small room here. (We take it gratefully, even though we havent seen a gate that is locked by such, as yet.) Now, where was the exit back to the 2nd cave? Nope. No idea! (Its easy for the designer to find his way! (Oh you think so? Says George. I drowned poor Lara a few times myself, heh heh) - but so tricky for the new explorer.) Right, from the key room, drop/dive down a bit lower than you normally might want to (when you dont know the way), then head for those 2 thick pillars. (And if youre one of those who gets lost SO easily, then take consolation in knowing that you wont be the first! - nor the last! Its all Georges fault, anyway, of course!)
We want to swim between the 2 pillars, then bear over to the right a bit. The vertical shaft up that were looking for is just here, but is still difficult to spot, because of its small size, and because it, too, is recessed into the roof. When weve found it at last, we can swim up and then, when we reach the gap in the pillar, turn so that were horizontal, and look round. It is still not entirely straightforward, but if we swim round to the right, then it should be easier to see the air hole that were seeking.
(As we hoist up into the room above the air hole, we can see a couple of levers, along with several other things. There is one more thing we can deduce, therefore, before we continue: the unusual feature we saw in The Valley, behind the double gates [at the right hand side] was just like one of the lever assemblies that we can see here. We could just see the left hand end of the levers handle, and the background of the wall panel was the same also.)
3. A Door Puzzle to ponder - (21 step quick way, below)
As well as the 2 levers in this room, there are 3 closed wooden doors and some wall flames blazing away by the doors. There is a grating at each side of the room, and we can see another room beyond each grating. (There is a doggie candle in the room to the right.) In addition, we can see another grating at the far side of each of those rooms, and that there seems to be a passage or a further room still beyond both of those gratings. So there could be as many as 5 rooms altogether, all next to each other. (We can see through the gratings at least one further lever in each of the rooms next to this Pool room and at least one plant[!] in each of the outside rooms or passages.)
This Pool room that were starting in, is the first of a series of rooms - we wont say how many, yet - where we need to solve the puzzle presented by the rooms, doors and levers, in order to reach an as yet unspecified goal. It is only fair to say that some have found this puzzle more than a bit tricky and have said they keep ending up where they started, in this Pool room (were actually meant to return here at least 3 times), while others (once theyve solved it!!) have found it an interesting diversion.
SAVE in this room before you do anything else! (Then we can reload however many times we want/need to!) The obvious next step is to find out what the 2 levers in this room do. Facing the central closed door, the left hand lever (behind) opens the right hand side door, leading into the right hand room with the doggie candle, while the RH lever opens the left hand side door, leading into the left hand room. All nice and symmetrical so far. In addition, we find that we cannot have both doors open simultaneously - this is clearly because George doesnt want us going in opposite directions at the same time! (If we had 2 Laras, on the other hand ....*Actually, smiles George, he figured it would cut down tremendously on the confusion factor*)
A common theme were also going to find (as well as the gentle creaking sound as each door opens and closes) is that almost all the doors close behind us, so we cannot return the way weve just gone. In the right hand Candle Room, which has only one lever, a central door forward and another door to the right (in addition to the door weve just come through), we should notice the lavish orange decoration by the right hand door. If we go into the left hand room (using the Pool rooms right hand lever), then we find a similar arrangement: one lever, a door forward and a door further to the left. (We can discover most of this by standing in the doorways - once weve learned about the doors closing on us and looking round, then returning to the Pool room.)
The additional information we can glean from our first 2 visits to other rooms - though wed have to go into the rooms to do so, allowing the doors to close behind us - is that it does look very much as if the 2 outside rooms or passages ARE actually both rooms also, similar to the first 3 rooms weve seen, with levers and doors, though perhaps slightly smaller. AND we can see that in the left hand most room a locked door at the rear of the room!! So perhaps we do need that key!
When we go into the Candle room and use the lever there, we find that the forward central door opens, ushering us into a new room ahead. This room has 2 right hand doors, a left hand door, and a single lever. Through the grating at the left, we can see at least 2 more rooms, and through the small grating at the right we can see another, perhaps smaller room, with 2 levers and a door to the right, behind - connecting with the room to the right of the Candle room, presumably.
When we use the lever in this 4 Door room, the left hand door opens and we can go into the room immediately to the left. (Logically, this room should now be directly ahead of the Pool room where we started.) We can see through the grating at the left here, that there are 2 more rooms further left still (unless the left hand most one is just a passage). This makes 10 rooms in all, one bank of 5, where the central room is the Pool room, and a 2nd bank of 5, where this current room is the Central room. This Central room has 2 levers also, and also a door behind (to the pool room, we believe).
There is also a left hand door here, that would presumably connect with the room immediately to the left, that we can see through the left grating. This room to the left has some more of the orange decoration on the wall, plus some wall torches alight, all next to a door, that in turn would presumably connect with the furthest left room or passage that we can see. (Now one final check before we frame all this a bit more systematically.)
If we pull the left hand lever in this forward central room (assuming were facing forward), then the door behind us opens and we can see that it does lead back, as we suspected (& hoped!!), to the Pool room. If we now return to the Pool room and use the right hand lever to enter the left hand room and pull the lever there, then we find that, again, the forward central door opens, so that we can go forward into the room ahead. THIS is the room with the orange decoration plus wall torches, by the left hand door. We can confirm that there is only one (smaller) room further left, where we can see one lever and a door behind (to the left), presumably connecting with the locked door room. When we pull the lever in this orange/wall torch room, then the right hand door opens and we can reach the forward central room, just as we could from the room to the right of the forward central room. Complicated, eh? - like many a maze-like structure! This would seem to suggest that whichever way we go initially from the Pool room, well end up in this forward central room. So THIS room is important!
Systematically,
then:
We can call the first bank of rooms, from left to right: 1-5, where 1 is the
outermost locked door room, 2 is the room we reach when we pull the right
hand lever in the pool room, 3 is the Pool room itself, 4 is the Candle room
with the orange decor and 5 is the room to the right of that. The bank of
5 rooms ahead of those, we can call 6-10, where 6 is the room ahead of the
locked door room, 7 is the room with orange decor and the wall torches,
8 is the forward central room with 2 levers, 9 is the 4 Door room ahead of
the Candle room and 10 is the room to the right of that. (We havent yet visited
any of the 4 outermost rooms: 1 [where we think were aiming!], 5, 6 or 10.)
Right, thats the rooms sorted out! We now need to discover how to get from room to room, with the presumption - which may yet be incorrect! - that the locked door room is the room were heading for, so that we can use the gate key we found. (You didnt find the key?!! Ah!! Well, NO need to panic! George has done something quite helpful for non-key-finders that well come across in the not-too-distant future, so well cross that bridge later!)
So: STAGE 1: from the pool room (room 3), either lever will take us into an adjacent room (room 2 OR Candle room 4), where we can pull the only lever in that room, to take us forward (to orange/wall torch room 7 OR 4 Door room 9), where we can pull the only lever in that room, so as to enter the forward central room (room 8). In this room, pulling the left hand lever (when were facing forward) opens the door behind, back into the pool room.
STAGE 2: when we pull the right hand lever in the forward central room, we hear a door creak open, and if were quick, we can just see through the right grating that it is the right hand door in the adjacent room, 4 Door room 9. (We can replay this to check, by using the lever more than once.) We cannot reach this room directly, but we now know that we can go via the pool room (so that is why the door behind has also been opened), and then Candle room 4, to reach room 9s opened right door.
STAGE 3: Room 10 has 2 levers, both at the right hand side, and 2 doors, in addition to the one weve just come through. We expect the back door will lead into - the as yet unseen - room 5 and the 2nd (further back) left hand door will lead back into 4 Door room 9 - that weve just come from!! (This door matches the 4th door in that room.) Pulling the back lever opens the back left hand door, and invites us to return to room 9. (But not before using the other lever!) When we use the forward lever, we are shown a cut scene of a door opening with orange decoration next to it, but without the wall torches. So the door that has just been opened is the one in Candle room 4, and we can reach it via rooms 9 & 8, and then the Pool room.
STAGE 4: Once in Candle room 4 again, we can go straight ahead through the door with the orange decor (since it is directly opposite the door that weve just come through), into room 5. Room 5 has only the one lever, but it is most significant, in that we are shown in a cut scene that it opens the other orange-bordered door - the one with the wall torches, that we know is in room 7. And with the opening thereof, we are given some grand, confirmatory achievement music. THIS that we have just done is of considerable importance, then. Will we now be able to reach rooms 6 & 1?!
STAGE 5: When we look round, we see that the forward door in this room has also been opened, so we can go forward to room 10 once more. Because of our explorations, we now know that we can reach room 7 with the orange wall torches door, by using the back lever in room 10 to enter 4 Door room 9, then the lever there to enter forward central room 8, then the left hand lever there to go back to the pool room again; and finally, by way of room 2, we can then go forward to room 7.
STAGE 6: Through the orange wall torch door from room 7, we enter the relatively narrow room 6, which has just the one lever and one other door at the rear of the room. The lever opens this door, and leads into the locked door room, room 1. In this room, there is one lever also, and another wooden door, as well as the locked door. If we dont have the gate key and so cannot open the locked door! - then we need to return to the Pool room, and the caves below the Pool room, to find it.
(Those clever people WITH the key, please bear with us for a moment!) The first stage of retrieving the gate key is to use the lever here to open the side door. We can then enter room 2 again. Using the lever here, we can go forward again, to room 7, where we discover that the orange wall torches door at the left has remained open. This is another example of Georges generosity (so he tells me! - Im getting soft, he says!), so that the keyless person need not do the whole doors puzzle again.
If we use the lever in this room, we can enter forward central room 8 again, then use the left hand lever there to return to the Pool room. Once in the Pool room, we can search for the gate key (see the last 6 paras of section 2 - note the word: yet - [though the very last para is not relevant]) - then, when weve returned to the Pool room, bearing the gate key triumphantly, we need only use the right hand lever in the pool room, to reach room 2; and the lever there will open the forward door, to access room 7 again, with the still-open orange wall torches door at the left - from which we can easily reach the locked door in room 1 again.
NB. The alternative, quicker way of finding a route through the doors
maze.
{The rooms are numbered, left to right, 1-5 & forward of those, 6-10.}
From the beginning, starting in the Pool room (room 3)
01. LH lever in the pool room; then through to Candle room 4.
02. Lever there; & forward to 4 Door room 9.
03. Lever there; & left to forward central room 8.
04. BOTH levers; then back to pool room 3, to repeat lines 1 & 2.
05. When in 4 Door room 9 again, go right, into room 10.
06. BOTH levers; then back to 4 Door room 9; then repeat line 3.
07. In forward central room 8: LH lever; & back to pool room 3.
08. LH lever; & right to Candle room 4.
09. Then
straight through room 4s orange door that is opposite, into room 5.
10. Lever there (achievement music); & forward to room 10.
11. Back lever to reach 4 Door room 9; then repeat line 3.
12. Repeat line 7; then RH lever; then through to room 2.
13. Lever there; & forward to orange wall torches door room 7.
14. Go through this door to room 6; lever there; & go back to locked door
room 1.
15. If you have the gate key, then you can open the locked gate & go through,
& continue your explorations, with the knowledge that the doors puzzle
is behind you & that you can ignore 16-21 below!
16. If you
DONT have the key, then use the lever here in room 1;
17. Go through to room 2; use the lever here to go forward to reach room 7;
18. [Note that the orange wall torches door has stayed open];
19. Use the lever here to reach forward central room 8;
20. Repeat line 7, to return to the Pool room;
21. Read the final para above, before this quick route sequence began.
Finally: from the locked door we can go forward and prise the FIRE STAR off the wall. We now need to make our way to the wide gates below the great flight of steps, that have the star receptor next to them. There is an opening above, just inside the door to this room. Now what could that be for?! Hoisting up, we come to a cave-like passage or tunnel. Going up and then turning right at the top, past some gemstone-bearing? rock, we come out along a passage above the very steps for which we were searching.
4. Below the Steps
[SECRET ALERT! (part II) - The 2nd part is close, now.] We can safety drop down and then go all the way down the long flight of steps. We can put the Fire Star in the receptor at the left and the wide gates rise, so that we can enter a fairly dark room with several high ledges and openings (with some wary music as we do so). We can see that the monkey swing (that we could see from outside the gates) extends over to the left and near to a platform, from which another opening, further to the left, is accessible. We notice then (if standing near the wide gates) that there is another gate in that opening that is (now: hint!!) open. There are dog statues here and a torch to be lit, it would seem, and if we go to the front of the room, we can see a 2nd high gate on the right hand side.
Forgotten about the gate as we go forward: it drops down with a crash behind us! Thatll stop us taking the torch elsewhere, should we have had such designs! All the blocks and platforms in this main area are too high to reach, but then we see a channel behind the T-rex head, where there is a (3rd, closed) gate, 2 blocks that we can jump onto, and some flares. If we look through the gate (binocs, with the light feature), we can see that beyond the lower gate there is a passage with a couple of openings off to the right, though we cannot see much more than that. (And if we look for long enough, we might also be able to see the owner of the thumping footfalls we can hear!)
We then might notice that there is an opening above the block near the flares. Though we cannot light the torch from the wall torches in front of the T-rex head, the wall torch behind is low enough to do so. We can hoist up (but not with the torch) to the wide ledge above and find that we are right next to the 2nd gate that we saw from below, which has a wolf emblem above it. Beyond this gate we can also see a short section of passage. As go across to the far right hand side of the wide ledge here, we see at the opposite corner of the room, at this level, that there is a black thug on a separate, darkened ledge.
(Even though hes out of range, if we line up correctly, then we can shoot at him effectively with pistols, even.) It is a good idea to deal with this particular thug since, when we run and jump to the left alcove from the wide ledge, with a view to using the monkey swing to reach the far right side and the opened gate, we would be defenceless for a time against him, while ON the monkey swing. From this platform (& from the monkey swing in a moment) we can see that there is a lot more to the thugs ledge than was apparent from further back (a passage leading from it, eg.), though we cannot reach it.
From the platform at the left, we can jump up to the twisting monkey swing and then use it to reach the right platform (we must go left at the end of it, in order to drop safely on the edge of the platform). We can then jump to the ledge at the end wall and go through the gate there. As we do so, we hear the secret sound, telling us that weve found the 7th secret area (the 1st of this level). As we go into a fairly large room, we see another lava pool, with an apparently red lava/water fountain above it. So this is the room (the colour of the fountain confirms it) that was opened up when we pulled that lever in the underwater shaft next to the small island in the Lake of Fire. At the far side of the room we find a loaded SIX SHOOTER (with 6 rounds) and a SMALL MEDIPAK.
From the secret room, we can drop to the floor outside, when it seems that the next thing to do is to see if we can light the dog statues heads. Yes. Perhaps well leave the statues furthest from the gate behind the T-rex until last, just in case something charges out of it! And we discover that when we have lit the 4th head, a raptor does indeed charge out of that gate towards our intrepid adventuress!
Going forward in the tunnel that the raptor came from, past more gem-bearing? walls, do we hear another raptor? (Useful to take the torch to light the way. Actually, this is a VERY good idea!!) We come to a junction, with passages left and right. At the end of the right hand passage we can see a closed gate and a couple of left hand openings/alcoves; to the left, there is a passage with openings left, right and forward; and there is an opening above, at the junction, to both right and left. We cannot reach up to either of these, but the raptors plodding is so loud now (without it attacking), that it almost seems it must be in one of the overhead openings. In the right hand passage, the 2 left hand openings are wide alcoves. Then we come to the gates, that show a small room beyond, where the only item within seems to be an artefact that we might be able to use as a key - the one needed by the gates in The Valley?
[SECRET ALERT!] When go into the left hand passage, the raptors footsteps are sufficiently quietened to make it seem almost certain that it was the right hand upper passage where the raptor was to be found. We note that at this moment there is no other obvious course of action, so the next thing to do must be in this left passage. The left and right openings are both alcoves and when we go forward, we can see one of those block-steps up ahead, then another, to enter a new room. This means that we are able to take the torch up to this new room (and were not immediately attacked when we enter it!).
Back round to the right in the dark, there is a SMALL MEDIPAK, then take the passage to the right. The 1st opening is another alcove, and we may become conscious of a tiny glow in the distance ahead. Ah. Binocs show that this is the handle of a lever. (Using binocs so as to NOT rush forward into a new, dark room, lest .... !) As we go forward, we see another passage to the right, then a pit across the floor. It seems that there is a passage beyond the pit, and if we use the binocs again, we can see a closed gate further off, along this upper passage, past what looks like another 2 small pits/holes in the floor, before the gate.
Before using the lever, and approaching the right hand pit, we can see that there are block steps down into it, so theoretically, we could take the torch down AND be able to bring it back up. We can run and jump right over the pit, with the torch in hand, if we are slightly back from the edge of the pit when we jump; if we jump at the very edge of the pit, Lara will bang her head on the top of the far passage ceiling. (We would normally use cling to avoid this, but we cannot while carrying the torch.) Alternatively, we can jump to the highest of the block steps in the pit itself and then simply jump up to the far side from there. (And we can repeat this if we come back this way.)
Without the torch, we can safety drop from any of the pit-sides to the ground below, without any health loss, and in each case, it will bring us into the same lower passage. If we then go along that passage (a flare or two is essential) we will find at the end - below the furthest pit, in fact there is a left turn into a small alcove, where we can find an extremely useful GRENADE GUN!! As we pick it up, we hear the secret sound once more (for the last time) for the 8th secret area (the 2nd of this level).
We can then return along the dark passage to the block steps, to reach the upper area again. If we investigate the gate in the passage, then the raptor we have been hearing will come to do the same thing(!), in his usual noisy fashion. When we go to the lever, this gate opens. We can carry the lighted torch, with care, across each of the 3 pits (all Run and jumps), though we shall have to put it down when we meet the raptor, of course, if we wish to avoid being pushed into one of the pits or worse. (We can drop the torch on the spot if we press one of the numbered keys for a weapon - provided we have that weapon! If we use the spacebar to draw a weapon then we shall be throwing the torch, and with these pits around, that might not be too wise at present.)
5. A Torch Journey
(If we tried to use the pistols against the raptor, then he may well have succeeded in running back along the passage and turning round a corner at the end. We may feel that this is unhelpful to us[!], but it has shown us in advance that there IS such a corner further along the passage.) As we continue, we find more alcoves on the left, and then .... a real jump out of the seat moment!: you have been warned! (I knew this from previous play, but was still caught out by the appearance and sudden noise in the confined space, and in the relative darkness.)
After this occurrence (which youll have to experience for yourself), we can continue along the passage. We come to another couple of alcoves, then a shallow fountain pool on the left (where, if were daft enough to drop the torch, itll go out!! - just testing! - though we can pick the [unlit!] torch up again). The last alcove is opposite a couple of wolf wall panels, that mark where the passage changes from the dressed, carved stone walls that weve been passing, to being more rocky in nature.
As we go along the more rock-like passage, with alcoves, we come to the drop down to the junction in the lower passage that we came across, when we had just come along from the doggie candles room. Now, can we get the torch across to the far side of the gap? Yes. With a tiny step back, or at the right angle, Lara can run and jump and land without hitting her head. (We still dont know if the torch is going to be useful in this new section of tunnel, of course!)
After an alcove, we see a block ahead and then a much higher ledge above. If ... ? Yes, there are other blocks or ledges behind, where it might be possible to continue to take the torch, ultimately - if that is our objective - to reach that much higher ledge. It is the 2nd jump that seems hardest: we can easily jump up to the first block with the torch; then we have to turn round and run and jumpexactly straight to land successfully on the 2nd block. (We have had the opportunity to try this in several earlier places, notably in level 2s Great Hall, when a run, jump and catch was probably used - a very precise, exactly straight run and jump would have sufficed in some of these places. Itll probably take several attempts to get this jump right, but be encouraged that it IS possible!!)
The next jump is easier: a standing jump from near the back of the tall block, diagonally left to the single square ledge. At first we may wonder if we can run and jump all the way to the previously noted highest ledge, but its not necessary, as we can run and jump easily to the dark (at first completely unseen) single square ledge diagonally right, then easily jump across (or even run across the diagonals) onto the highest ledge itself. From there we can, also easily, standing jump up to the ledge above that, to discover a dog statue here! This suggests that our whole journey with the torch has NOT been in vain, after all, as there is nothing else that we can do save light this dogs head & transform it into another doggie candle!
6. The Fire Stone
Lighting this candle means that the gates (somewhere below this point if our sense of direction is up-to-scratch?) that lead to the key artefact, are opened. (An evocative, suitably creaky gate noise [that needs oiling!] is heard, and we hear some running water, also.) We can drop the torch down to the ground from here, then safety drop down after it. (We dont know if were going to need the torch again, so lets carry it with us for as long as we can; in the meantime, we can use it as a continuous flare.)
After picking it up, we can go forward to the junction point in the passage, where we jumped across the gap. We dont need to go back along the upper raptor passage with its pits, as we can drop down here without any health loss and go forward (were already facing the right way, which means that our sense of direction wasnt so good!) to reach the opened gates. (We can obviously drop the torch at some point in the lower passage, ready to pick it up again on the way back.) As we pick up the FIRE STONE, we are shown the gate below the wolf symbol, on the ledge above the room with the 4 doggie candles, being raised (if we recognise it!).
[The one query we might still have here, is about the water running sound, which we can also hear (but not see!) close to the Fire Stones gates, and which we heard when the gates were opened. The answer is that we are hearing the sound of a fountain and water pool that we passed in an upper passage a bit earlier, and which we hadnt realised was just above this area that were now visiting. It is part of the designers art, in a way, and shows something of the authenticity and realism that is involved in TR custom level construction, that these clever people can employ in their adventures.]
(George here points out that the water pool had been intended for use in dousing fire sprites. But he couldnt get the damn sprites to work properly in this level for some reason. But the fountain looked cute, so he left it, so folks would have something to talk about, heh heh.)
As we go back along the passage, when we reach the junction again, another raptor appears from around the left corner. We can then go forward along the original passage from the doggie candles room, to reach the cross passage behind the T-rex head. We can jump up here to the block, which gives access to the wide ledge above, and thence the wolf gate that has been opened. If we wish to keep the torch (but for how much longer?: one suspects that its usefulness has ceased, except as a helpful alternative to flares), then we can use the technique mentioned in the last para of section 4: we can stand on the edge of the block, just where were going to hoist up, then jump vertically, and at the highest point of the jump, draw the pistols - not with the space bar that throws the torch and the torch will be neatly deposited on the edge of the wide ledge, just where we shall hoist up in a moment (or slightly to the left, because Lara holds the torch in her left hand).
Hoisting up, we can go through the wolf gate. Going forward into the passage (a gate that does NOT drop down behind us!) there is a LARGE MEDIPAK at the end of the passage, just beyond a right opening. Going along that passage, we come out to the place we saw earlier, when going across the monkey swing, that we called the thugs ledge, to discover a lever there. (If we didnt deal with the thug earlier, of course, this exit is a little more problematic!) The lever, helpfully, opens the wide gates to the doggie candle room below.
We can drop off this ledge to the floor below without any health loss, so we can still carry the (probably unneeded) torch up the flight of steps and out to the great blue/black/red yonder. We can then go by way of the Lake of Fire and its islands, and along The Valley to reach the gates of the small temple. When we get there we can place the Fire Stone into the receptor. The gates open, and inside we find a LARGE MEDIPAK, a SHOTGUN and SHOTGUN SHELLS - as a clue in preparation for something?!! (The aha! as Lara picked up the shotgun itself would seem to lend support to this theory.) There is a lever on the right.
Accompanied by energetic music to make us a little anxious(!) we are shown, as we pull the lever, a close up of the gates that we know are at the nearer end of the defile, in the area at the far end of The Valley. After a bit - just stretching out the tension, then, eh, George?! - the gates open and we see first one, and then a 2nd, raptor, AND their big Daddy (or perhaps Uncle?) a T-rex himself(!), who causes the ground to shake. These all run along the defile, and the camera follows them as they exit that, approach The Valley and then start to run along The Valley floor. Oh, thats where we are(!), and we still dont have control returned to us immediately!
The following few moments(!) might consist of your trying to decide what to do next! But you dont have a LOT of time, surprisingly!! A suggestion or two, that may help: (1) these dinosaurs wont go into or onto lava; (2) remember just which items George placed here; (3) it is difficult to outrun something with an enormous stride, but perhaps it can almost be done! (This is quite a good place to SAVE, immediately before or after pulling the lever, so that you can practise your best strategy.)
(*The small pool at the far end of the valley was included for this very eventuality. If in panic, sprint and jump your way there, and youll have time to get your breath back. If youre having trouble killing the T Rex, run between his legs and give him a couple of shots in the chest from the shotgun.*)
When the 3 principals are despatched(!!), then we may proceed. Our next port of call will be the opened gates at the end of the basalt defile. When we reach the far end, we come out into an area that has several tall, wide alcoves, lined with the stone walls weve seen in many places, and topped, as elsewhere, with basalt. (We cannot climb any of these.) And then we come to another narrow defile ahead.
At the end of this 2nd defile, we come to a new room with a gem on top of a pedestal. We are also given a replay of the magnificent music that begins the whole game. There are a couple of gates (the left one guards a lever and the right gate has a steep slope down beyond it into the darkness), a couple of dog statues (whose heads we cannot light - what dedication, to carry the torch all this way!) and a T-rex head fastened to the wall.
7. And Finally
We can take the FIRE GEM (our final artefact!) from the pedestal, with the intention of returning to the lava lake and its islands, where we have seen a gem-type receptor on the wall, beneath another T-rex head. So we go back along to The Valley, accompanied all the while by the cool instrumental music, helping us on our way, and the overtures of a small earthquake, the effects of which weve not seen yet. This music is our finale, and provides a nice symmetry, where we have the same music at what we believe to be the end, as we had right at the beginning. (Though George is not quite finished yet!!)
As we approach the Lake of Fire we find that it is lava no longer, but now water!! A significant change indeed!! - caused by the earthquake, presumably. We can now either wade across to place the gem in the receptor beneath the T-rex head, or use the islands again - which is a bit quicker. (Another small change is that the vertical shaft next to the 2nd island is no longer accessible, so if we didnt retrieve the 7th secret earlier, then unfortunately ...)
When we go to the gem receptor and place the Fire Gem (probably still accompanied by the music, depending on how long our return has taken) we have a remarkable scene of 4 armoured skeletors rising, in an unrecognised area of lava-strewn ground. (This is in keeping with the legend that we might have read about before we even began our journey.) We can now retrace our steps to the pedestal room, where we find the lever gate open. When we pull the lever, we see those 4 belligerent skeletors drop down into a lava pit in that same area, to bother us, and any other intrepid adventurers who may wish to tread this way, no more. We have at last succeeded in banishing those who would disturb this realm, entirely, and so, quite rightly, we find that the other gate is now open and we can slide down to our next audacious exploit!
THE END
Az oldalon közölt képek, a szöveges tartalom, illetve minden sajátkészítésû anyag, a © TR Editor.hu tulajdonát képezi. Azokat semmilyen formában nem lehet reprodukálni, másolni, terjeszteni, csak a szerkesztõség engedélyével.