
NGLE Installation
by Bedazzled
Windows XP
There are two parts to this - the initial full installation and then the updates. Download the full TRNG Installer from the tools page. You only have to run the TRNG MKIV Full Installer ONCE, which will install TRNG 1.2.2.6 onto your machine. After downloading the Full Installer, double click the exe, extract the files, click Install and the installation will begin. Make sure no TRNG or NG Scripter programmes are running or the installation will fail.
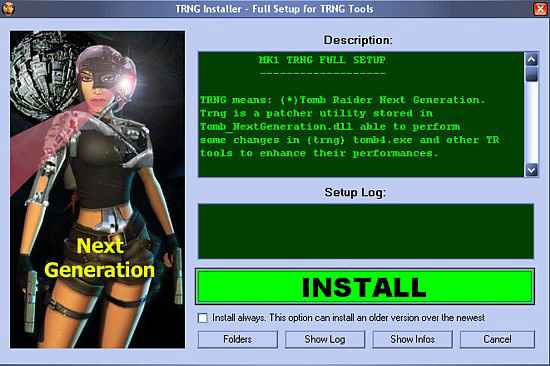
Once installation is complete all programmes and files will be correctly installed and ready for use. Please note that the NG Scripter is required to produce working DAT files for the new game engine. If you convert your scripts manually, new features will not work in the new game engine.
Windows Vista and Windows 7
To install the level editor and TRNG on the Windows 7 operating system, both the 32 bit and 64 bit versions, follow these instructions. This tutorial is suitable for the complete newcomer to the level editor, and assumes you are doing a fresh install of the editor and TRNG which is by far the best way to avoid problems. While this tutorial was written specifically for Windows7 it should also be relevant to installing under Windows Vista. Users of Window 7 Professional or Ultimate should note that TRNG will not run in the virtual Windows XP environment.
To begin with you'll need the following:
The full level editor downloadable from Skribblerz or the original level editor CD supplied with Tomb Raider Chronicles.
The revised Wads available from the Tools and Resources page
Angkor Wat WAD, Map and Textures available from Tools and Resources page
Library and Guard WADs, Maps and Textures available from the Tools and Resources page
TRNG full installer available from the Tools and Resources page
MousePatch v2 available from the Tools and Resources page
Visual Basic 5 and 6 Runtimes available from the tools section of TRSearch
Visual Basic 5 and 6 Runtimes available from the tools section of TRSearch
Installing the Level Editor
By default this would install into a folder in program files unfortunately doing so will cause the windows User Account Control to create no end of problems for you. The simple solution to this particular problem is to install the level editor in the documents folder.
Run the level editors setup program and install the level editor until you reach one of the screens shown below depending on your operating system version. The first screen shows installation for 32 bit version of Windows, while the second screen shows the 64 bit version of Windows.
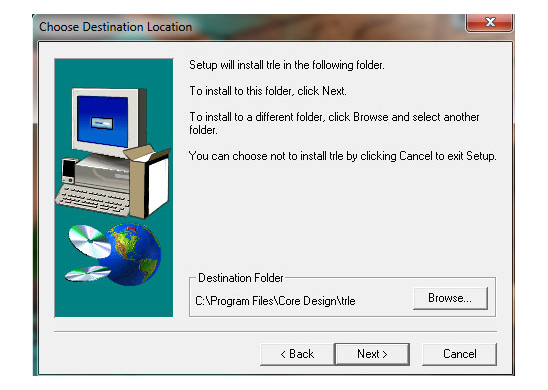
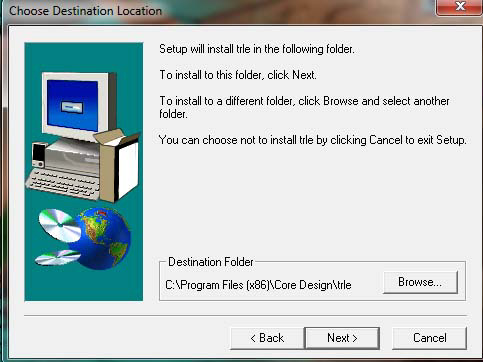
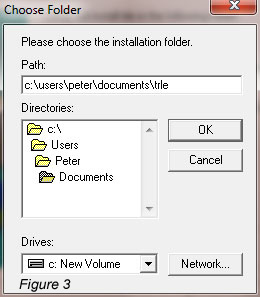
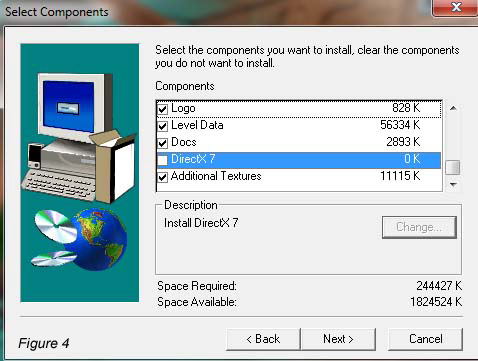
In either case click the browse button and browse to the documents folder, once you have done that you will need to manually complete the installation path by adding "\trle" without the quotes as shown in Figure 3 regardless of the OS version.
Continue with the installation opting for a custom install and removing the tick from the DirectX 7 checkbox.
You can then allow the installation process to finish. If you are familiar with and have previously used the level editor skip down to the section Installing the VB-Runtimes: if however you will be using the level editor for the first time continue here.
Revised wads and extra wads
The wads supplied with the original level editor have several of Lara's animations missing from them. Simply extract the files from the revised wads download into your trle\graphics\wads folder replacing the originals to give Lara all of her animations. It should be noted that the tut1 wad does not have an updated version.
There are also three extra wads which were released after the level editor, they are the Guardian, Lost Library and Angkor Wat wads. Installing them allows you to build levels with the objects and textures from those TR4 levels. The Angkor download also includes a project file. The Guardian download includes an alternative City wad named new City, the differences are that it contains a night sky horizon and the locust swarf has been replaced with a domestic looking dog.
To install these extra wads please see the readme file included with each download for full instructions.
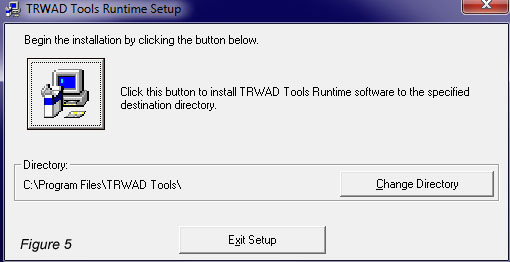
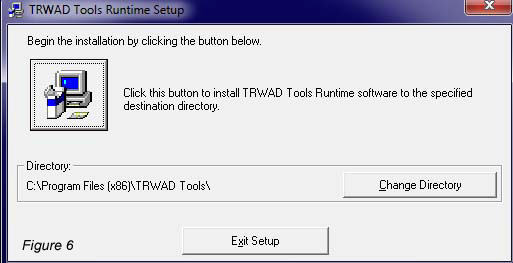
Installing the VB�-Runtimes
Before going any further install both the Visual Basic 5 and Visual Basic 6 Runtimes into their respective default folders.
Figure 5 and Figure 6 show their respective 32 bit paths and Figure 7 and Figure 8 show their respective 64 bit paths.
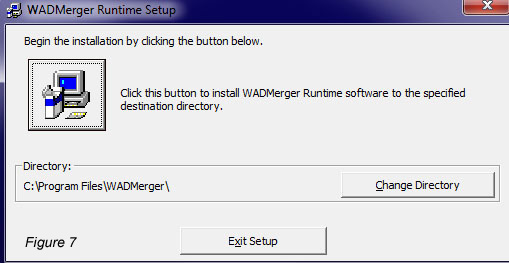

Installing WadMerger
Windows 32 bit - All files from the WadMerger download should be extracted into the C:\program files wadmerger folder, this folder would have been created automatically when Visual Basic 6 was installed.
Windows 64 bit - All files from the WadMerger download should be extracted into the C:\program files(x86)\wadmerger folder, again this folder would have been created automatically when Visual Basic 6 was installed.
Installing TRNG MK2
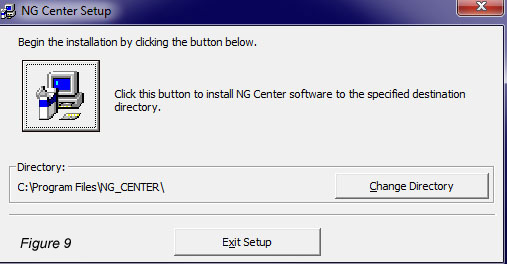
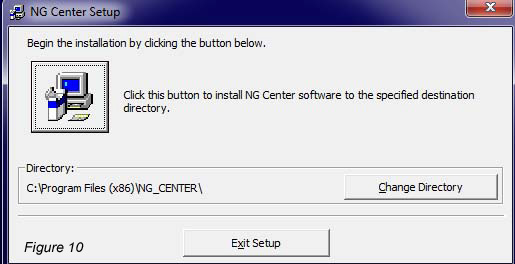
Allow the TRNG installer to install into it's default folder Figure 9 shows the 32 bit path and Figure 10 shows the 64 bit path.
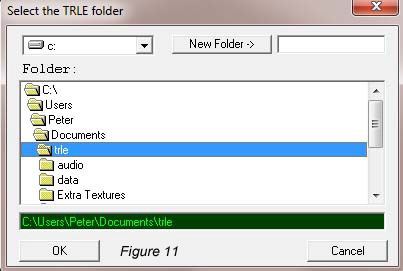
At the next screen click continue, TRNG will install and you should see a message saying the NG Center Setup was successful. You will now be asked to select the trle folder you want to use for TRNG. Browse to the trle folder contained in the documents folder as shown in Figure 11.
You are now asked to verify various folders, just click ok on this screen and the next then click install. Click ok at the install completed message and then click the quit button. You will see a DOS type window open and a lot of files being installed.
Again you will be asked for the location of the trle folder you want to use with TRNG, browse to and select the trle folder located in the documents folder.
The main NG Center window will now open showing the trle script.txt file, the next job is to install the latest TRNG update. You can either run the update downloaded from Skribblerz or while in the main NG Center window, click on the updates tab and then on the check for available updates button to download it from Paolone's site.
Whichever method is chosen the procedure is the same, run the update and click the install button, once the updater has finished click the quit button and after a dos type box has flashed up the main NG Center window will open again.
Before using the level editor new Script and English.dat files need to be produced by clicking the build button in the NG Center main window. However if you do that now you'll receive several error messages, and the new files will not be produced.
Highlight and delete any unwanted language.txt lines from the script. In my case only the English.txt is required.
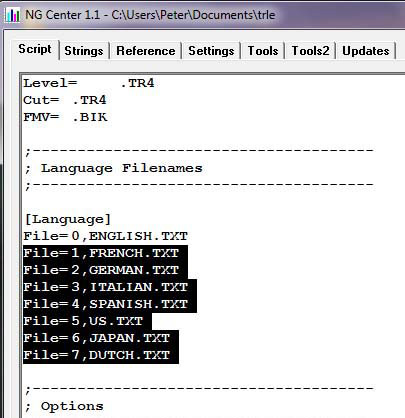
Also remove the following duplicate lines from the level sections of the script, this will prevent the error messages.
Tutorial level
LoadCamera= 0,0,0,0,0,0,255
The Tomb of Seth
LoadCamera= 0,0,0,0,0,0,255
City of the Dead
Puzzle=1,Nitrous Oxide
feeder,0004,$0300,$0000,$0000,$0000,$0002
New City
Puzzle=1,Nitrous Oxide
feeder,0004,$0300,$0000,$0000,$0000,$0002
Now click the tools tab and the "convert texts to new format button" then follow the prompts, finally click the save button followed by the build button in the main window. TRNG is now installed and the new dat files have been built.
You should also use the NG_Tom2pc program to build each Tom file to ensure your trle\data folder contains a TR4 file for each level.
Very Important notes
The level editor should only be started by clicking on the NGLE.exe in the trle folder or by using a shortcut to this file. Avoid using the NGLE button in the NG Center window as doing so creates problems with the editor.
The Tomb 4 setup icon will no longer work and you will need to create a new one pointing to the correct path as explained in this tutorial Creating a playable folder
It's possible that when applying textures the walls of the room in the editor window will turn white until you zoom out of the window. This is a graphics card driver issue updating to the latest drivers for your card or in some cases installing an older driver may solve the problem. Wasp has also figured out that going to the compatibility tab and ticking Disable Visual Themes can also solve this problem.
MousePatch
This makes rotating and zooming rooms in the level editor so much easier by eliminating the fast spinning room problem. Simply extract the patch into the main trle folder and drag the NGLE.exe icon onto the patch icon. This brilliant little tool will also allow you to pan and zoom holding down Ctrl or Alt and using the mouse.
Handy tip
Once you have the level editor installed, make a copy of the trle folder, rename it to master copy and move it to a safe location. Should you then need to re-install the level editor at any time, just use a copy of this master folder to replace your old trle folder.