
Room Geometry and Texturing
by
Paolone
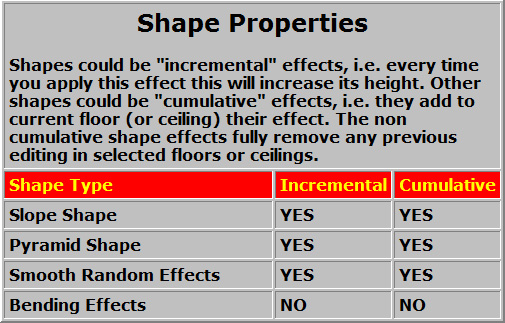
In Next Generation, WinRoomEdit has had a Shapes menu added with many new commands enabling the fast and easy creation of the most common shapes used in level building. All shapes are supported by the "undo" command.
Pyramids
You can create pyramids on the floor or on the
ceiling, in convex or concave patterns. Pyramids use a progressive
building mode: each hit of the command grows the pyramid by 1 click. In
this way you can easily select the desired height.
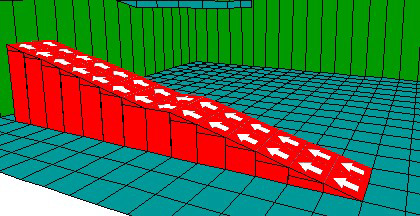
By default all pyramids are smooth, however you can use a trick to
create stepped pyramids. If you want a stepped pyramid, prepare
selection with white arrows as below. It's not important which direction
the arrows point. When you apply the common pyramid effect, the pyramid
will now be stepped.

Slopes
Sloping is the one of the most common building tasks. You can create smooth or stepped slopes on the floor or ceiling. Slopes require white arrows to determine which direction the slope is to be formed. Floor slopes go up in the direction of arrows, while ceiling slopes go down.
Grid Walls

Grid Walls is a new feature which enables you to automatically grid walls. This is an incredible time saving feature. You can create grids over a specified section of wall or over the walls of the entire room.
If you have doors in your room leading off to
other areas it is better to highlight walls in turn and use the command
Grid Selected Wall
(F11) otherwise floors and ceilings in
adjoining rooms may be affected. If there are no other rooms adjoining,
use the command Grid All Walls
(F12).
The texture grid will be created in accordance with
current room height. If you want to remove the grids you can use the
command Remove Editing from selection
(CTRL F11). If you apply this command to floor/ceiling squares, all
changes to room geometry will be removed.
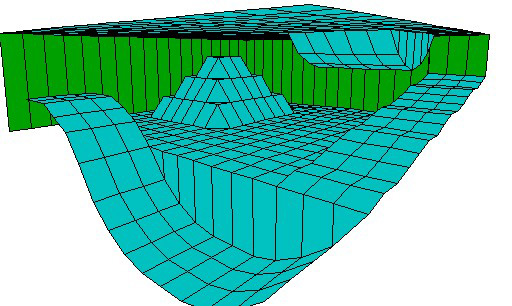
Curved Shapes
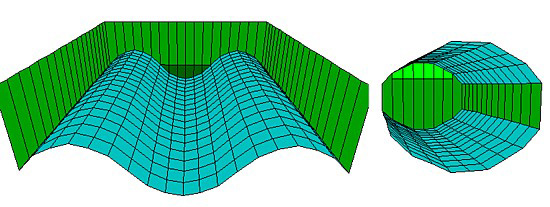
Perhaps the most difficult and tedious
operation in level building is the curving of floors and ceilings to
produce uniform patterns, as above. The NG WinRoomEdit allows you to
easily produce curved structures. Unlike slopes and pyramids, the
curving effects are not incremental which means you get a pre-fixed
curvature in accordance with the current width of selection.
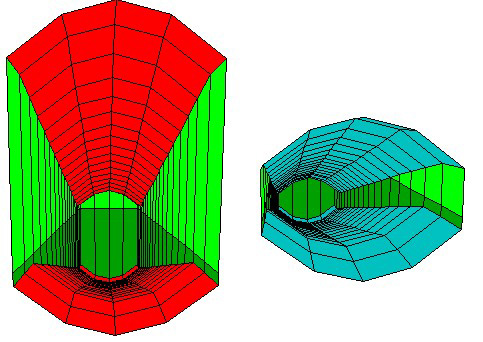
Example - Building an inclined and Rounded
Tunnel
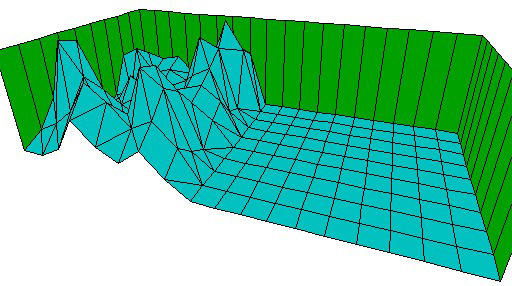
We will experiment with mixing different shaped effects to form the complex room design below:
This is an inclined tunnel with smooth, curved
floors and ceilings. The following method is not necessarily the only
way to build this room but it is surely the easiest!
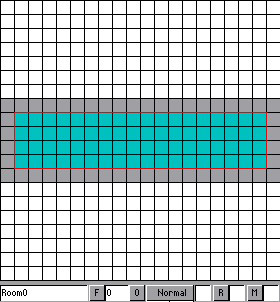
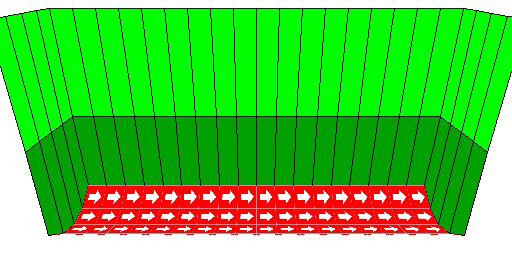
1) Create an
empty room 18 x 4
2) Select the entire ceiling and using [+] Ceiling, increase it until it reaches a height of 40 clicks.
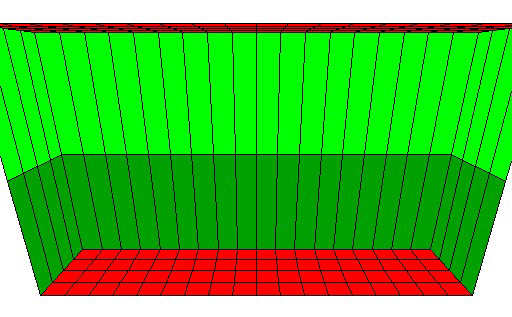
Note the texture
line between light green and dark green on the walls. This line will be
our reference point for the following operations.
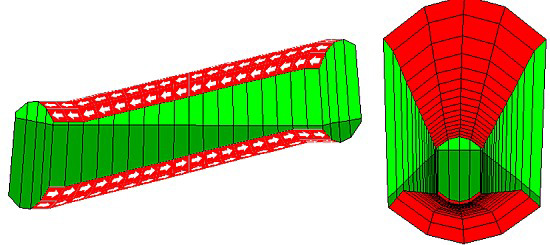
3) Select the
entire floor and arrange the white directional arrows as below.

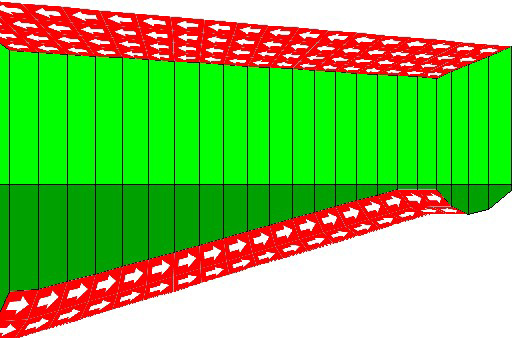
4) Apply Inverse Bend Floor effect from the Shapes menu. Then click on selected floor to move the white arrows to the following direction.
5) Now we can apply a Smooth Slope Floor (CTRL F1). The floor has to slope up the tunnel until it is one click below our texture reference line, as shown below. If you go higher than the reference line, you can use the Undo command to go back to a previous height.
6) Now we'll perform the same operations for the ceiling. Apply a Bend Ceiling effect and then move the white arrows as illustrated below.
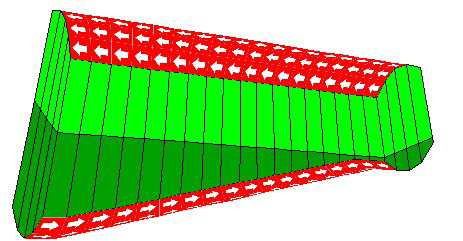
7) Use the Smooth Slope Ceiling (CTRL F3) command and move the ceiling down until the lower part of it is one click above our reference texture line.
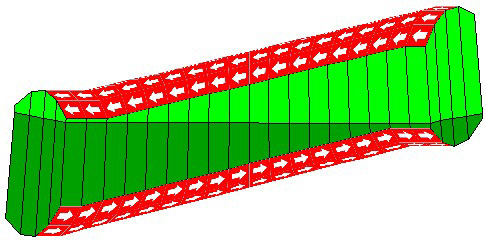
8) Our tunnel is now complete but we could still resize the height of the tunnel to get a more rounded shape. Select ceiling, removing the white arrows, and then click on [-] Ceiling until you achieve the desired shape.
Ground Simulation
There are many geometric shapes available with which to build temples, labs and bases, villages and towns etc, but when it comes to building natural geometry for hills and caves, everything discussed so far is of little value. However, the NG WinRoomEdit has some new features which will help you to create realistic natural environments very easily.
In the Shapes
Menu you will find commands to create
hills and even mountainous terrain, specifically, the
Random Smooth Floor
and Random Smooth Ceiling
commands. These commands work following parameters you can set using the
command Set Random Smooth Parameter
(SHIFT F2)
With the Smooth function you can instantly create a
smooth floor or ceiling where all squares will be attached to each other
with no fractures.
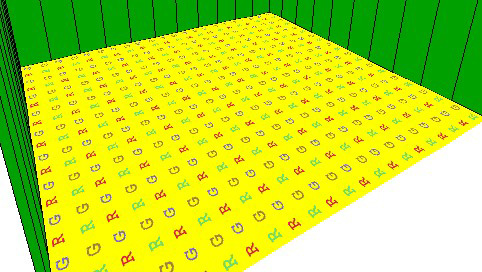
Random Smooth commands allow you to keep previous texturing intact, avoiding the problem of misplaced and wrongly aligned textures on new triangles. Thanks to this feature it is strongly recommended that you texture floors and ceilings when they are still flat, and only when all textures have been applied to use the random smooth commands.
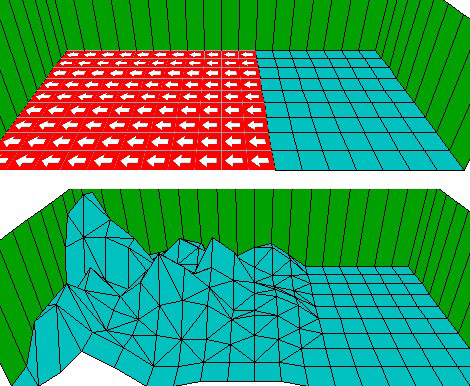
To better understand this, we need an understanding of the difference better how the old TRLE methods compare with the NGLE. We will use this textured floor for comparison:
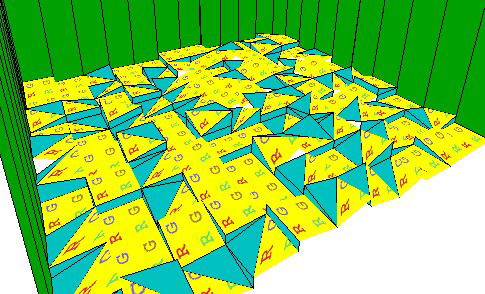
In the old TRLE when we apply the Random Floor Up, this is the ugly result:
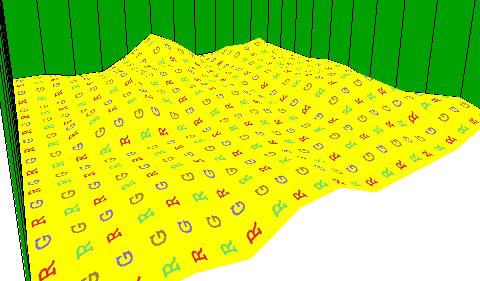
While using Random Smooth Floor with the setting Hills in the NGLE, this is what we get:
Setting Random Smooth Parameters
1 = Mountains
(0=Soft Hills)
Mountains effect creates more height and sharper
outlines. Normally we would use Mountains for perimeter areas to prevent
Lara from straying to the edge of the map.
2 = Limit max
height to room height
By default, random effect will grow floors
with no limits. This means the floor could pass through the ceiling. In
rooms linked with vertical portals this is not a problem but for other
rooms you may wish to limit the max height of random effect to the
current room height.
4 = Many changes
for hit
The algorithm to generate hills or mountains is based on
a series of single changes to floor or ceiling. You can allow a standard
number of changes or increase this quantity using this setting.
8 = Don't smooth
Despite smoothing being the best feature of new random floor
functions, in some circumstances you may wish to have a fragmented
terrain. To remove the smooth effect you can add an 8 value to the
random smooth parameter.
16 = Fewer
Changes for hit
Same effect as "Many changes for hit" (see above)
but in this case you can reduce the default number of changes.
Tips & Tricks for 3d Terrain Generation
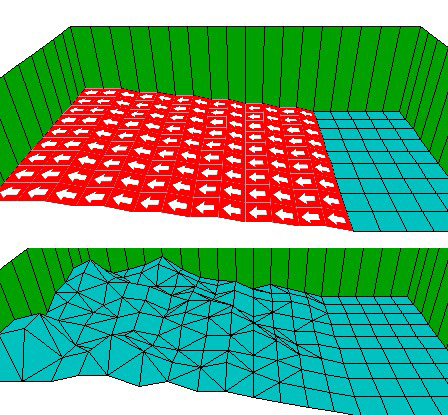
Random smooth commands use optional directional white arrows to perform bigger increments of change in the direction of the arrows. In the picture below using a mountain effect you can see the increment is not really regular because the mountain generation is random. However, we get most height towards the left side of the zone, in the direction of the arrows.
If you want a more gradual rise in hills, don't use white arrows but rather mix two different shape effects. First prepare the zone by making a smooth slope and then apply a random smooth floor effect set with hills, as in the picture below.
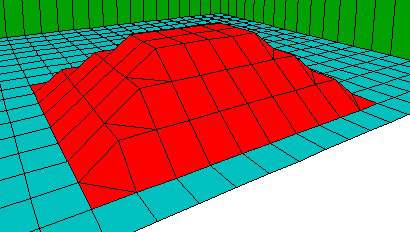
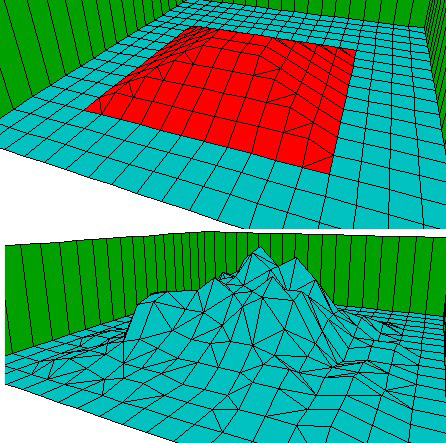
If you want a mountain in a central position of your room, you can mix smooth pyramid floor with a mountain effect. In the picture below is also applied a hills effect to smooth out the edges of our little mountain.
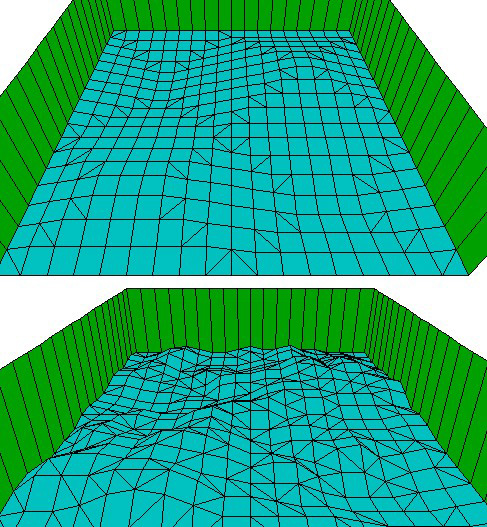
Hills effect works fine also by itself, but if you want terrain like desert dunes, you could prepare the zone putting alternate direct and inverse pyramids using only a few clicks of height, and then apply the hills effect with few changes for hit, as in the picture below.
If you want to limit access to Lara in a certain direction you can use an effect with Mountains + Limit max height to room height + Many changes for hit (value = 7). In this way you can have a high natural mountainous barrier to prevent Lara going in that direction.
Other Shape and Texture Menu Commands
In this section we will describe some of the commands in the Shapes and Textures menu.
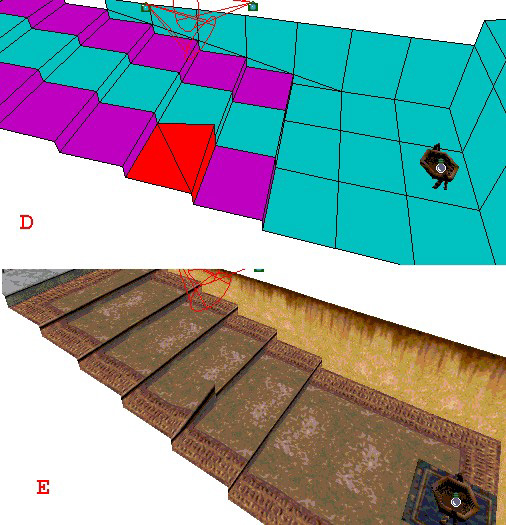
Create Floor Triangular Tex
This Textures menu command permits automatic texturing in any selected zone where there are untextured triangles. This operation works only if the square with the untextured triangle was textured before splitting the square into two triangles. Let's look at an example to better understand this.
Here we have a textured floor (figure A) to which we apply some editing by lifting up one corner of a step (figure B).
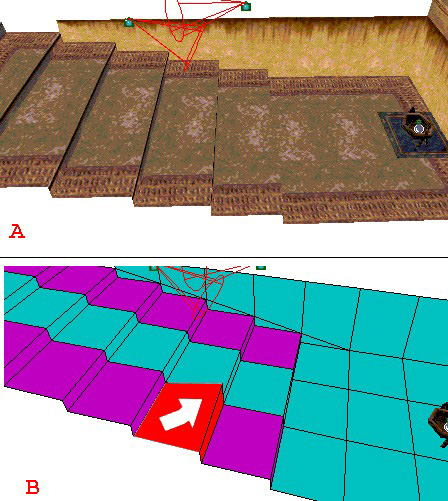
Because of this, we now have an untextured (new) triangle. Additionally, the other triangle of the same tile now has the wrong texture orientation.
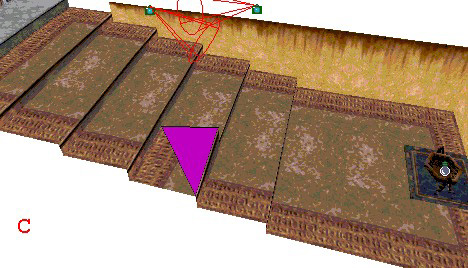
To resolve this problem we can select that square (figure D) and apply the command Create Floor Triangular Tex (SHIFT F3), which effectively applies the correctly aligned texture to the whole tile (figure E).
Create Ceiling Triangular Tex
This command has the same target and working mode of the Create Floor Triangular Tex command. You'll use this command when the triangles to correct are on the ceiling.
Note that in some circumstances the restored
texture may have the wrong orientation. This happens when you apply two
edits to the same sector before employing the above commands.
Remove Editing from Selection
This Shapes command removes all editing from a selected zone. (CTRL F11). The results you get are very alike to the old Average Floor of the Features menu but with two differences:
Remove Editing works like the Average floor + Average Ceiling old commands, applied at the same moment, restoring floor and ceiling.
The old commands of Average floor and Average ceiling could cause crashes if applied to bound walls, whereas the new Remove Editing command works fine even on bound walls. This new command can even be used to remove all texture grids from walls.