Outfits for Lara
by
Trinity
This tutorial is for complete beginners, so if you want to make outfits
but have no idea how, this tutorial is for you. Ok,
important things first. You are going to need a few tools to get you
started.
1: The Level Editor
This is the most important thing, some people make outfits without the
level editor but that's a very bad idea. The level editor is what you
will test your outfit in. The Level Editor (LE) is what comes with Tomb
Raider Chronicles (TRC), if it didn't (If you got it as a jewel case or
off of Ebay maybe) come with TRC , then you can download the Level
Editor.
2. StripX
This is the program that you import your meshes into and texture Lara's
outfit. This is the program that makes the outfit. (Note: This works
great with 98 & ME, but it runs really slow on XP pro edition)
3.WadMerger
This tool converts your outfit into the right file so you can test it in
the level editor. This is also an extremely useful tool for making
levels and other things related to the LE, but we won't get into that.
You'll also need Runtime 5 and Runtime 6 to make this run properly on
your computer. (Occasionally this program is hard to get to work right,
just ask the members on this site and they can probably help you.)
4. Metaseqouia *This
is optional*
If you want to make meshes for Lara, (If you don't know what meshes are,
they're basically Lara's Polygons. The thing that makes Lara 3D) then
I'd suggest Meta. Meta is a ton easier to use then, say, programs like
3D studio Max, Rhino or Gmax. I've worked with all of them, and I
learned Meta in 10 minutes, as for the other tools, I'm still learning.
5. Texture making tools *Also
optional*
A photo enhancing tool is great for making textures. The best are Photo
shop pro and MGI photo suite. If you don't want to download a demo of
those or buy them then the next best thing is to go online and get
textures from web page background sites and resize them in Paint. Ok,
don't try making your own textures in paint, no matter how good you are
it'll probably look very bad. The internet textures will probably be
good looking enough for your outfit.
Backups & Finding files
Assuming you've installed your level editor by now, and all the needed
programs listed above, then you're ready for the next step.
StripX is not a hard program to use, it's got a simple layout. Click
open, and you will find your WADs under: program files - Core design -
TRLE - Graphics - WADs.
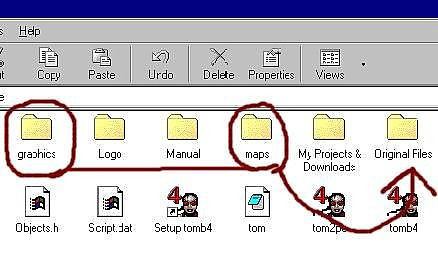
If you haven't already, make a back up copy of your ''Graphics' and
'Maps' folder. Make an "Original files" folder. This files are often
saved over, and you can't get them back unless you reinstall the level
editor, or download them.
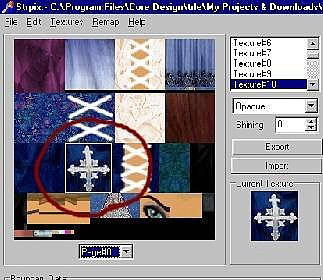
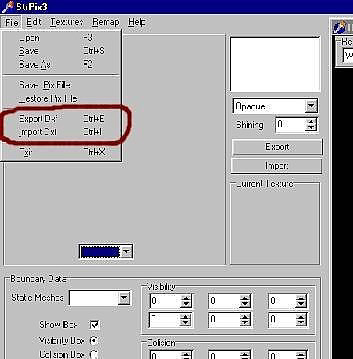
Loading & Saving Textures: Are you ready to texture? Texturing is not hard, so don't sweat it. Load StripX and open the WAD you want to start with, let's use the Tut1 WAD file (Remember to make a backup copy of it before you start). Ok, on the task bar at the top there is a button called "Textures" click on it and a bar will appear beneath it, it says 'Export bitmap' and the other says 'Import bitmap'. Basically: Export = save, and import = load. Click on 'Export bitmap' and save your texture to a folder that you wont forget how to get to. ( :p ) What that does is it saves all of the textures from all of the objects in your Tut1 WAD into a picture format. It will be the exact same thing as the textures to your right when in StripX.

Making Textures
Choose your best photo enhancing program, one that you know how to use,
and load the Bitmap that you just saved. It might look like a lot of
textures, but zoom in and start at the top. It might look overwhelming
but you'll get used to it. Take a look at the textures, you'll see that
they're all squares, well ok, some are rectangles. (If you've explored
any in StripX you will have noticed that if you select a texture it will
have a little white box around the texture that you clicked on. They are
many textures put into one big picture.) Ok, have you gotten or made any
textures for your outfit? If you haven't then go online and search for
some good outfit textures or make your own. If you're loading a picture
into you're texture set then you'll probably need to resize it. You'll
need to make the picture you loaded the same size as the texture you
want to replace it over. If the texture is too big, when you load it in
StripX the white box will only take a piece of it, and if it's too small
it'll take off of the texture behind it. It might sound confusing, but
they best way to understand it is too test it your self. And if you make
a mistake, you can always save your modifications as a separate file
then the original texture. Or load the original Tut1 again and save the
texture from StripX.
Placing textures on
Lara
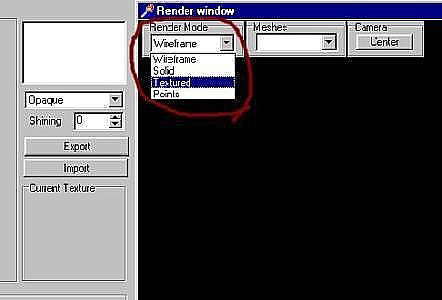
Once you're finished making your textures, load it (Import it). It will
take maybe 5 seconds at most to load them all. When you first load a WAD
it'll be in Wireframe mode. Look to the top right of your screen where
the wireframe mesh is. See the little gray box? Click on it, it'll say
four things, "wire frame", "Solid", "Texture" and "Points". Now, scroll
down to Texturing. You'll now see some parts of Lara. She made up of
several pieces and you'll need to texture each part you want to change.
If you scroll through the meshes you see lots of pieces of Lara and some
of her objects and enemy. Feel free to look, but all of Lara is located
in the first part of your WAD.
To place a texture, click on the texture you want then click on the
place you want the texture to go.
When you get to Lara's face, you'll probably notice that when you place
new lips that it looks odd. That's when mirroring or flipping the
texture is needed. The Left click places the texture, Alt rotates, Shift
mirrors and Ctrl selects a texture from the mesh (Ctrl isn't needed
much).
Loading & saving Meshes: Select the mesh you'd like to modify/change. Let's say you want to change her chest, then go under file and you'll see 'Export DFX' and 'Import DFX'. Remember, just like with the textures, Export = Save and Import = load. The DFX is the file that the mesh is saved in.
Making meshes in
Metaseqouia (Meta)
Ok if you're going to use Meta then read this, if not then this probably
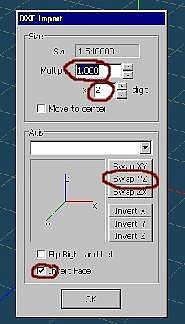
won't do you any good. Load Meta and open the mesh you saved. It'll come
up with a box (See first meta picture for reference). Multiply should
be: 1.000. Digit should be: 2 .Axis: Click on Swap YZ . And do the check
box for "Invert Face".
The basic tools that'll you'll need want to learn how to use: Create,
Primitive, Extrude, Mirror & Delete.
Don't use "Knife" for now, it cause's holes most of the time. And a good
little feature is if you want one point to join to another point just
drag the point to the one you want it to connect to and right click
once. It won't work if the two points are not close. (Don't forget that
Meta includes a tutorial in it's files on your hard drive. If you have
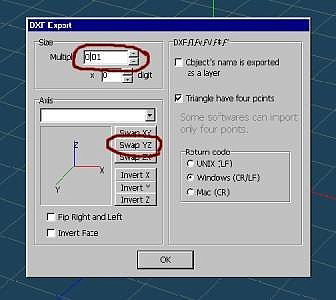
problems). And to save the DFX, Multiply should be: 0.01 . And click
Swap YZ. See second Meta picture for reference.
A few little things that you should know
Making a high polygon outfit is difficult and may cause problems. If
you're in StripX you'll see some numbers in the bottom left corner. The
one that says Vercites, if the number is above 255, the outfit probably
will not work when you test it.
If you want to use a mesh that someone else uses then load their outfit
and save the mesh you want then load it in your outfit. But do not
forget, they spent time working on that mesh! So credit them. If you
include a ReadMe file with your outfit (Under the start & accessories
bar there is a 'notepad', that's a great program to make simple
ReadMe's) then say in that readMe something like: 'The head mesh was
made by - their name here!-. The same goes for textures, if you use a
texture, credit the person who made it. If you don't know who made it
then state that you didn't make it but don't know who did. Ok, one last
thing about credits, I promise, most authors like it if you add credits
in the description of your outfit when you add it to the site.
Last but certainly not least. For a first outfit there is no need to
over do it, no one expects a first outfit to be a master piece. Even
experienced outfit creators have bad outfits from time to time. But the
best thing to remember is if you make a ugly outfit is that maybe the
outfit wasn't a success to other people but it is a success to you. If
you learn from that outfit your next outfit will be better. Don't give
up just keep trying, you'll get better, I know you will.