Screamer - Advanced
by
EssGee
Introduction
This tute will cover some specific uses of
Screamer for fixing sound in wads. The program is best used in
conjunction with Wadmerger. I am not going to cover installation, as
that is thoroughly explained in the manual that comes with the program.
However you should note that you must download and install the Java
environment to run the program.
What Screamer won't do. It will
not create a sounds.txt from your current wad.
What it can do:
It allows you to create a new sounds.txt and output new .sam and .sfx
files (sound files) for your wad. You can use it to create a new
sounds.txt file for a single object or for a complete wad. It will allow
you to add custom samples to an object.
What's the point of
doing this? Some of it is creative such as adding custom sounds, but
often it is used as a corrective measure for wads with messed up sounds.
There is also a huge buildup of unwanted sounds that get assigned to
wads through objects being brought into a wad then being deleted. The
average level probably uses 120 -160 sound samples, but wads often end
up with 200 or more sounds associated with the wad during the building
of the wad, as objects are added and deleted. When you compile your TR4
level file with tomb2pc.exe all these samples get added to the TR4 file.
That can be mean about 2-3 Mb of unwanted rubbish being added to your
TR4! My tip here is do all your experimental work with new objects in a
test wad and project. Only add objects to your level wad when you are
satisfied that they are working properly.
Getting started
Understanding sound samples in
TRLE:
In TRLE game sound samples are wav files in the format
PCM 22,050 Hz 16-bit mono.
You have a huge set of standard TR4 sounds
to choose from in your Samples folder. You can add custom samples to
this set of sounds. I recommend if you create new samples you stick to
the 8-letter naming convention for the file and keep the sample smaller
than about 70 kb otherwise it probably won't trigger in game.
In
the TR4 wad format there are 370 sound banks available (0-369). Think of
these as channels on an audio mixing desk. These audio banks or channels
are set with a predetermined name and number. With each of these sound
banks you can associate (assign a sample) a sound sample or samples to
it. Unlike the Sound banks themselves which are not changeable, you can
change the samples that are assigned to each Sound Bank.
e.g.
Sound bank 0 - LARA_FEET: foot01 foot02 foot03 foot04
This means
that the four different Lara footstep sounds are assigned (associated)
to Sound bank channel 0 - LARA_FEET.
So these 4 samples will
trigger alternately when Lara walks. They will trigger where a sound
trigger for Sound bank 0 has been set in the Anim Commands of the Lara
wad object. You can view this in the Anim commands window of Wadmerger's
Animation Editor.
Opening Screamer
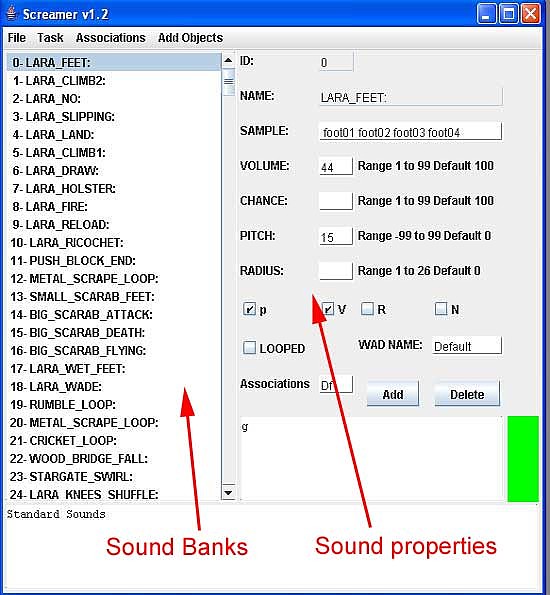
When the Screamer program window opens you are
presented with 4 menus at the top. Below this are two frames. The left
hand frame contains the list of 370 sound banks. You can scroll down
through the entire list. The right hand frame contains all the sound
properties and settings required to associate a sound sample and sound
bank to a wad.
Let's work through the different fields.
ID: The Sound bank ID. This corresponds with the sound bank list.
Nothing to do here.
Sample: this is the name of the sample
that is assigned to the current sound bank you are viewing. Notice if
you click on a different item in the list, the properties change. If you
are adding a custom sample to a sound bank this is where you would enter
its name.
Volume: This sets how loudly your sound sample
will play in game.
Chance: This sets how regularly a
sample will be played. In most cases you'll want this set as blank (or
default100 - same thing). E.g. it will play 100% of the the times it is
triggered. If Chance was set at 95, the sample would play about 95% of
the times it triggered.
Pitch: this changes the pitch of
the sample. A negative value will make the sample sound deeper and
slower, a positive value will make the sample play faster and sound
higher in pitch.
Radius: This is the distance away from
Lara that a sample will be heard.
P V R N: Disregard
these buttons, Their exact function has not been described.
Looped: This is only applied to samples that are played continuously
like the waterfall loop.
Wad Name: This is where you enter
the name of your wad.
Associations: This is where you
enter a 2-letter shorthand name for your wad.
Add: Press
this button to add a Sound Bank to your wad. (Note:Side panel is Green
when associated).
Delete: Press this button to delete a
sound bank from your wad. (Note: Side panel is Red when not associated).
Associations panel: This displays the shorthand wad names
that are currently associated with the sound bank.
Example 1: Single object wad
Adding sounds to a
door
Scenario: You have a single silent door object
in a wad (let's call it testdoor.was) and wish to add sounds to it when
it opens and closes.
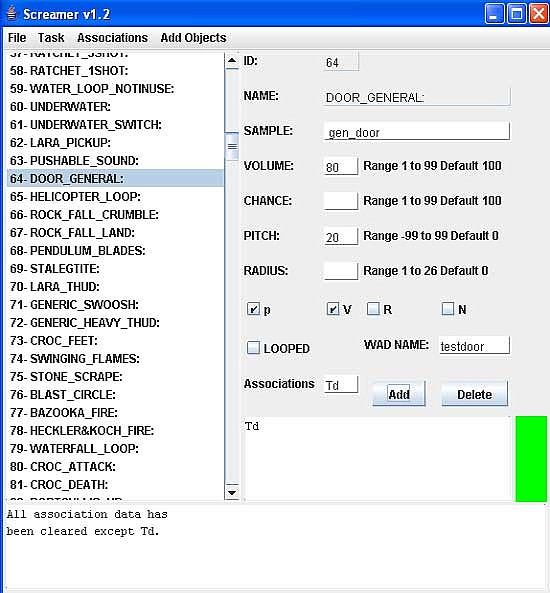
1. Open your testdoor wad in Wadmerger.
Click on your door and open the Animation Editor. On the Sound drop down
menu go> Add Sounds. Scroll down the list to TR4 64 - DOOR_GENERAL and
tick the check box and click Add Selected button.
2. Using the
Current Animation drop down list to view the different animations -
Select the 'Door opening' animation (you'll be able to see this as it
goes through the animation) and open the Anim Commands button (The
button with 0011 etc). In the first window select 'play a sound' from
the drop down list. In the second window put '4' for the frame number
you want the sound to start triggering. In the third window select '64 -
DOOR GENERAL' and in the fourth window select 'Always'. Now click the
'Add' button. Repeat this step for the door closing animation. Now save
your wad. You have now set the DOOR GENERAL sound bank to trigger
whatever sample is associated with it on Frame 4 of both the opening and
closing door animations. By default, that is the sample gen_door.
3. Open Screamer. When Screamer opens, it automatically loads a
default sounds.txt. (Don't save over this - always use the Save As
function)
4. In the Wad Name field replace the word 'default'
with 'testdoor'; in Associations field, replace Df with Td (It can be
anything - I've chosen this for testdoor. Note: the letter combination:
first letter uppercase, second letter lowercase).
5. Go to
associations Drop down menu and choose 'Clear all except'. A message in
the bottom panel tells you all associations have been cleared except Td.
There are temporarily no sounds associated with your wad.
6. From
the Sound Bank list scroll down to no.64: DOOR_GENERAL and click on it.
This brings up the properties for sound bank 64. You can see that the
sample assigned to this sound bank is gen_door. We'll leave it and the
other settings as they are.
7. Click the Add button to add Sound Bank 64 to your
sounds.txt. We're using this sound for both opening and closing the door
so there's no other sound banks needed. Look at the Chance value. If it
is not a blank field or a value of 100, change it to 100. This is to
ensure that the sample plays every time the door is opened and closed.
8. Go to the Task Drop Down menu and select 'output wad'. Now look
in the Output folder where Screamer is installed. You'll find two new
files created here: testdoor.sam and testdoor.sfx. Copy them and paste
them over the same named files that were created with the testdoors wad.
9. You are finished with Screamer for now, so using the 'Save As.'
function, save your custom sounds.txt file (for future reference) to a
folder with your testdoors wad.
Example 2: Fixing sounds on an entire level wad
Scenario: You have built an level
wad that you are using with your level. At some point your sounds have
gotten messed up. Classic examples of this are: rolllingballs, levers
and underwater switches with no sound; enemies that make underwater
gurgling sounds then they shoot at Lara; Lara's gun sounds go strange or
are missing.
Cause of problem: Usually caused by too many
samples in the wad, by an object being added to the wad that has a sound
sample that isn't in your Samples folder, or an object that has TR3 or
TR2 sound banks assigned to it.
Solution: There
is no simple fix for this. You have to get rid of the excess samples
and/or Sound banks that are causing the problem. So you must create a
new sounds.txt for your wad. Screamer performs the same function as
pcwadsfx by creating a new sounds.txt and outputting new sam and sfx
files for your wad. It just does it a lot more cleanly and and makes
editing the sounds.txt file a lot easier.
Preparation: You
need to do some homework first. So get yourself a pen and paper and get
ready to start writing lots of numbers. You need to make a list of all
the Sound banks that should be associated with your wad.
How do
you know which Sound banks should be associated with your wad? Let's put
them into 4 categories:
1. The default General sounds that are
used by all levels - this is Lara's sounds and basic environment sounds.
2. Sounds associated with enemies.
3. Sounds associated with
other moveables (traps, levers, animating objects).
4. Sound
banks that are hardcoded in the TR4 game engine (eg rollingball rumble,
vehicle movement).
This procedure may take about an hour, but
don't be scared off - it is well worth the effort, as it will restore
sounds correctly to your wad as well as reducing the size your TR4
output.
So begin by opening up your wad in Wadmerger. (First save
a backup of your level wad, was, sam, sfx and swd files in a safe
location).
1. The General sounds we'll deal with in Screamer
shortly.
2. Enemies sounds. Select your first enemy and open it
in the Animation Editor. Select animation 0 in the Current Animations
drop down list. Open the Anim Commands window (button with 0101 etc).
Click on one of the lines of sound instructions (If there are no
instruction lines in the window, you may have to select another
animation). Now click on the arrow of the Sound Bank field (second field
from the right). This will display a list of all the sound banks used
for this enemy. Write them all down. E.g Baddy 2 - 95, 254, 258 64...
Repeat this process for all the enemies in your wad.
3. Other
moveables sounds. Work down the list of your wad items for all your
traps, doing the same as you have done for the enemies, listing all
sound banks that are associated with the item. As an aid I have created
a list of commonly used items and the relevant sounds that need to be
associated with them. (Note: this is not a complete list , but I will
add to it as necessary). Check through your wad and/or the list to see
which objects you are using in your level and write the relevant sound
banks down in your list.
Note: If you discover any enemies or
objects that use sound banks from TR2 or TR3 (e.g.TR3Sound205) you may
need to modify these otherwise they can cause problems in large wads.
(See separate Tutorial - Changing Sound banks and samples).
4.
Hard-coded sounds. There are some sounds that are hard-coded and these
need to be added to your sounds.txt directly using Screamer.
You're done with Wadmerger, so now open up Screamer. Let's assume your
level wad is called 'mylevel'. You can substitute the real name of your
level wherever this appears in the tutorial.
5. Open Screamer.
When Screamer opens, it automatically loads a default sounds.txt. (Don't
save over this - always use the Save As function for your sounds.txt)
6. In the Wad Name field replace the word 'default' with 'mylevel'
(don't include the quote marks); in Associations field, replace Df with
Ml (It can be anything - I've chosen this for 'mylevel'. Note: the
letter combination: first letter uppercase, second letter lowercase).
7. Go to associations Drop down menu and choose 'Clear all non G &
T'. A message in the bottom panel tells you All association data for all
sounds has been cleared except 'g' and 't'. There are temporarily only
the standard game sounds associated with your wad.
8. Now using
the list you just compiled, work through the list by clicking on each
Sound Bank number in your list to select it, and then click the Add
button, to add it to your wad. Repeat this process until all the sound
banks that you have listed have been added.
9. You may also need
to add any hard-coded sounds that are not on your list. This may include
Rollingball sounds, or Vehicle sounds. Add them now.
10. You are
now at a point where you could stop, but there is also the opportunity
to be a bit creative and fine tune any of your sounds. It's a bit hard
to list all possibilities but if any of your sounds are playing
intermittently then change their Chance value to 100 so they play all
the time. If any of your sounds seem too loud you could adjust the
volume of that sound bank. If you would like a sound to be heard further
away from its source than it is now then increase the Radius of the
sound to achieve this effect. If you want to replace a standard sound
sample with a custom sound sample you could do this by replacing the
name in the Sample field.
11. Now do a Save As.. for your
sounds.txt file in a unique folder to keep for reference, in case you
need to do any other alterations to it later. You can open up this
sounds.txt file with Screamer at a later date, if necessary.
12.
Finally, go to the Task Drop Down menu and select 'output wad'. Now look
in the Output folder where Screamer is installed. You'll find two new
files created here: mylevel.sam and mylevel.sfx. Copy them and paste
them over the same named files that were created with your mylevel wad.
Now place your five wad files (was, wad, sam, sfx, swd) in your
Graphics/Wads folder and compile your TR4. If you've done everything
right, all your sounds should play correctly. You may also notice that
your TR4 file size is significantly smaller (like about 2-3 Mb). Now
play through your level, paying attention to hear if all sounds that you
would expect to be playing are doing so when you expect them to play.
There is always a chance that you missed something on your first
attempt. If so, go back to your lists and double check what's missing
from the offending item. Add the needed Sound Bank as you did for all
others, resave your sounds.txt file and go Task > output wad again,
replacing the current sam and sfx files of your level, with the new ones
you have just generated in the Screamer/Output Folder.
Changing Sound Banks and Samples
I'd call this Screamer
tute an Advanced Tutorial. Hopefully it is useful to you.
This tute
assumes you have understood the preliminary Screamer Tutorials and are
now looking to modify Sound banks and sound samples.
Modifying Sound Banks
This is only necessary with
moveables that have TR2 or TR3 sound banks associated with them. (Note:
Some builders have used these objects without too much problem. I have
found that by the object adding extra TR2 or TR3 sound banks to the wad
structure, that sound problems do arise, especially with large wads.) So
consider this a recommended rather than essential method for
sound-fixing.
Scenario: You
have an enemy that uses four TR3 sound banks and samples.
Solution: The sample can retain
it's name. Just ensure that it is the same sample format as TR4 - PCM
22,050 Hz 16-bit mono. The Sound banks can be replaced with TR4 sound
banks and the TR3 sound samples can be assigned to the TR4 sound banks.
Method: Save your object as
a single object wad using Wadmerger. Let's call it 'mydog' wad.
Open
the object in Wadmerger's Animation Editor.
Open an animation
from the Current Animations list and also that has sound instuctions in
it. Open the Anim Commands window (button with 01010 etc) to see the
sound instructions. Click on the Sound bank field arrow to show the
complete list of Sound banks used. Write these down.
Using the
Add Sounds button to open the Add sound window, now select suitable
sound banks to substitute for the TR3 Sound Banks. For example, if you
had a TR3 Hound in the Dog slot and it had four TR3 Sounds associated
with it, you could choose four TR4 Dog Sound Banks as the substitute
banks (E.g. 175_Dog Howl, 176_Dog Hit Ground, 180_Dog Bite, 181_Dog
Death).
Make a reference table list so you don't get confused.
You want to list your four TR3 sound Banks, the four TR4 Sound banks
that will replace them and the TR3 Samples that they use. (Remembering
that a single Sound bank may have several sound samples assigned to
it).
Open Wadmerger's Sound Manager and click on each of your
four Sound banks to establish which samples are associated with each
Sound Bank. Use the Dropdown arrow on the Sound sample field to see if
more than one sample is assigned to a Sound Bank.
Returning to
Wadmerger's Animation Editor, Use the Anim Commands window to replace
(Change button) each TR3 sound instruction with your chosen TR4 Sound
Bank. Work through every animation doing this. Save your wad.
Now open Screamer
1. When Screamer
opens, it automatically loads a default sounds.txt. (Don't save over
this - always use the Save As function).
2. In the Wad Name field
replace the word 'default' with 'mydog'; in Associations field, replace
Df with Dg (It can be anything - I've chosen this for 'Mydog'. Note: the
letter combination: first letter uppercase, second letter lowercase).
3. Go to Associations Drop down menu and choose 'Clear all except'.
A message in the bottom panel tells you all associations have been
cleared except Dg. There are temporarily no sounds associated with your
wad.
4. From the Sound Bank list scroll down to no.175_DOG HOWL
and click on it. This brings up the properties for sound bank 175. You
can see that the sample name assigned to this sound bank is dog_hwl.
Change this to the sample that is in your table/list. - It might be
something like TR3Sound205_0. If there is more than one sample to be
assigned, simply leave a space and add the next one on the same line of
the Sample field.
5. Click the Add button to add Sound Bank 175
to your sounds.txt. Look at the Chance value. If it is not a blank field
or a value of 100, change it to 100. This is to ensure that the sample
plays every time. If there is more than one sample you will need to
adjust the Chance Value to create a random selection of which sample is
played. Repeat this procedure for Sound Banks 176, 180 and 181.
6. Go to the Task Drop Down menu and select 'output wad'. Now look in
the Output folder where Screamer is installed. You'll find two new files
created here: mydog.sam and mydog.sfx. Copy them and paste them over the
same named files that were created with the 'mydog' wad. Use Wadmerger
to add the enemy to a test wad and see if the sounds work correctly. If
all has gone well - your dog will perform the correct sounds in game.
7. You are finished with Screamer for now, so using the 'Save As.'
function, save your custom sounds.txt file (for future reference) to a
folder with your mydog wad.
Changing Samples
Using the above tutorial it is easy enough to imagine that custom
samples can be substituted for standard sounds for just about anything.
Simply save the sound sample in your TRLE Samples Folder in the correct
format - PCM 22,050 Hz 16-bit mono. Then replace the Sample Field name
for the relevant Sound Bank with your custom sample name. Then Output
your wad and replace the Sam and Sfx files as previously described.
Reference Sound bank list for Commonly used Wad Items.
Rollingball - 122, 147
Pushable object - 11, 63
Teethspikes - 343
Darts spit - 325
Large flame emitters -
368
Small fires - 150
Shatter object - 347, 366
Wraith 184
Library Switch/ Old switch - 241
Trapdoor
open/close - 161, 162
Underwater switch - 61
Big Lever
switch - 328, 337, 338
Push button click switch - 369
Wall
lever - 269
Falling block - 66, 67