Lightning and Electric Arcs
by
Fluen
Sky Lightning
The Lightning
Conductor
Lost
Library Planet Effect
Blue Electric arcs
Notes
To have the sky flash with lightning you will have to
edit your script and add the line:
Lightning =
ENABLED to your level.
And for the thunder you will have to enable the sound:
THUNDER_RUMBLE (sound-ID
182) in the wad for your level.
If you use Sounds.txt, the line
says:
THUNDER_RUMBLE: thun_rum VOL80 P V PIT-86 #g
If the
letter is still a g (for general) you don't have to do anything. If not,
add the letter for your level or change the letter to g. The thunder
will be heard in all outdoor rooms and their adjoining rooms.
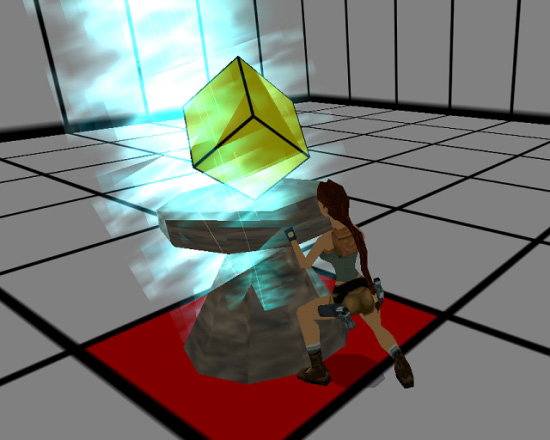
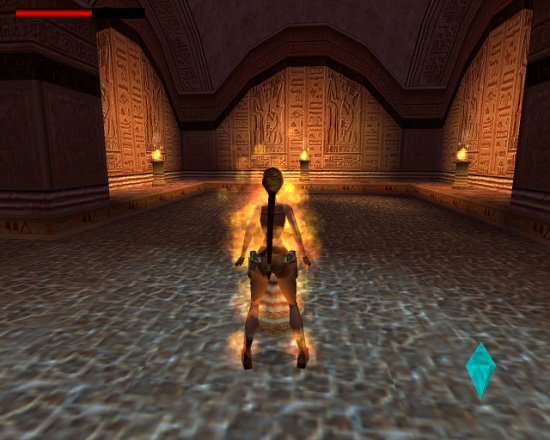
The LIGHTNING CONDUCTOR (Street Bazaar)
In Street Bazaar Lara must cross a small bridge. But
the bridge has been damaged and the authorities have blocked it off.
This takes place during a thunderstorm as bolts of lightning constantly
strike into a kind of lift with a metal surface nearby. Lara must weigh
the lift down with a pushable to make the lightning find a new target
(the blockade on the bridge) in order to proceed.
It's one of the
most peculiar setups in TR4. It can be done in two differents ways -
Core Design's way or the shortcut.
If you want the sound of
lightning, you must enable the sound: THUNDER_CRACK (sound-ID
183) in the wad for your level. If you use Sounds.txt, the line says:
THUNDER_CRACK: thun_crk VOL70 P V PIT10 RAD06 #A
Add the letter for your level or change the letter to g (general).
Please
note: to get the
proper lightning you must have the original sprite 28: or one looking
very like it in your wad.
Core
Design's setup
This is a very sensitive setup and if your setup
deviates just a bit in PUSHABLE_OBEJCT-slot, trigger type, number of
codebits turned on or number of LIGHTNING_CONDUCTORs, it may not work
correctly.
The setup reqires two LIGHTNING_CONDUCTORs, a
PUSHABLE_OBJECT1, a FLAME_EMITTER2 and two ANIMATING8s. There must beno flipmap
number 1 in your level.
The picture below is an illustration of
the following steps:
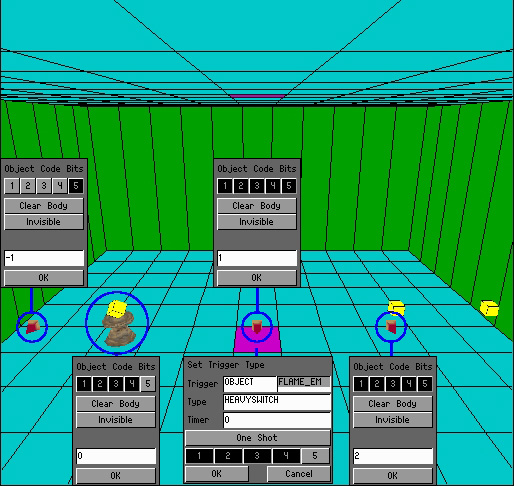
1. Place the two LIGHTNING_CONDUCTORs - the first one
where Lara must place the PUSHABLE_OBJECT1, and the second one where a
second bolt of lightning must destroy a blockade. The two
LIGHTNING_CONDUCTORs can be placed in different parts of the level.
2. Open the object window for the first LIGHTNING_CONDUCTOR
(highlight it and type 'o'). Turn all five codebits on (black) and give
it OCB = 1. This LIGHTNING_CONDUCTOR is deadly, if it hits Lara, and
it's active from the beginning of the level.
3. Open the object
window for the second LIGHTNING_CONDUCTOR, turn all five codebits on
(black) and give it OCB = 2. This LIGHTNING_CONDUCTOR is harmless to
Lara, but only strikes once in all. And it's active from the beginning
of the level but doesn't work until the LIGHTNING_CONDUCTOR setup is
activated.
4. Place one ANIMATING8 on the same block as the
second LIGHTNING_CONDUCTOR (the one with OCB = 2). This is the blockade
which is shattered by a bolt of lightning. There's no need to do
anything more about it. In this tutorial the yellow cube is my version
of ANIMATING8.
Note: The
two ANIMATING8s must be the ones with the lower movable number of their
kind. See the end of this tutorial for an explanation of movable
numbers.
5. Place a second ANIMATING8, where you please.
Core Design used a 'phony room' to show the destruction of the blockade
during a cutscene. Thus the need of two of the same blockade: one for
show and one for real. This step is just to be safe from bugs.
6.
Place a FLAME_EMITTER2 somewhere in the level. Open the object window
for the FLAME_EMITTER2 and give it OCB = -1. Turn codebit 5 on (black)
and the other codebits off (grey).
This FLAME_EMITTER2 will never
be seen, because FLAME_EMITTER2's with OCB = -8 - -1 serve only to flip
flipmaps with the positive number (a FLAME_EMITTER2 with OCB = -3 will
flip flipmap number 3 in the level, when triggered). So when they are
triggered, they aren't lit, and you don't have to worry about the
location of this FLAME_EMITTER2.
It's because of the OCB-code of this
object that there is no room for a flipmap number 1 in the level.
7. On the same block as the LIGHTNING_CONDUCTOR with OCB = 1 place
the trigger for the FLAME_EMITTER2 mentioned above. Open the trigger
window and make it a heavyswitch trigger and turn the codebits 1-4 on
(black) and codebit 5 off (grey).
The heavyswitch trigger is
needed when a specific PUSHABLE_OBJECT is supposed to activate the
trigger.
8. And finally open the object window for the
PUSHABLE_OBJECT1 and turn the codebits 1-4 on (black) and codebit 5 off
(grey). Then this pushable is the only one able to activate the
heavyswitch trigger. In the original game Lara can choose from several
pushables, but only one is heavy enough to weigh the lift down.
It's the combination of the active codebits in the PUSHABLE_OBJECT1 and
the heavyswitch trigger that ensures that only this PUSHABLE_OBJECT is
able to activate the heavyswitch trigger. I describe a similar
connection between pushables and heavyswitch triggers in the Lost
Library setup later in this tutorial.
When Lara pushes the
PUSHABLE_OBJECT1 onto the block with the deadly LIGHTNING_CONDUCTOR (and
the trigger for the FLAME_EMITTER2, that activates the setup), it will
immediately become harmless. So even if the lightning hits Lara, while
she is busy pushing, she's safe:
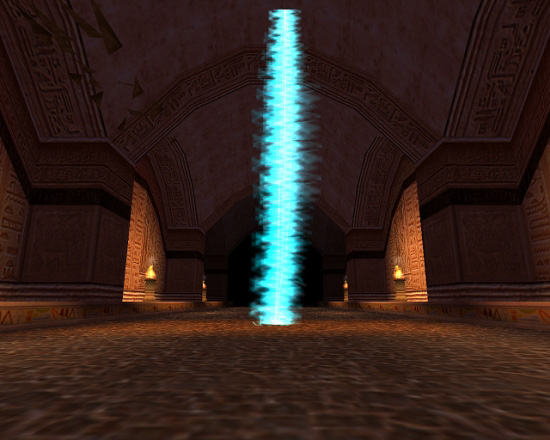
After a few moments - Core Design used a flyby - another bolt of lightning hits the ANIMATING8, which breaks along with the other ANIMATING8. From then on there is no more lightning from either of the LIGHTNING_CONDUCTORs.
The shortcut
It seems the very thing which activates this setup is when the game engine receives the very first call to flip flipmap 1. So if you want to skip the PUSHABLE_OBJECT1, the FLAME_EMITTER2 and the heavyswitch trigger, all you have to do is to use a flipmap number 1 in your level and flip it.
This setup also seems a bit more stable so you may be
able to use more of the deadly LIGHTNING_CONDUCTORs than just one. But
test it to see if it works for you.
You still have to place the
two LIGHTNING_CONDUCTORs with all codebits turned on (black) and OCB = 1
for the deadly one and OCB = 2 for the one to produce a single bolt of
lightning. And you still have to use the two ANIMATING8s, but aside from
that all you have to do is set up a trigger for flipmap 1. The advantage
is that you are free to choose how to trigger the flipmap.
I've
made an example with a creative use of the shortcut setup below.
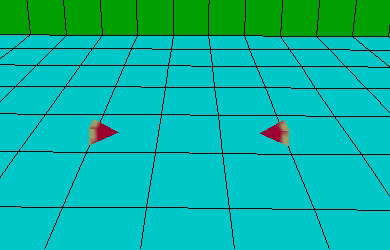
Lara is unable to pass these two statues:
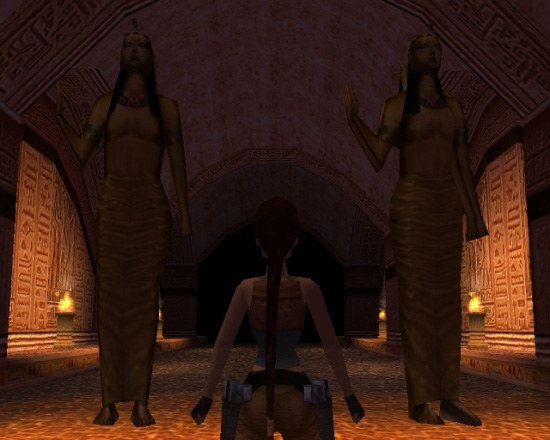
To be able to move on she must pick one of these four gems:
But only one is safe to take. The three others toast her:
In a magic mirror a bolt of lightning shows Lara, which one to take:
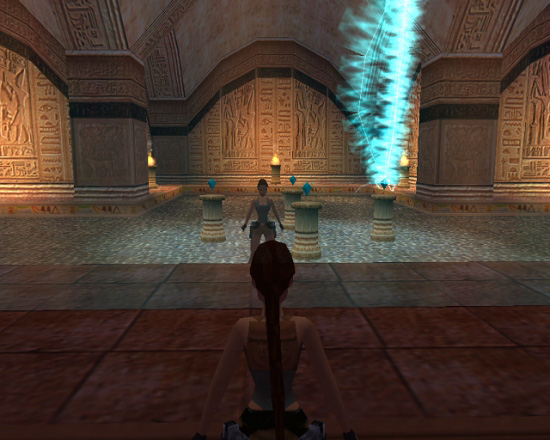
When she takes the right gem, another bolt of lightning destroys the guardian statues (you can see the flying shards of one of them in the top left corner):
Lara's path has been cleared:
In the example I toggled opacity on the portal behind the statues so an invisible wall would prevent Lara from going past them. I made the room flipmap 1 and in the flipped room, the portal was a standard open portal.
In this case I didn't use the deadly lightning as a
danger to Lara but as a hint. So I trigged a FLAME with a pickup trigger
under each of the three wrong gems. A pickup trigger under the right gem
flipped flipmap 1. This call for flipmap 1 activated the harmless
LIGHTNING_CONDUCTOR, which then 'destroyed' the two statues
(ANIMATING8's). And in the flipped room Lara could go through the
portal.
Note:
The bolt of lightning reaches down to the nullmesh for the
LIGHTNING_CONDUCTOR. Place it at floor height, if you want it to strike
into the ground, or higher, if you want it to look like it strikes into
something on that block (like the gem in above example). But you may
risk that Lara is able to get safely under a LIGHTNING_CONDUCTOR, that's
placed higher than floor height.
You can only have one
setup in a level, because when the game engine receives the very first
call to flip flipmap 1, the setup will be activated. And this doesn't
depend on which setup version you've used.
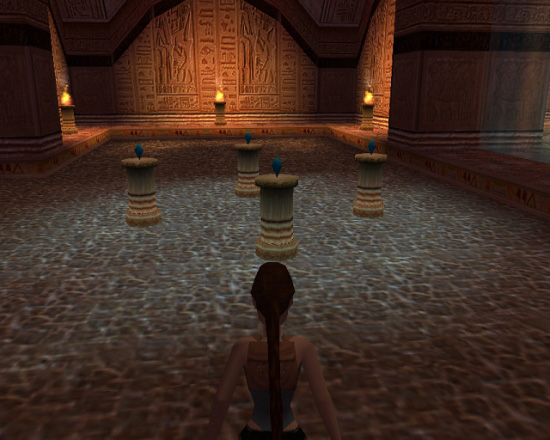
In The Lost Library one of the puzzles is about the
solar system, the way the Greeks believed it was arranged - the earth in
the centre and a handful of planets (including the sun and the moon)
circling around it. Lara must push the globes into place, and each time,
one of them is placed in the right spot a smal ghostlike or holographic
planet object (the PLANET_EFFECT) appears above it.
When all five
globes are in place, the five PLANET_EFFECT's exchange electric arcs
with each other and with an ornament (ANIMATING4) above a raising block
that is lowered.
If you want the sound of electricity, you must
enable the sound: ELEC_ARCING_LOOP (sound-ID 197) in the wad for your
level. If you use Sounds.txt, the line says: ELEC_ARCING_LOOP: l_vander
VOL75 L PIT-13 RAD10 #h #i #j #u
Add the letter for your level or change one of the letters to g (general).
Please note: to
get the proper electric glow at the origin of all arcs you must have the
original sprite 11 (the shine-sprite) or one looking very like it in
your wad.
And for the electric arcs you must have the original sprite
28: or one looking very like it.
Setup:
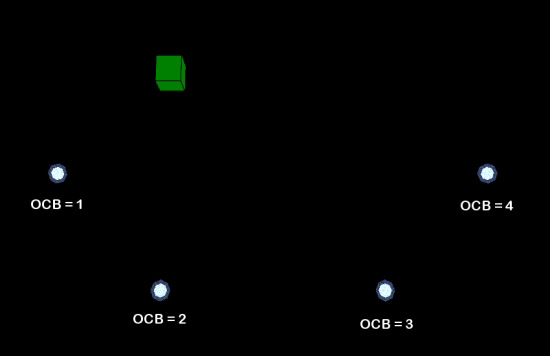
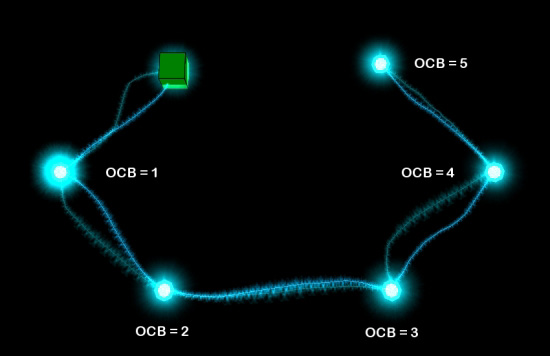
The setup
requires 5 PLANET_EFFECT's and one ANIMATING4.
The five PLANET_EFFECT's must have OCB codes 1-5 and
must be triggered. When all five PLANET_EFFECTs are triggered, they and
the ANIMATING4 will be connected by electric arcs like pearls on a
string.
They are connected like this:
ANIMATING4 --- OCB = 1
--- OCB = 2 --- OCB = 3 --- OCB = 4 --- OCB = 5
In the pictures
below the green cube is my version of ANIMATING4 for this tutorial:
If one of the involved PLANET_EFFECT's is
anti-triggered, the string of electric arcs is also turned off, but is
turned on again when the anti-triggered PLANET_EFFECT is re-triggered.
However, the anti-triggered PLANET_EFFECT doesn't become invisible when
anti-triggered - it just stops animating.
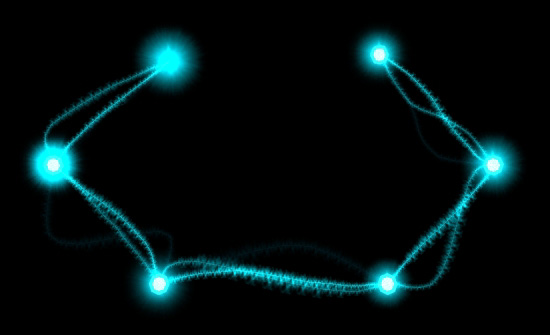
You can also make the
ANIMATING4 invisible - it's difficult to see because of the very strong
glow in the picture below, but it's still the one on the top left:
Notes:
An ANIMATING4 must be
present in the level or the game will crash when the last PLANET_EFFECT
in this setup is triggered.
A PUSHABLE_OBJECT with the
same OCB-code as an PLANET_EFFECT can no longer be moved when the
PLANET_EFFECT is triggered. And this is irreversible. Lara will never be
able to move the pushable again even if the corresponding PLANET_EFFECT
is anti-triggered. It only works for one pushable per OCB-code (the one
with the lower movable number - see Movable
number at the end of
the tutorial).
You can only have one setup in each level. If you
trigger more PLANET_EFFECTs than this, strange things happen (strange
sounds or disappearing PLANET_EFFECT's). But if you avoid the planet
effect setup by, say, skipping OCB = 1 and use numbers higher that five,
you can have a whole array of PLANET_EFFECT's in your level and use them
to block more PUSHABLE_OBJECT's than five.
The Lost Library setup
Because the setup in the version of The Lost Library
that came with the editor isn't all correct - while the one in the
original game is - I'll describe a similar setup with five pushables,
matching PLANET_EFFECT's and a trapdoor, which opens when all five
PUSHABLE_OBJECTs are in place.
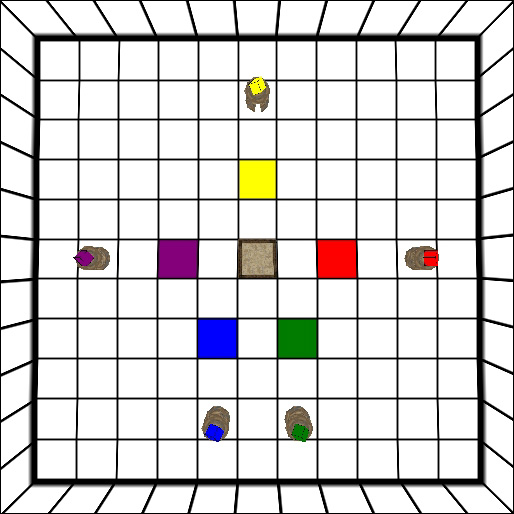
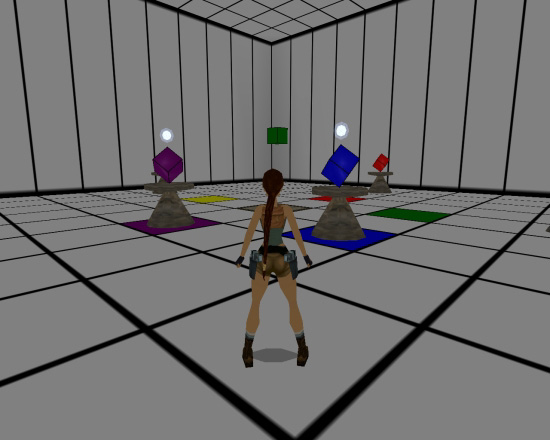
In the picture below I have
arranged five PUSHABLE_OBJECTs and prepared the five blocks they are
supposed to be placed on to open the TRAPDOOR1 in the centre (guess,
which PUSHABLE_OBJECT goes on which block):
The tricky part of this setup is that each
PUSHABLE_OBJECT when placed on the correct block must both trigger an
object (the PLANET_EFFECT) and trigger a
part of another object
(the TRAPDOOR1). To do this you must work with codebits, partial
triggers and heavyswitch triggers. The heavyswitch triggers are required
to make sure that each PUSHABLE_OBJECT is only able to activate the
triggers on one specific block.
I will explain this step by step:
1. Place five triggers for the trapdoor.
2. Open the trigger
window for each trigger and select trigger type 'heavyswitch'.
3.
For each trigger only one codebit must be turned on (black). The
remaining four must be turned off (grey). This ensures that all five
PUSHABLE_OBJECT's must be on their corresponding block to open the
TRAPDOOR1.
In the picture below the trigger window for the first trigger for the trapdoor is open and I have written the number of the codebit, which is turned on in the trigger window, on the block for all five partial triggers.

4. Place the ANIMATING4 (I have placed mine over the
trapdoor) and adjust it to the desired height. There's no need to do
anything more about this object, because it doesn't need a trigger.
5. Place the five PLANET_EFFECT's - one over each trigger - and
adjust them to the desired height.
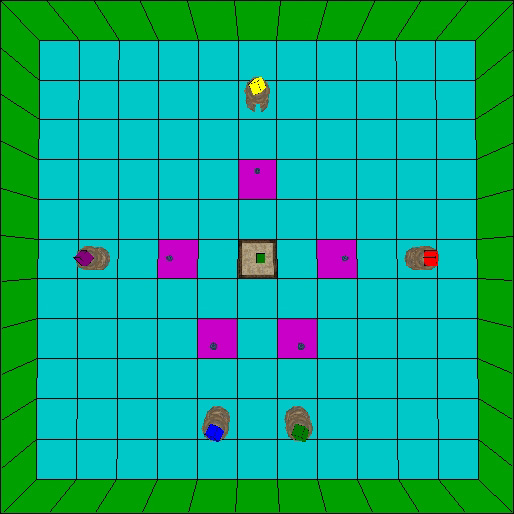
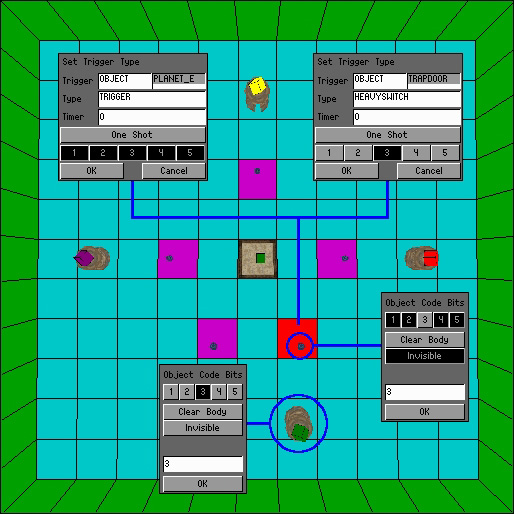
6. Place an ordinary trigger for the PLANET_EFFECT on
the block it hovers above.
In the example below I have used the
planet effect over the heavyswitch trigger with codebit 1 turned on (the
one in the blue circle).
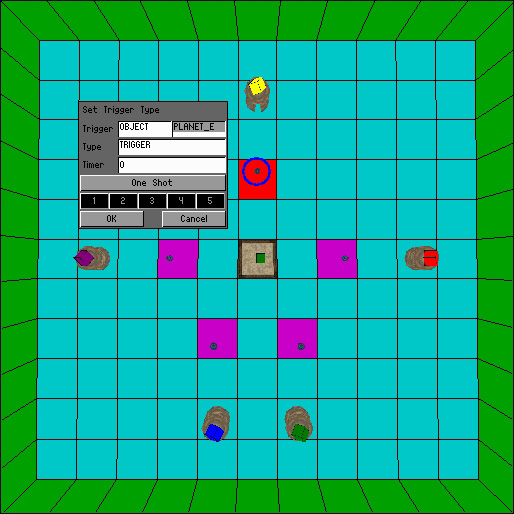
The editor works with stacked triggers,
where one special trigger affects all other triggers on that block. This
means that the heavyswitch trigger with only codebit 1 turned on will
only trigger one fifth of the PLANET_EFFECT on the same block, even
though the trigger window for the normal trigger has all five codebits
turned on:
So you will have to tamper with the PLANET_EFFECT
itself to make it active, when the correct PUSHABLE_OBJECT is in place.
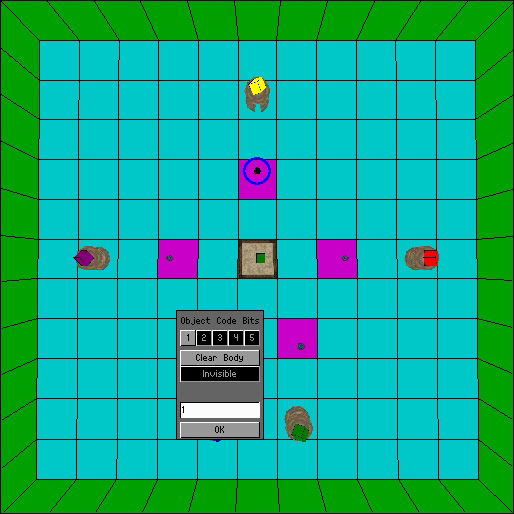
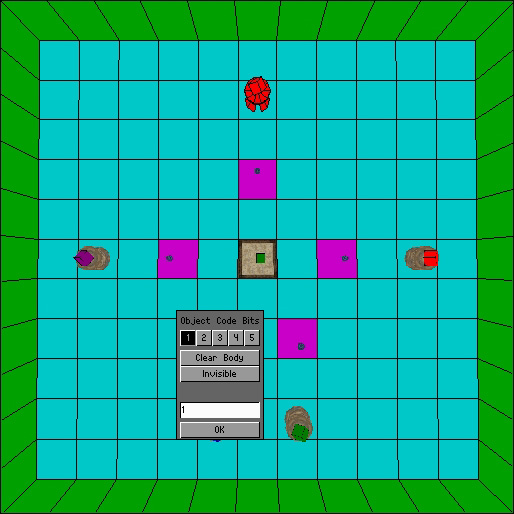
7. Open the object window (press 'o') for it and press the
'invisible' button (to make it invisible before it's triggered). To make
it part of the placet effect setup you also give it OCB = 1.
8.
Codebit 1 must be turned off (grey) and all other codebits turned on
(black). So this PLANET_EFFECT is almost active
from the beginning. It just needs that last fifth, which comes from the
trigger below it.
But also the pushable, which is supposed to activate
the trigger, must have its settings adjusted. In my example it's
PUSHABLE_OBJECT1, but there's no connection between the pushable-slot
and the OCB's for the PLANET_EFFECT's - you can use five pushables of
the same kind, if you want to.
9. Turn codebit 1 on (black) and
leave the other codebits off (grey). This ensures, that the
PUSHABLE_OBJECT1 will be able to activate only the heavyswitch trigger
with codebit 1 turned on and its partner PLANET_EFFECT above.
10.
And give the PUSHABLE_OBJECT OCB = 1 to make sure it stays put, once
Lara has placed it on the correct block (Lara will no longer go into her
ready stance and prepare for a push or a pull). This special effect only
works in connection with the object PLANET_EFFECT and does so, no matter
if you use the planet effect setup or not.
11. Do the same thing for all other triggers, PLANET_EFFECT's and PUSHABLE_OBJECT's. To clarify I have used the third trigger with associated objects as an extra example:
- The heavyswitch trigger number three for the trapdoor must have codebit 3 turned on and all other codebits turned off.
- The planet_effect above it must be invisible, have OCB = 3 and codebit 3 turned off and all other codebits turned on.
- The trigger for the PLANET_EFFECT must be an ordinary trigger.
- The PUSHABLE_OBJECT3 must have OCB = 3, codebit 3 turned on and all other codebits turned off.
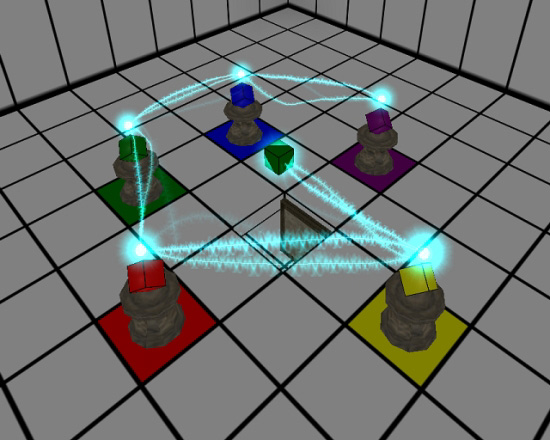
When Lara in game moves the pushables in place, the PLANET_EFFECT above each is activated:
And when all five pushables are in place, the line of sparks is created, and the trapdoor is opened:
While I wrote this tutorial, I discovered, that none of the PUSHABLE_OBEJCT's meant to be locked in place by PLANET_EFFECT's can be movable number zero (0). If one of them is movable number zero, Lara can still move this one, after it has reached its destination and has triggered the PLANET_EFFECT with the same OCB-value. See the end of this tutorial for an explanation on movable numbers.
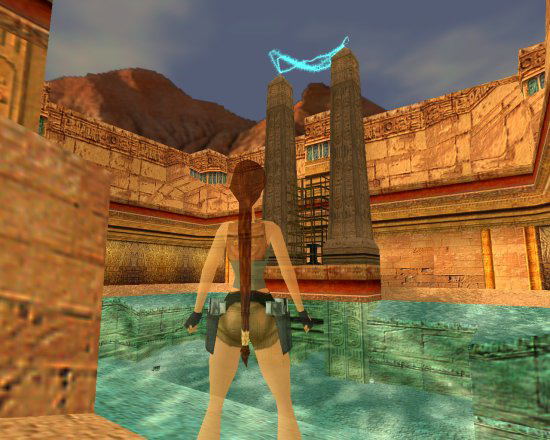
FLAME_EMITTER3 arcs (The Temple of Karnak and Sacred Lake)
The most common electric arc effects use the
FLAME_EMITTER3 with an OCB-code greater than zero. When OCB = 0, the
FLAME_EMITTER3 makes harmful flames emitting from a grill. But with all
other OCB-codes it makes electric arcs, which are harmless to Lara.
If you want the sound of electricity, you must enable the sound: ELEC_ARCING_LOOP (sound-ID
197) in the wad for your level. If you use Sounds.txt, the line says:
ELEC_ARCING_LOOP: l_vander VOL75 L PIT-13 RAD10 #h #i #j #u
Add the letter for your level or change one of the letters to g (general).
Please note: to
get the proper electric glow at the origin of all arcs you must have the
original sprite 11 (the shine-sprite): or one looking very like it in
your wad.
And to get the proper electric arcs you must have the
original sprite 28: or one looking very like it.
OCB = 1 is
a single point with small sparks like this:
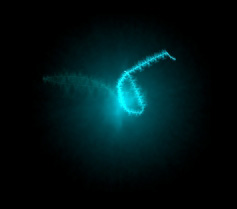
OCB = 2 is a single point with small sparks and a set of longer arcs reaching two blocks like this:
The long arcs follow the direction of the cone of the nullmesh and reach from the centre of the block and to the centre two blocks away (see below):

Temple of Karnak setup
To get the effect from Temple of Karnak, where two
electric points exchange arcs, you have to use one FLAME_EMITTER3 with
OCB = 1 and one with OCB = 2 and place them one block apart.
The
FLAME_EMITTER3 with OCB = 2 must point towards the one with OCB = 1. I
don't know if it's necessary to make the one with OCB = 1 face the one
with OCB = 2. But that is how it's done in Temple of Karnak, so do that
too.
The result looks like this:
And in Temple of Karnak:
This is a simple and reliable setup, and you can use as many of this or of single FLAME_EMITTER3's with OCB = 1 or 2, as you wish in a level, as long as you anti-trigger them, when Lara has left the area. See General notes about FLAME_EMITTER3 for the possible complications.
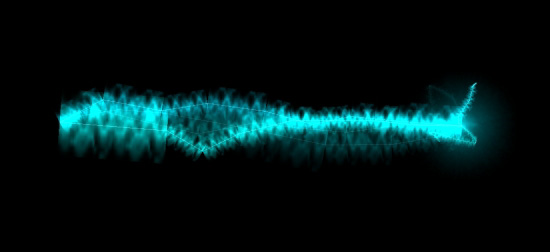
OCB = 3 is
an electric point exchanging electric arcs with two ANIMATING3's, no
matter where in the level they are placed - the arcs go through walls
and rooms and cross the void between rooms. And the longer the arcs are,
the cruder the electric waves appear.
One ANIMATING3 must have OCB =
0 and the other OCB = 3.
It looks like this:
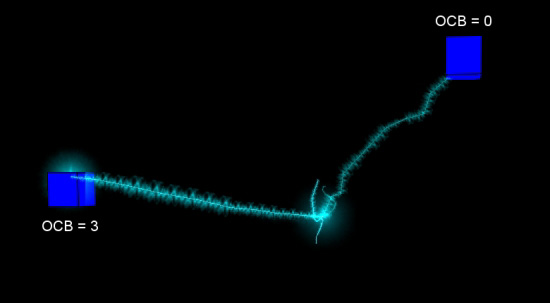
The blue cube
is my version of ANIMATING3 in this tutorial.
The ANIMATING3s
don't have to be visible or trigged, but make sure the one with OCB = 0
is the first one of its kind you place in the level at all. The reason
for this is, that a FLAME_EMITTER3 with OCB = 3 or higher will exchange
arcs with only one of each ANIMATING3 with the required OCB-code, and it
will always be the one with the lower movable number.
See the end
of this tutorial for an explanation of the movable number.
Due to
this behaviour you can only use this setup once in a level, because all
FLAME_EMITTER3's with OCB = 3 in a level will send sparks to the same
two ANIMATING3's. And unless you place all the FLAME_EMITTER3's with OCB
= 3 near the two ANIMATING3's, the sparks will reach through walls,
which will look odd.
If one or both of the ANIMATING3's are
missing, the 'loose' arcs will connect to movable number zero in the
level, no matter of what kind. Because most level builders place Lara as
the first object, it's usually her who becomes the target. The arcs are
still harmless, but will follow her for as long as the FLAME_EMITTER3 is
active, which may irritate the player to death - if not Lara.
If
movable number zero has been deleted, it's much more difficult to figure
out which object the 'loose' arcs will aim at. This is because there's
no logic (or at least a logic beyond me) in the order the editor assigns
numbers to objects when they are placed. And the logic gets even more
difficult to figure out when objects are deleted and the editor begins
to recycle their numbers.
This is a picture of the above setup,
where I have deleted the ANIMATING3 with OCB = 0:
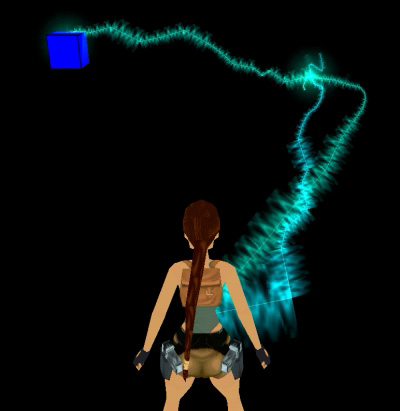
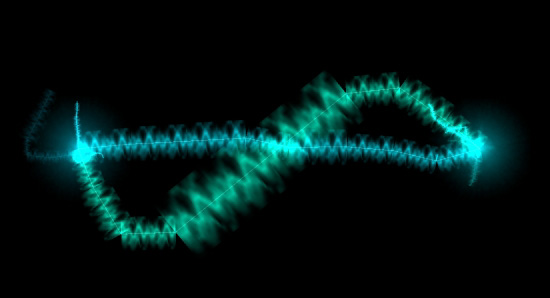
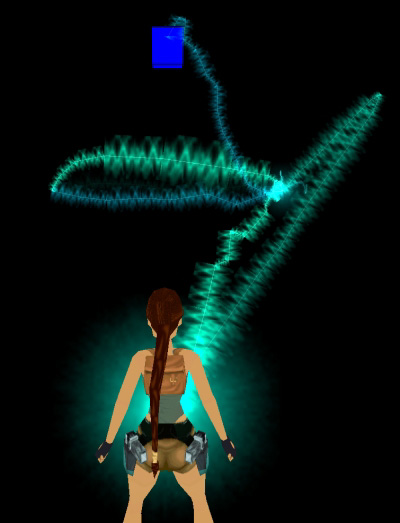
OCB = 4 is an electric point exchanging arcs with two ANIMATING3's. These two must have OCB = 0 and OCB = 4. But the FLAME_EMITTER3 also sends arcs to a point two blocks away in the direction of the cone tip just like the one with OCB = 2 did:
Again, the electric arcs connecting to the two
ANIMATING3's will go through anything and across the level if necessary.
And for the same reason as for OCB = 3, the FLAME_EMITTER3 with OCB
= 4 can only be used once in a level, or as several duplicates near the
two ANIMATING3s.
And just like the FLAME_EMITTER3 with OCB = 3
the 'loose' arcs will aim at the movable number zero, if only one or
none of the ANIMATING3s are present. The difference is, that if the
object is Lara, she will be encircled in a blue ball or glory:
In
the above setup I deleted The ANIMATING3 with OCB = 4
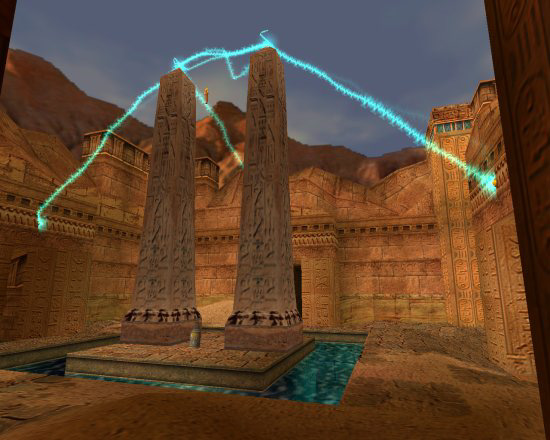
Sacred Lake setup
In Sacred Lake Lara places a figurine of the sun
goddess on a cone. The figurine then floats high in the air, while the
two obelisks next to it exchange electric arcs with each other and with
three golden plaques above three doorways.
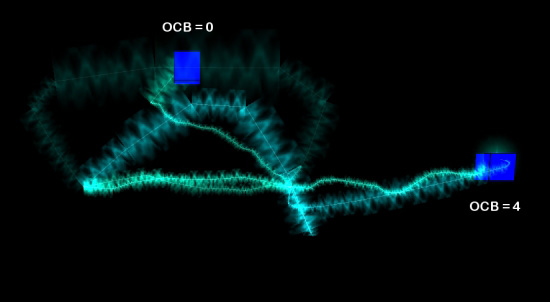
To get the electric
effect you have to use one FLAME_EMITTER3 with OCB = 3 and one with OCB
= 4 and place them one block apart.
The FLAME_EMITTER3 with OCB = 4 must point towards the one with OCB = 3. I don't know if it's necessary to make the one with OCB = 3 face its counterpart, but do that too just to be safe.
Furthermore you have to place three ANIMATING3s. One with OCB = 0, one with OCB = 3 and one with OCB = 4. As mentioned, each of those must be the first of its kind with that OCB-code.

Both FLAME_EMITTER3's will exchange arcs with the ANIMATING3 with OCB = 0:

And if you make the ANIMATING3s invisible:

In Sacred Lake the golden plaques hold the ANIMATING3-slot in the above described setup. They are visible and the sparks reach nicely out for them:
Any other positive OCB-number will
make the FLAME_EMITTER3 behave almost like OCB = 3: The sparks will
reach out for two ANIMATING3's - one with OCB = 0 and one with the same
OCB-code as the one, you have assigned to the FLAME_EMITTER3.
And
if one or both of those ANIMATING3's are missing, the sparks will reach
out for movable object number zero. The only difference is, that if that
object is Lara she will be encircled in a blue ball or glory of
lightning (like for OCB = 4).
It also seems that
this glory grows in size and intensity with increasing OCB-codes, but
it's more visible in screenshots than in game.
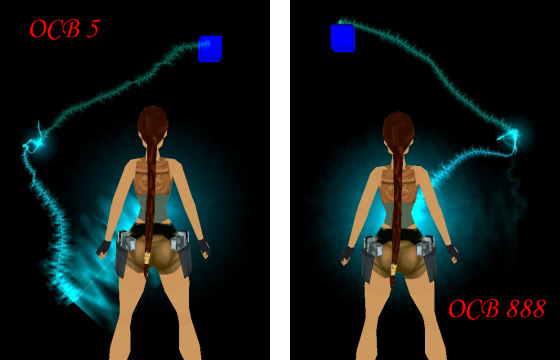
OCB = 5 OCB
= 888
General notes about
FLAME_EMITTER3
Remember to anti-trigger the FLAME_EMITTER3's when
Lara has left the area, because one FLAME_EMITTER of any type counts as
one active light. And if you have too many active lights at the same
time, you may experience the flare bug (flares don't give any light
until Lara throws them away), which means your level is about to crash.
It seems the game engine only has a limited capacity for the
electric arcs. The more active FLAME_EMITTER3's with OCB-codes above 1
at the same time, the fewer electric arcs per FLAME_EMITTER3. They are
so to speak 'diluted' by their numbers.
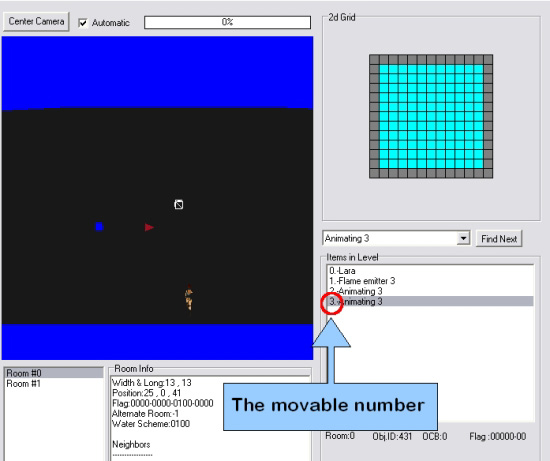
Movable number
You can find the movable number by opening
your .tr4-file in Fexinspect. This program by TurboPascal only counts
and lists the movables: